About this book
The Planning, Installing, and Configuring Host On-Demand guide helps you to plan for, install, and configure the Host On-Demand program. This book is written for administrators. It contains three major parts.
Planning for Host On-Demand gives you information about Host On-Demand for you to consider before installation and deployment. For example, which server platform will you use? Which deployment model will you use? How will you handle security?
Fresh Installation, Migrate Installation, and Uninstalling Host On-Demand offers step-by-step procedures based on each operating system.
Configuring Host On-Demand describes different configuration models to specify how session configuration information is defined and managed, how to dynamically modify session configuration information, how to customize new clients, and how to deploy Host On-Demand to your users.
After you install and configure Host On-Demand, use the online help to learn how to define sessions and perform other administrative tasks.
About the other Host On-Demand documentation
 |
The MySupport feature enables you to personalize your support view and register to receive weekly e-mail notifications alerting you of new fix packs, downloads, and hot technical support information for IBM products. To register for support notifications, refer to About my notifications. |
- Online help. The online help is the primary source of information for administrators and users after Host On-Demand installation is complete. It provides detailed steps on how to perform Host On-Demand tasks. A table of contents and an index help you locate task-oriented help panels and conceptual help panels. While you use the Host On-Demand graphical user interface (GUI), help buttons bring up panel-level help panels for the GUI.
- Readme file. This file, readme.html, contains product information that was discovered too late to include in the product documentation.
- Web Express Logon Reference. This book provides a step-by-step approach for understanding, implementing, and troubleshooting Web Express Logon. It offers an overview of Web Express Logon, several step-by-step examples to help you plan for and deploy Web Express Logon in your own environment, as well as several APIs for writing customized macros and plug-ins.
- Macro Programming Guide. This book describes how to create Host On-Demand macros for automating user interactions with host applications or for passing data between a host application and a native application. This book provides detailed information on all aspects of developing macros and includes revised information about the macro language previously published in the Host Access Beans for Java Reference.
- Host Printing Reference. After you configure host sessions, use the Host Printing Reference to enable your users to print their host session information to a local or LAN-attached printer or file.
- Session Manager API Reference. This book provides JavaScript APIs for managing host sessions and text-based interactions with host sessions.
- Programmable Host On-Demand. This book provides a set of Java APIs that allows developers to integrate various pieces of the Host On-Demand client code, such as terminals, menus, and toolbars, into their own custom Java applications and applets.
- Host Access Toolkit. This book explains how to install and configure the Host On-Demand Toolkit, which is shipped with the Host Access Client Package. The Host On-Demand Toolkit complements the Host On-Demand base product by offering Java beans and other components to help you maximize the use of Host On-Demand in your environment.
- Host Access Beans for Java. This book is part of the Host On-Demand Toolkit. It serves as a reference for programmers who want to customize the Host On-Demand environment using Java beans and create macros to automate steps in emulator sessions.
- Host Access Class Library for Java. This book is part of the Host On-Demand Toolkit. It serves as a reference for programmers who want to write Java applets and applications that can access host information at the data stream level.
- Host On-Demand J2EE Connector. This book is part of the Host On-Demand Toolkit. It serves as a reference for programmers who want to write applets and servlets that access Java Enterprise Edition (J2EE) compatible applications.
Conventions used in this book
The following typographic conventions are used in Planning, Installing and Configuring Host On-Demand:
| Convention | Meaning |
|---|---|
Monospace |
Indicates text you need to enter at a command prompt and values you need to use literally, such as commands, functions, and resource definition attributes and their values. Monospace also indicates screen text and code examples. |
| Italics | Indicates variable values you need to provide (for example, you supply the name of a file for file_name). Italics also indicates emphasis and the titles of books. |
| Return | Refers to the key labeled with the word Return, the word Enter, or the left arrow. |
| > | When used to describe a menu, shows a series of menu selections. For example, “Click File > New” means “From the File menu, click the New command.” |
When used to describe a tree view,
shows a series of folder or object expansions. For example, “Expand
HODConfig Servlet > Sysplexes > Plex1 > J2EE Servers > BBOARS2”
means:
|
 |
This graphic is used to highlight notes to the reader. |
|
This graphic is used to highlight tips for the reader. |
Terminology
- applet
- A program written in Java that is referenced in an HTML file. An applet is launched by a Java Virtual Machine (JVM) running in a Web browser.
- application
- A program or suite of programs that perform a task or specific function.
- cached client
- A Host On-Demand cached client is any Host On-Demand client whose components have been cached (stored locally for quick access) on the hard disk of a user's workstation.
- default publish directory
- The default publish directory is the subdirectory HOD in
your Host On-Demand server's install directory, for example,
c:\Program
Files\IBM\Host On-Demand\HOD\
on Windows platforms and/opt/IBM/Host On-Demand/HODon AIX, Linux, Solaris,/QIBM/Programs/IBM/Host On-Demand/HODon i(as/400), and/usr/lpp/HOD/Host On-Demand/HODon z/OS platforms. - download client
- Download clients download the necessary applet files each time users access the HTML files. Download clients are generally used in LAN-connected environments because high-speed network connections reduce the time it takes to download them from the Web server.
- emulator client
- An emulator client is a Host On-Demand client that launches a terminal emulator session. Host On-Demand includes the following emulator clients: cached client, Web Start client, and download client.
- separate user publish directory
- Provides a separate writeable location for deploying custom
HTML files, isolating them from the files provided by Host On-Demand.
This keeps the Host On-Demand publish directory read-only and makes
it easier to apply future Host On-Demand upgrades.
Note: Other user-modified files (such as custom applets and HACL programs) still need to run from the Host On-Demand publish directory.
- Web Application Server
- The run time for dynamic Web applications. Web application server includes support for Java servlets, JavaServer Pages (JSP), and other enterprise Java application programming interfaces (APIs). A Web application server provides communications, resource management, security, transaction management, and persistence capabilities for Web applications. It also typically includes an administration interface for managing the server and deployed applications.
- Web server
- A server on the Web that serves requests for HTTP documents. A Web server controls the flow of transactions to and from the browser. It protects the confidentiality of customer transactions and ensures that the user's identity is securely transmitted to the server.
- Web Start client
- The Web Start client allows users to run Host On-Demand sessions without a browser. Users start Host On-Demand sessions from the Java Web Start Application Manager.
Terms relating to Java
- Java
- Refers to Java Runtime Environment (JRE) on either the HOD server or the HOD client.
- Java-enabled browser
- A Web browser that runs Java applets on the Java JVM of an installed Java plug-in, for example, Firefox and Internet Explorer with a Java plug-in. For more information, refer to Browsers and Java plug-ins.
- Java emulator client, Java cached client, Java download client
- A version of the Host On-Demand client. The Java version consists of a complete set of Host On-Demand client components compiled with a Java compiler.
Planning for Host On-Demand
Introducing Host On Demand
IBM Host On-Demand provides cost effective and secure browser-based and non-browser-based host access to the users in intranet-based and extranet-based environments. Host On-Demand is installed on a Web server, simplifying administrative management and deployment, and the Host On-Demand applet or application is downloaded to the client browser or workstation, providing the user connectivity to critical host applications and data.
Host On-Demand supports emulation for common terminal types, communications protocols, communications gateways, and printers, including the following:
- TN3270 and TN3270E terminals.
- TN5250 terminals.
- VT52, VT100, VT220, VT320, and VT420 terminals.
- The Secure Shell (SSH).
- Transport Layer Security (TLS).
- File Transfer Protocol (FTP).
- Customer Information and Control System (CICS) Transaction Gateway.
- TN3270E and TN5250 printers.
Purpose of the Document
Purpose of this document is of Host On-Demand v15.0.1 installer supports fresh Installation, Uninstallation, and Migrate installation.
- The Host On-Demand server, which is necessary for using Host On-Demand.
- The Host On-Demand configuration servlet, which is needed only in specific instances when you are running Host On-Demand in conjunction with a firewall.
- The Deployment Wizard, an extremely useful tool that runs on Windows to generate customized Host On-Demand clients. Installing the Deployment Wizard is not required, but it is highly recommended.
Host On-demand v15.0.1 installer supports only fresh installation, and it will not support direct upgrade from any of earlier release Installation Manger Host On-Demand are installed.
Host on-Demand v15.0.1 supports migrate installation from earlier release of v14 or v13 is installed. it performs data backup and uninstalls earlier release and it installs v15 and restore backup. This happened on while running v15 installer.
Host On-demand v15.0.1 is an ease of use and user-friendly installer. It supports Installation, Uninstallation, Migrate Installation, and upgrade installation ( v15.0 onwards).
Scope of the Document
Host Host On-Demand v15.0.1 installer has the same functionalities as the earlier release of the Installation Manager HOD installer. It supports GUI, Console, and silent mode installations.
- An earlier release of Host On-demand requires Installation manger as dependency, to remove the Installation Manager dependency software Host On-demand v15.0.1 developed using InstallAnywhere tool and does not require any dependency to install.
- From Host On-Demand v15.0.1 does not have support on Installation Manager based installer, and it is discontinued and does not have support on Group and user mode installation. It supports only Administrator user installation.
What is Host On-Demand?
Host On-Demand provides cost effective and secure browser-based and non-browser-based host access to users in intranet-based and extranet-based environments. Host On-Demand is installed on a Web server, simplifying administrative management and deployment, and the Host On-Demand applet or application is downloaded to the client browser or workstation, providing user connectivity to critical host applications and data.
Host On-Demand supports emulation for common terminal types, communications protocols, communications gateways, and printers, including the following:
- TN3270 and TN3270E terminals
- TN5250 terminals
- VT52, VT100, VT220, VT320, and VT420 terminals
- The Secure Shell (SSH)
- Transport Layer Security (TLS)
- File Transfer Protocol (FTP)
- Customer Information and Control System (CICS) Transaction Gateway
- TN3270E and TN5250 printers
You can use the Java component-based Host Access Toolkit to create customized e-business applications. This Toolkit contains a rich set of Java libraries and application programming interfaces: Host Access Class Library (HACL), Host Access Beans for Java, and Java Enterprise Edition (J2EE) connectors. Host On-Demand also includes Database On-Demand, which provides an interface for sending Structured Query Language (SQL) queries to IBM DB2 databases hosted on IBM System i7 systems.
How does Host On-Demand work?
The following figure and explanation show how a Host On-Demand system works. Host On-Demand is a client/server system. Host On-Demand clients are Java applets that are downloaded from the Web server to a Web browser on a remote computer.
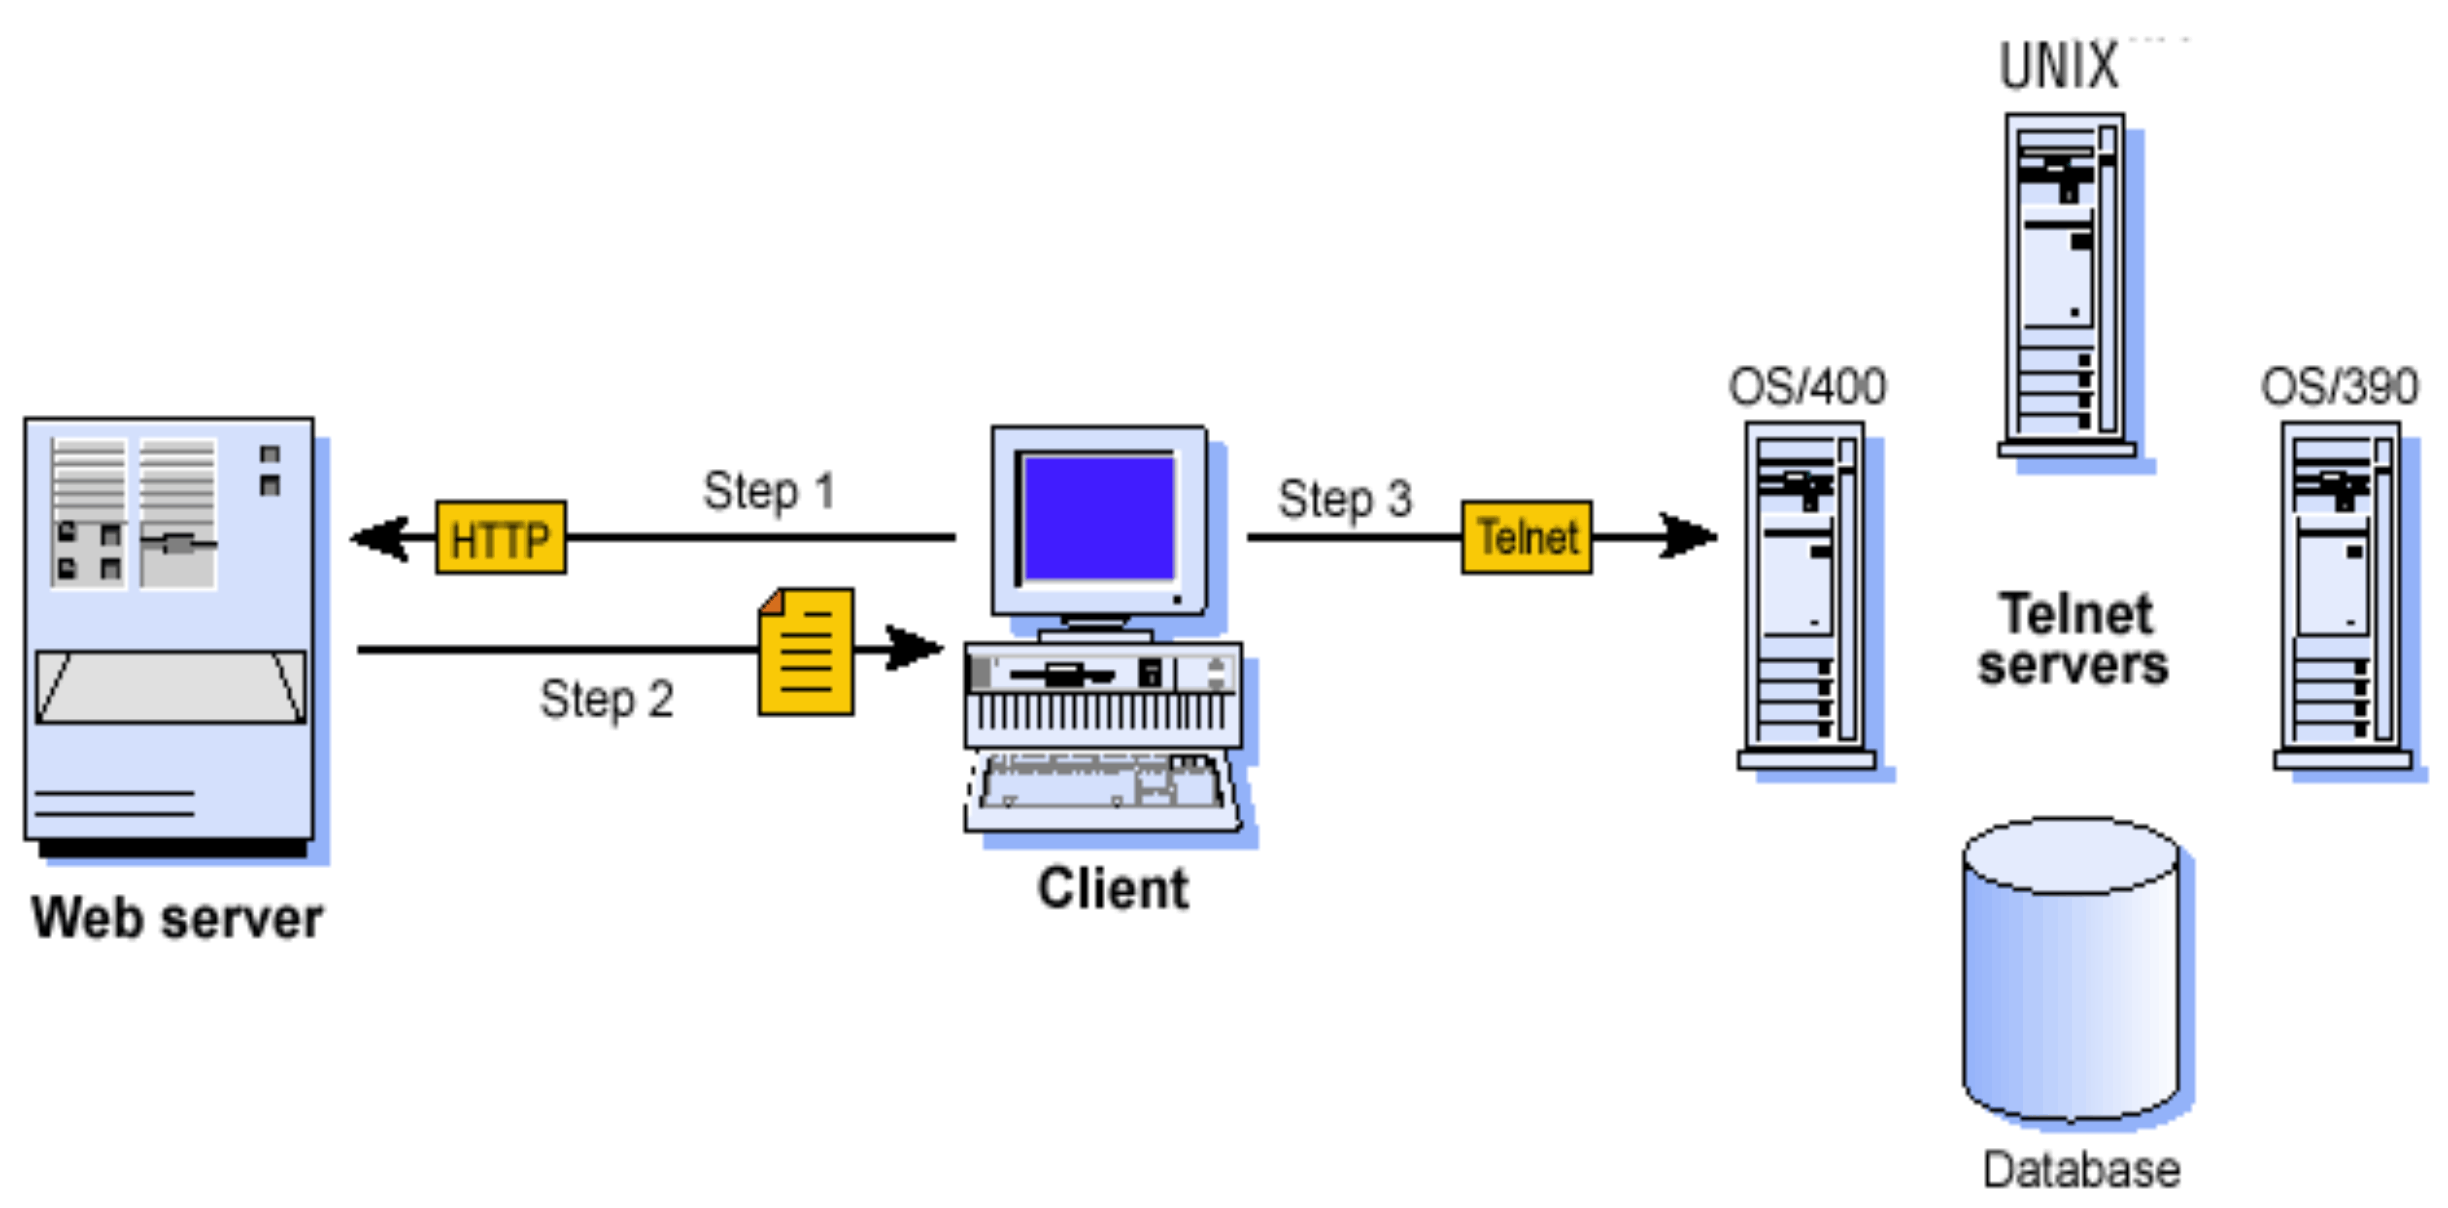
Step 1. The user opens a browser and clicks a hyperlink.
Step 2. Host On-Demand applet downloads to the client workstation.
Step 3. When the applet is downloaded, Host On-Demand connects directly to any Telnet server to access host applications.
Session information is configured in the HTML file or Host On-Demand configuration server. For more information about the configuration server, see Planning for deployment.
Host On-Demand client applets can be run as download clients, Web Start clients, or cached clients. Download clients are downloaded from the Web server every time they are used. Cached client and Web Start clients are downloaded from the Web server and stored on the client computer. After the initial download, the cached client is loaded from the local machine. The cached client checks the Host On-Demand server for new versions of the client and automatically downloads the updated version.
- The Deployment Wizard, a tool for creating emulator client HTML files. The Deployment Wizard enables administrators to quickly and easily build Host On-Demand HTML files that are customized for an organization's needs.
- Administration clients that can be used by system administrators to define common sessions, create users and groups, and perform other administrative tasks on the Host On-Demand server.
In addition, a number of predefined clients are also supplied with Host On-Demand to demonstrate Host On-Demand's client functions for users and administrators (for example, emulation, Database On-Demand, cached client removal, and problem determination utilities).
Why use Host On-Demand?
A cost-effective approach to connectivity
You can reduce maintenance costs and increase your return on investment by installing Host On-Demand on a Web server, eliminating the need to manage individual user desktops.
Since the applets reside on a server and are downloaded to Web browsers when needed, you no longer have to schedule maintenance and upgrades. Upgrade the software on the server and users can receive the upgrade the next time they access the client applet.
Centralized management of configuration data
Administrators can centrally define and control all session configuration information available to their users, including connection options, security features, macro definitions, keyboard specifications, and color mappings. Furthermore, administrators have full control over which fields the user can or cannot modify, and can choose where user updates should be stored.
On Windows platforms, the default Host On-Demand graphical
user interface is based on the Nimbus Look and Feel provided by Java
1.6 and later. The Nimbus Look and Feel for the administration graphical
user interfaces can be disabled by setting the SETHODNIMBUSGUI environment
variable value to false.
Connect directly to any Telnet server
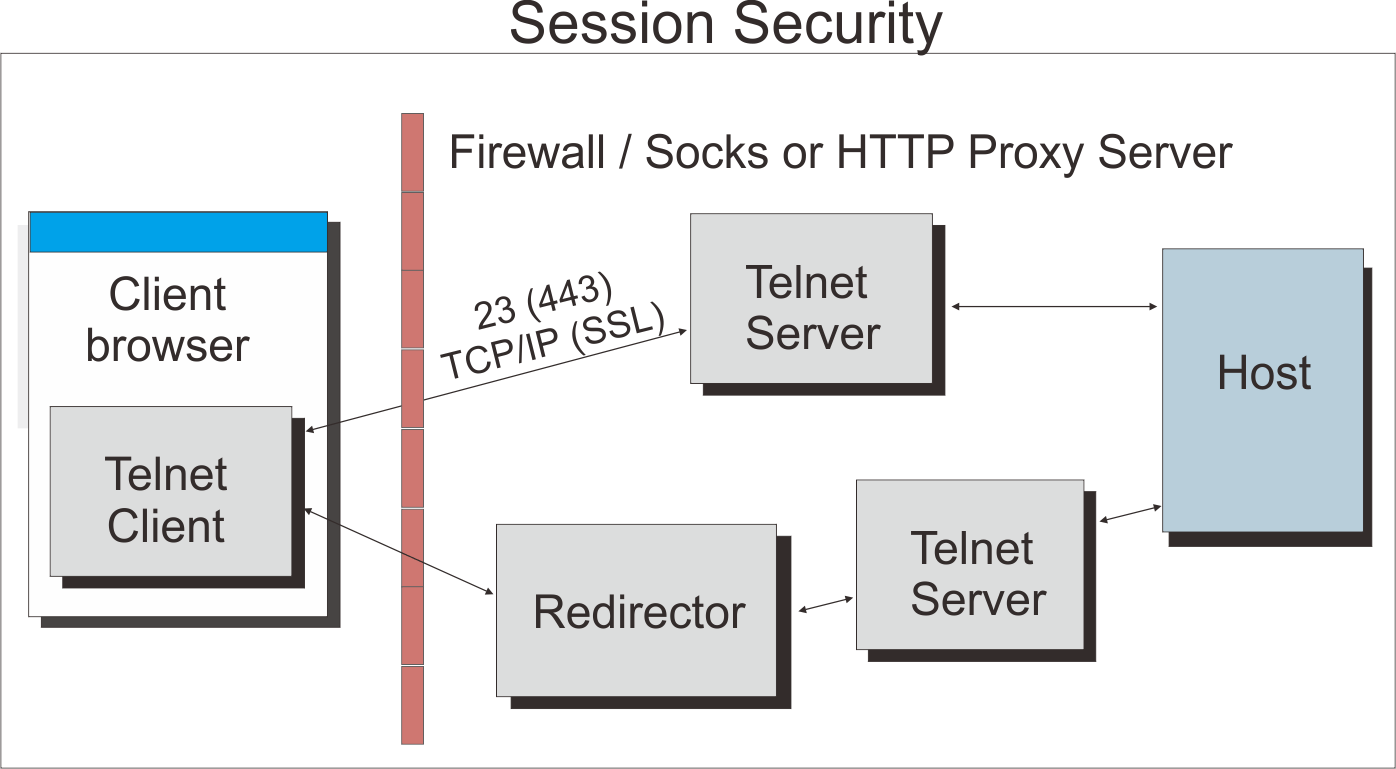
With Host On-Demand, the client applet contains the emulation functionality. With the emulator residing on the client, the middle-tier server, such as IBM Communications Server or a third-party SNA server, can be eliminated. Any performance and security issues introduced with this intermediary piece will also be removed. Once the applet is served to the client, it is easy to connect directly to any standard Telnet server that provides the best access to the required data. You can access many host sessions concurrently. By eliminating the need for a middle-tier server, Host On-Demand also minimizes capacity restrictions. To see how this works, refer to Figure 1.
Browser-based user interface
The browser-based access of Host On-Demand gives you a simple way to centrally manage and deploy critical host applications and data. Host On-Demand uses the power of Java technology to open the doors to your host system whenever you need it, wherever you need it, directly from your browser. Just click on a hyperlink to launch the Host On-Demand Java applet. This Web-to-host connectivity solution provides secure Web-browser access to host applications and system data through Java-based emulation, so you can take existing host applications to the Web without programming. Because Host On-Demand is Java-based, its interface has the same look-and-feel across various types of operating environments.
setHODNimbusGUI HTML parameter
or the SETHODNIMBUSGUI environment
variable.
Supports many different platforms and network environments
Host On-Demand servers and clients are supported on a wide variety of platforms and can be used over any TCP/IP network. This gives you a great deal of flexibility in setting up your system and enables Host On-Demand to be deployed in your computing environment without having to purchase new hardware.
Support for Java
Host On-Demand is compatible with browsers that support Java standards. In addition, some new features of Host On-Demand take advantage of capabilities offered only by Java.
Support for Internet Protocol Version 6
Support for Internet Protocol Version 6 requires Java 1.4 or higher. However, Host On-Demand Version 15.0.1 supports Java 1.6 or higher.
An Internet Protocol is a protocol used to route data from its source to its destination through an Internet environment. An IP is an intermediary between higher protocol layers and the physical network.
Internet Protocol Version 6 is the replacement for Internet Protocol Version 4. Internet Protocol Version 6 expands the number of available IP addresses and makes improvements in routing and network configuration. Both Internet Protocol Version 6 and Internet Protocol Version 4 were designed by the Internet Engineering Task Force (IETF).
Most of the Internet currently uses Internet Protocol Version 4. Internet Protocol Version 6 is expected to replace Internet Protocol Version 4 over a period of years.
|
The Host On-Demand server also supports Internet Protocol Version 6 for the Redirector. For more information, refer to Redirector support for IPv6. |
Supports many national languages
Host On-Demand is available in multiple languages, including double-byte character set (DBCS) languages. Support for the European currency symbol, as well as keyboard and code page support for many more languages such as Arabic, Hebrew and Thai, is also provided. All language versions are available on the same media, and multiple language versions can be accessed concurrently.
Secure connections
Using Transport Layer Security (TLS) , Host On-Demand extends secure host data access across intranets, extranets, and the Internet. Mobile workers access a secure Web site, receive authentication and establish communication with a secure enterprise host. With client and server certificate support, Host On-Demand can present a digital certificate to the Telnet server - such as IBM Communications Server for z/OS - for authentication.
Host On-Demand can also be configured for use in environments that include firewalls. Firewall ports need to be opened for the functions defined in your Host On-Demand session definitions. For more information, refer to Using Host On-Demand with a firewall.
Custom HTML files
Host On-Demand includes a Deployment Wizard that you can use to create custom HTML files. With these files you can tailor the content of the client and the function necessary to meet the needs of specific groups of users. For more information about the Deployment Wizard, refer to Configuring Host On-Demand emulator clients.
Toolkit for creating new e-business applications
Host On-Demand includes the Java component-based Host Access Toolkit for creating customized e-business applications. This Toolkit contains a rich set of Java libraries and application programming interfaces, including the Host Access Class Library (HACL), Host Access Beans for Java, and Java Enterprise Edition (J2EE) connectors.
HACL provides a non-visual API for interacting with back-end host machines running applications originally designed for human interaction. Host applications rely on readable character presentation, formatted fields, color-coding, and keyboard responses. HACL provides specialized classes for functionalities needed to mimic traditional interaction with a series of host screen presentations (green screens). HACL contains no GUI (visible component) classes. For example, a Java program could be running on a mainframe as a secondary application. The secondary application program interacts first with another mainframe running a CICS data application, and then with a client browser through dynamically generated HTML pages. The secondary application interprets client inputs into simulated terminal actions which are sent to the CICS machine using the HACL API. The response screens from the CICS machine are captured using HACL APIs, converted into dynamic HTML pages, and sent back to the client.
Host On-Demand J2EE Connector provides a set of Resource adapters that communicate to 3270, 5250, CICS, and VT hosts. These resource adapters are deployed to a conforming application server, such as IBM Application Server. The users can write Web applications using the APIs provided in Host On-Demand J2EE Connector via WebSphere Studio Application Developer Integration Edition.
Programmable Host On-Demand
Programmable Host On-Demand is a set of Java APIs that allows developers to integrate various pieces of the Host On-Demand client code, such as terminals, menus, and toolbars, into their own custom Java applications and applets. The API gives the developer complete control over the Host On-Demand desktop (what the user sees) without starting with the Host Access Java Beans found in the Toolkit. The underlying Host On-Demand code handles all the "wiring" of the various components, including saving user preferences, such as macros, keyboard remappings, and color remappings, to the local file system for future use. The developer must only determine the layout of the Host On-Demand desktop. For more information, refer to the Programmable Host On-Demand Reference .
Host On-Demand Session Manager APIs
In addition to the application programming interfaces (APIs) provided with the Host Access Toolkit, Host On-Demand provides specialized public APIs that provide support for embedding host sessions in Web pages using JavaScript. These JavaScript-based APIs help application developers manage host sessions and text-based interactions with host sessions and are available through the Host On-Demand Session Manager. Refer to Session Manager API Reference for more information.
Support for WebSphere Portal
Host On-Demand can run as a portlet on Portal Server, a component of WebSphere Portal. Portal Server has sophisticated desktop management and security features that offer administrators more control over user access rights and users control over the appearance and arrangement of the portal desktop.
Connections to DB2 databases on IBM System i servers
Database On-Demand is included with Host On-Demand to provide access to DB2 information stored on IBM System i5 servers using a Java Database Connectivity (JDBC) driver. Database On-Demand is a Java applet that allows you to perform Structured Query Language (SQL) requests to IBM System i5 databases through a JDBC driver. Database On-Demand is a separate applet from the Host On-Demand applet and is started by a separate HTML file. You can also use the Data transfer support from within an emulator session to perform SQL requests if you need both terminal emulation and support for SQL queries.
What's New?
This section contains information supplementary to the online help and the publications, it includes newly added functions, hints, tips, restrictions, and corrections. See the IBM Host On-Demand Information Center for other considerations when using IBM Host On-Demand Version 15.0.1, and for complete product documentation.
For information on installing IBM Host On-Demand, refer to the Installation Guide. Refer to Quick Beginnings guide, for information about the new features added in this version.
Names and license terms for third-party components are referenced in license.txt, which is located in the IBM Host On-Demand installation directory or in the product installation image.
Thank you for choosing IBM Host On-Demand Version 15.0.1.
Getting the latest information on Host On-Demand
For the most recent information about Host On-Demand Version 15.0.1, see the product readme file.
For up-to-date product information, go to the Host On-Demand web site.
For the latest technical information for Host On-Demand, go to the Host On-Demand Support Portal.
For general software support information, see IBM Support.
New functions in Host On-Demand Version 15.0.1
The following functions and enhancements have been added to Host On-Demand Version 15:
Server JRE Update (HOD version 15.0.1.0)
Server JRE has been updated to IBM Semeru Runtime Certified Edition (JRE) version 11.0.19.0
TLS 1.3 Support
With this release, support for TLS 1.3 has been enabled for IBM Host On-Demand. TLS 1.3 will be the default protocol version used for secure negotiations for all types of sessions. Users should be at the JRE level where TLS 1.3 protocol is supported.
Host On-Demand Installer Upgrade
Previous versions of Host On-Demand were dependent on IBM Installation Manager for the product installation/update and uninstallation.
With the new release, the Host On-Demand packages have been created using InstallAnywhere. It provides a simple installation method to install Host On-Demand on all the supported platforms, without any external dependency.
FTP Performance Improvement
With this release, the Host On-Demand FTP client supports the parallel transfer of multiple files, thereby improving the overall file transfer performance significantly.
For more details, refer: https://www.ibm.com/docs/en/host-on-demand/15.0?topic=tf-using-ftp
Telnet Keep Alive Enhancement
With this release, Host On-Demand supports Telnet Keep-Alive. A Keep-Alive packet is sent to the host at regular intervals to check if it is still reachable. Two keep alive mechanisms are supported: NOP, and TIMING-MARK.
Code Page Conversion
Code page conversion support has been extended to UTF8.
Upgrade of Packaged JRE in IBM Managed HOD
The version of Java runtime packaged in IBM Managed Host On-Demand has been upgraded to Java 17.0.3.0
Usage of Specific Java Runtime for HOD Launcher
A new environment variable support is added to configure a specific version of Java to be used by HOD Launcher.
IBM License Manager Enhancement
With this release, IBM Host Integration License Manager is extended to support storing the data in Databases. Supported Database can be used to configure License Manager. The new user interface provides better accessibility, and ease of navigation to application pages. Detailed documents can be found
Flexible Scratchpad
With this release, the Host On-Demand scratchpad can be resized. It helps end users keep the green screen (emulator) size to suit their requirement.
Introducing New HTML Parameters
-
Optimize Wide Screen for all Sessions: This HTML parameter allows users to set Optimize for Widescreen property for all sessions.
-
Start session with Full screen.: A new HTML parameter is introduced to launch the session in full screen.
-
Tab delimiter support in FTP : A new HTML parameter is introduced to replace the TABS with a single space, for the file transferred through the FTP session.
Deprecated features in Host On-Demand Version 15.0.1
- Standalone HOD.
Parent topic: What's New?
Planning for deployment
Host On-Demand provides access to host applications from a Web browser. The browser downloads the Host On-Demand Java applet from the Web server and then connects to any Telnet server to access host applications. The Host On-Demand applet needs configuration information to determine which host to connect to and other host session properties. This configuration information can be provided to the Host On-Demand applet from an HTML file that is used to launch Host On-Demand or by the Host On-Demand configuration server. The configuration server is a part of that centrally stores session configuration information and user preferences by user and group IDs. Users then access session information and user preferences by contacting the configuration server. The configuration server is managed through the administration client. For information on configuring the Host On-Demand configuration server, see Basic Configuration Steps.
As Web browsers start to eliminate support for Java plug-ins, Host On-Demand clients will continue to work with some limitations as documented in IBM Host On-Demand browser support.
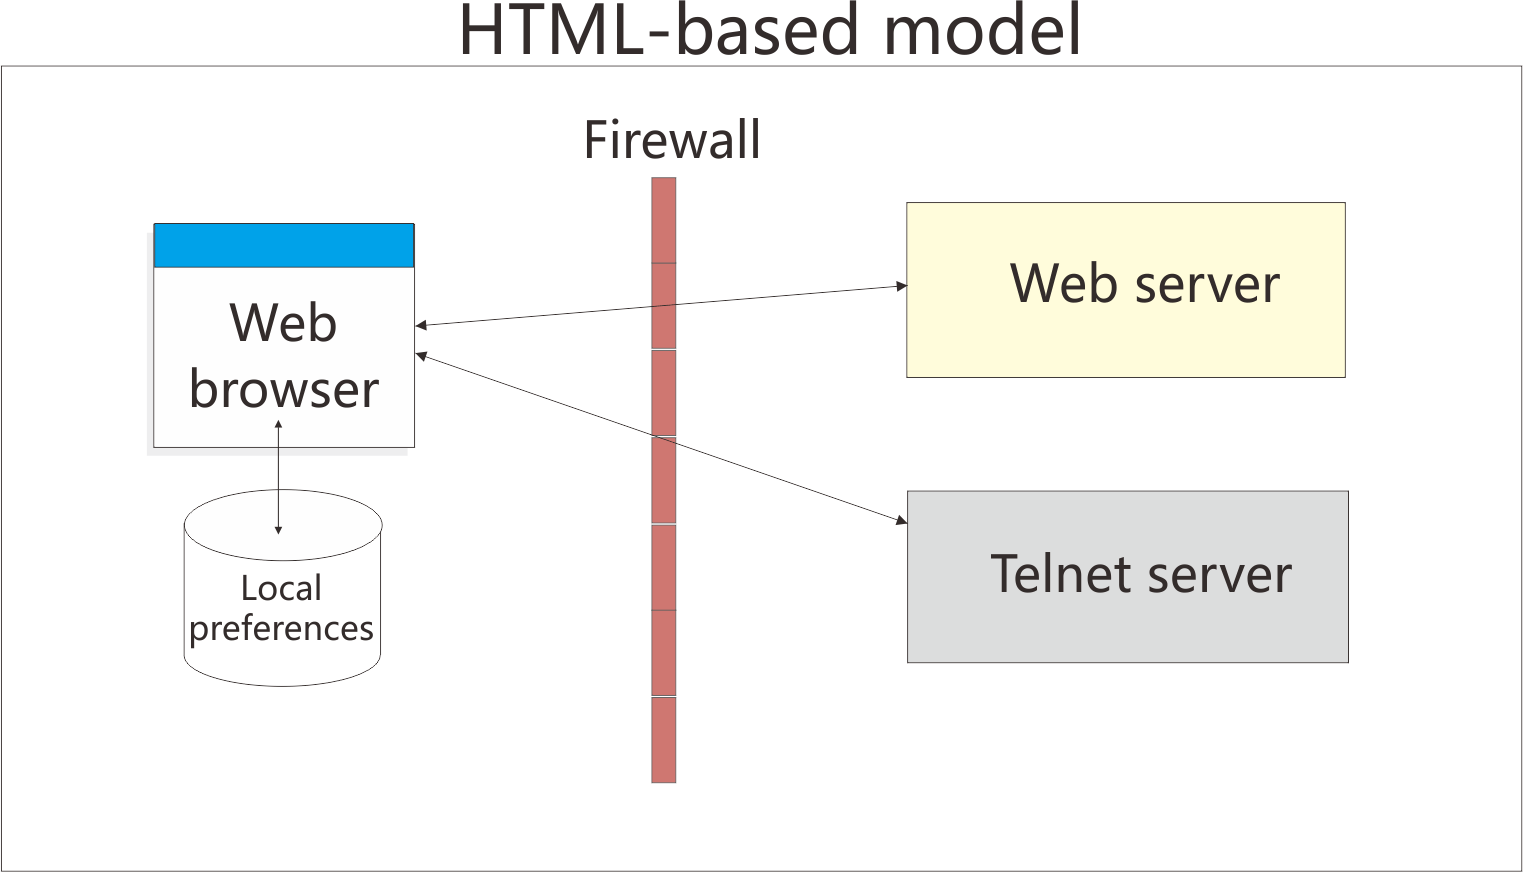
You can create custom client HTML files using the Deployment Wizard. When creating these HTML files, you can choose from three different configuration models to specify how session configuration information and user preferences are defined and managed: the HTML-based model, the configuration server-based model, and the combined model.
These models are described below. For detailed information on each model and benefits and limitations to using each model, see Help for Deployment Wizard Configuration Model Panel.
Understanding the HTML-based model
If you choose the HTML-based model, all host session configuration information is contained in the HTML file itself, and nothing more is needed to define host sessions. Therefore, you are not required to use the configuration server to specify sessions, which means you do not have to open up a port on your firewall. If you allow users to save changes to the host session configuration information, their changes are stored on the local file system where the browser is running.
You are suggested not using the port 8999 because you do not need to start the HOD server by using the HTML-based model. In this case the server resource is saved.
This option of defining configuration information in the HTML files is only available in clients that are created using the Deployment Wizard.
Understanding the configuration server-based model
In the configuration server-based model, host session information is maintained on the configuration server using the Administration client, and the information is defined using a user and group structure. By default, the configuration server stores its data directly on the Host On-Demand server machine, though it can be configured to use LDAP instead. Users access their configurations using either custom HTML files created in the Deployment Wizard or by using one of several HTML files that are provided as part of Host On-Demand. User IDs are defined in the configuration server, and in most cases the user needs to log on to the Host On-Demand server before viewing his sessions. If administrators allow users to save changes, user preferences are stored in the configuration server by user ID. Because their customizations are saved on the configuration server, this model may be the best choice if users need to access their sessions from multiple machines.
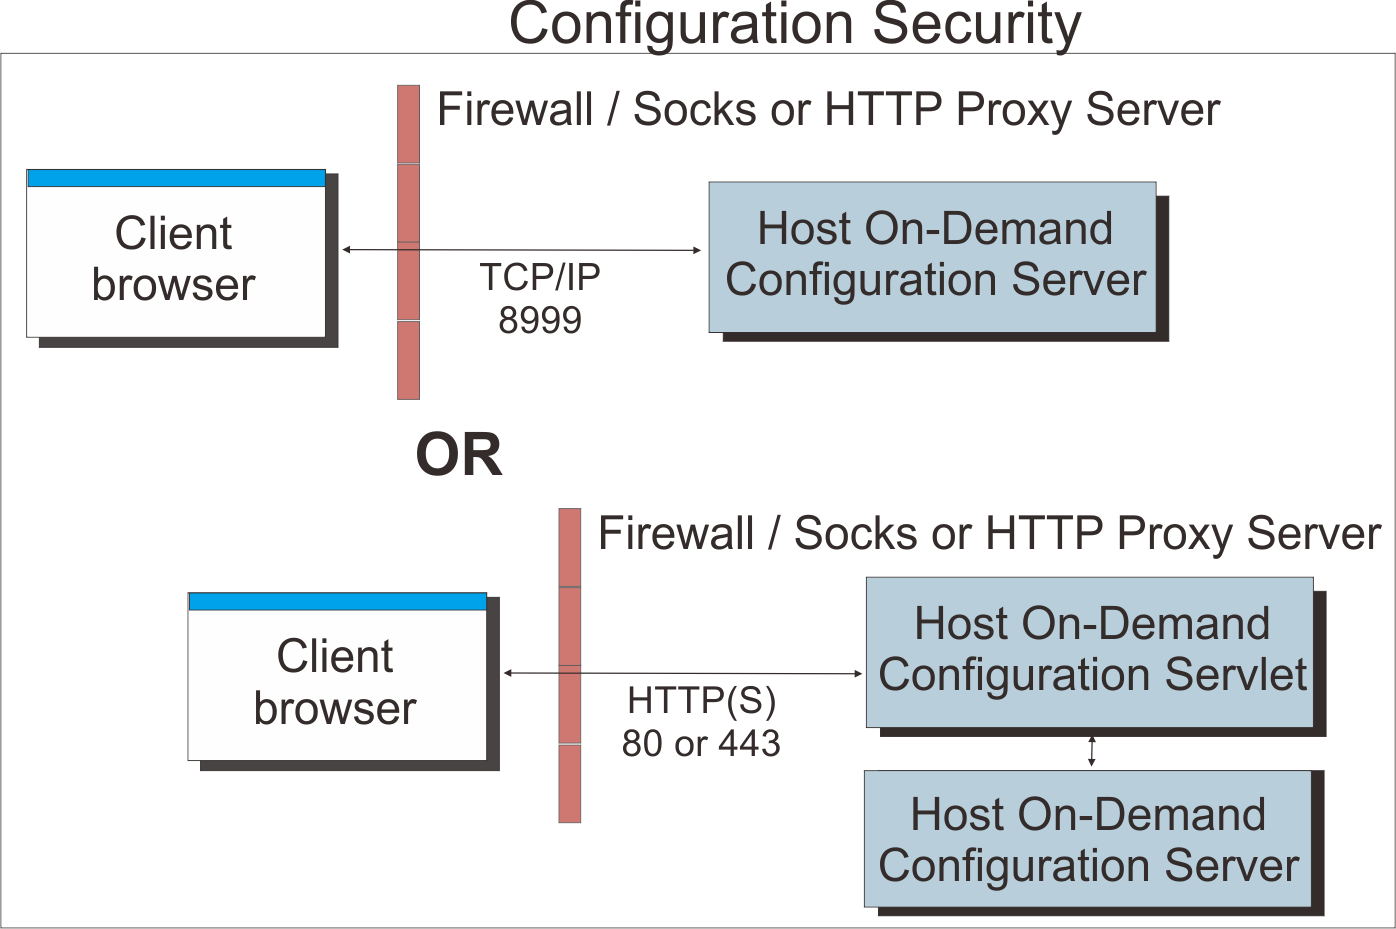
By default, the Web browser communicates directly to the configuration server. If you communicate through a firewall, you need to open the configuration server's port on the firewall. Alternatively, you can use the configuration servlet to eliminate the need to open the configuration server's port on the firewall. The Web browser connects to the configuration servlet over an HTTP or HTTPS connection and the configuration servlet then interacts with the configuration server. See Configuring the configuration servlet for more information about using the configuration servlet.
.gif)
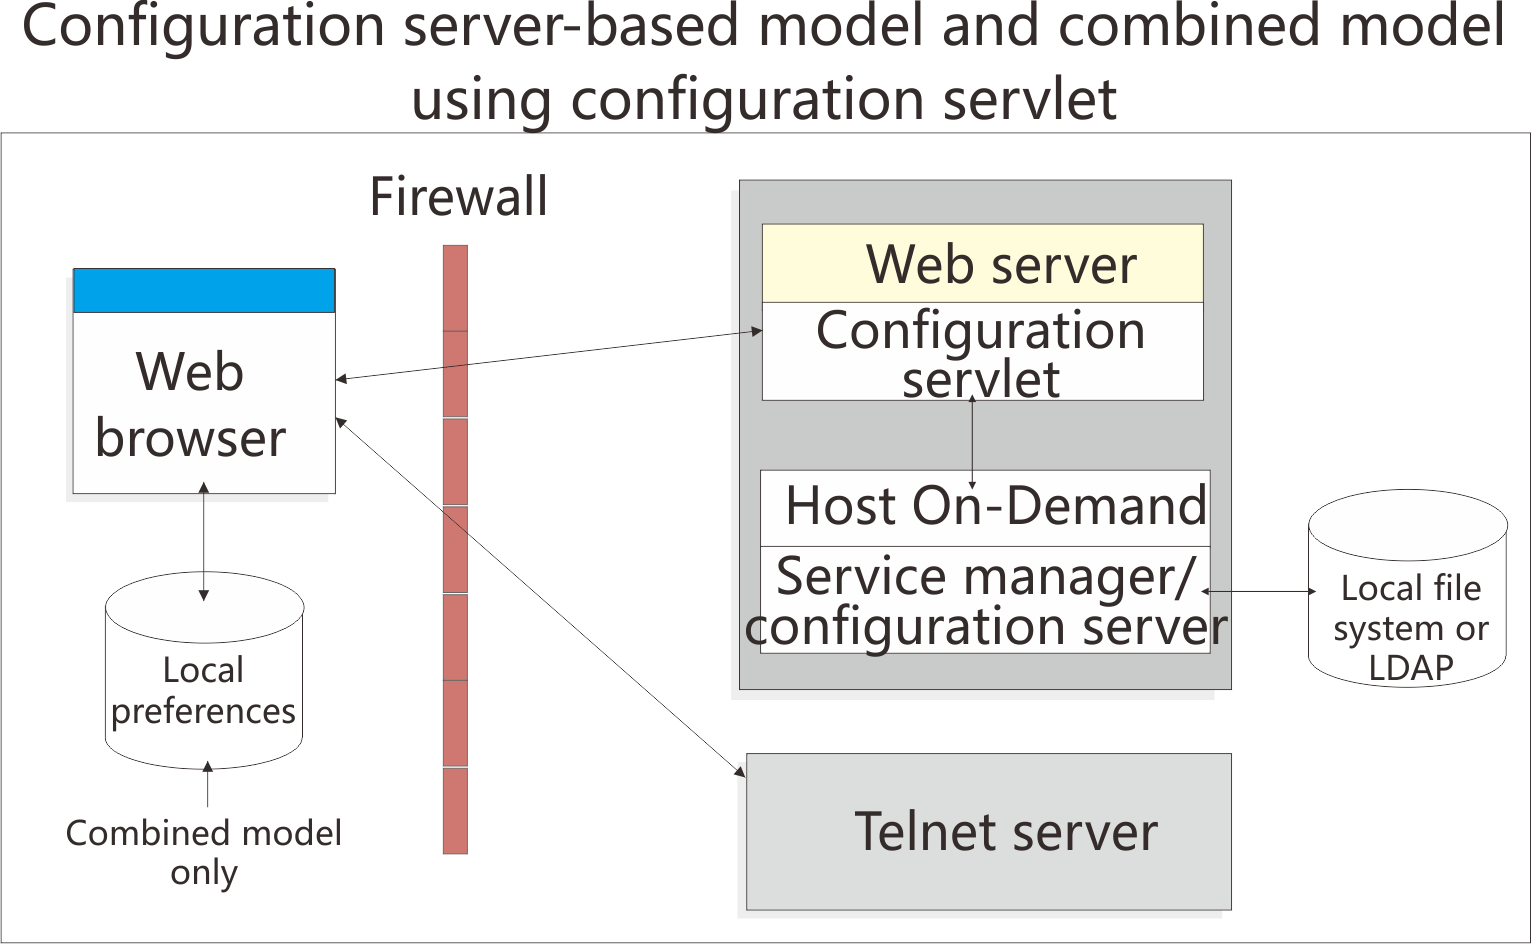
Understanding the combined model
Host On-Demand supports a combined model, where the host session information is defined in the configuration server (like the configuration server-based model) and user updates are saved on the user's machine (like the HTML-based model). In addition, like the HTML-based model, users of the combined model do not need to log on to the Host On-Demand server to view their sessions.
Client deployment considerations
Additionally, for client deployment considerations, you need to decide whether to use cached, download, or Web Start clients (see Using Host On-Demand emulator clients) and which version of Java to use (see Planning for Java on the client).
Planning for Java on the client
- Improvements to the cached client for Java describes functions of the Host On-Demand Java cached client.
- Downloading a client with Java describes advanced features of the Host On-Demand client that are available only with a Java-enabled browser.
- Mac OS X with Java discusses issues involved in using the Apple Mac OS X as a Host On-Demand client with Java.
- Browsers and Java plug-ins discusses issues involved in using Java–enabled browsers and Java plug-ins.
Improvements to the cached client for Java
- Install the Java cached client from a LAN drive or DVD drive. For more information, refer to Installing the cached client from a LAN or DVD.
- Share the Java cached client between more than one user on Windows. For more information, refer to Cached client support for Windows.
- Remove the Java cached client in one operation, without clearing the cache of Java plug-in. For more information, refer to Removing the cached client.
- Upgrade the Java cached client in the background.
A few Java cached client types cannot be upgraded in the background. See Limits of supportfor more information.
Almost all Host On-Demand Java cached clients support these improvements. The Java Web Start client also supports these improvements.
Limits of support
- Process Collection window for Print Screen Collection
- Support for the secure Shell (SSH) for VT display sessions and secure File Transfer Protocol (sftp) sesstions
- Auto IME/on-the-Spot Conversion
- Print Screen Enhancements
- Internet Protocol Version 6 (IPv6)
- Accessbility features
- Duplicate Key Support
- Customizable Popup Keypad
- Mousewheel Support
- For bidirectional languages, support is now provided for OS/400 Code Character Set Identifiers (CCSIDs) for displaying Unicode characters.
Downloading a client with Java
The following sections discuss the limitations in downloading a client with Java.
Cannot download a component not in the preload list
With the Java download client, a user cannot download a Host On-Demand client component that is not in the original preload list. Consequently, you need to specify all the components that your users might require in the preload list.
This limitation is caused by a conflict between the method used by a download client to download components not on the preload list and security restrictions imposed by the Java plug-in.
HTML files do not contain some components
- Data transfer
- 5250 file transfer
- 5250 host print support
- Import/export
- SLP
- Thai sessions
- FTP Codepage Converter
- Bidirectional sessions
- 5250 Hindi sessions
- DBCS sessions using user-defined character settings
- ZipPrint in DBCS sessions
IBM removed these less frequently used components from the preload list of the Java default download HTML files to shorten download time. However, with the Java download client, any component not in the preload list cannot be downloaded later.
- Use the Deployment Wizard to create a download client or cached client Java HTML file that contains the components that you need.
- Use the default HTML file for the cached client (HODCached_xx.html, where xx is the two-letter language suffix) instead of the default HTML file for the download client.
- Use the debug version of the default download client (HODDebug_xx.html, where xx is the two-letter language suffix). The debug version contains all the components. However, the debug version of the default download client is larger than the non-debug version.
Mac OS X with Java
Host On-Demand Mac OS X emulator and database clients support Safari , Firefox, and the Mac version of Internet Explorer. Host On-Demand does not support the administration clients on Mac OS X. Host On-Demand Version 15.0.1 supports Java 1.6 or higher.
The Duplicate Key Support feature requires a Java Plug-in of 1.4.2 or newer on Macintosh clients. However, Host On-Demand Version 12 supports Java 1.6 or higher.
Mac OS X limitations
Mac OS X does not support the Java cached client improvements described in Improvements to the cached client for Java. For more information, refer to Cached client support for Mac OS X (Java clients only).
Slightly slower startup times with Java clients
With a Java–enabled browser, the Host On-Demand client starts a little more slowly (5 to 15 seconds slower, depending on the workstation type). The delay is caused by the system loading the Java plug-in.
Also, with a Java–enabled browser, a host session on the Host On-Demand client desktop can take a little longer to start.
Limitations of specific Java plug-ins
If you are using a Oracle Java plug-in and Hindi characters are not displayed correctly, make sure your Oracle JRE level is the latest.
Limitations with customer-supplied applets and Java
- The applet must be archived in a signed Java .JAR file.
- The permissions must previously have been granted on the workstation using the Java Policy Tool that is provided with the Java plug-in.
If you do not meet the security requirements of Java, the applet silently fails.
Limitations with restricted users and Java
Restricted users do not have the authority to install the Java plug-in. A user with administrative authority must install the Java plug-in.
Browsers and Java plug-ins
This section discusses issues involved in using Java–enabled browsers and Java plug-ins.
Java-enabled browsers
A Java–enabled browser does not have a JVM included with it. It can display HTML files on its own, but it needs a separate Java plug-in installed to launch a Java applet such as the Host On-Demand client. Examples of Java–enabled browsers are Firefox and Microsoft Internet Explorer with the Java plug-in installed.
Browsers and plug-ins supported by Host On-Demand clients
Users with client workstations running Windows can download the IBM Java plug-in from Fix Central under the Host On-Demand product if the company is entitled to HOD.
As vendors of Java plug-ins such as Oracle and IBM publish new versions of their Java plug-ins, and as IBM extends Host On-Demand to support these new versions, IBM will update the Software Product Compatibility Reports for support of new versions of JRE.
Microsoft Internet Explorer with a Java plug-in
When a Java plug-in is properly installed and configured on a Windows client workstation, Microsoft Internet Explorer will function as a Java-enabled browser, depending on how Host On-Demand chooses to launch the client.
Firefox with a Java plug-in
To run a Java applet on Firefox, you need to install a Java plug-in.
Consequently, Host On-Demand expects you to configure the Java plug-in so that it is the default Java Runtime for Firefox.
Planning for security
Whether you are implementing Host On-Demand purely within your corporate network, or you are using it to provide access to your host systems over the Internet, security is a concern. This chapter provides an overview of Host On-Demand security.
- Transport Layer Security (TLS) Provides encryption, certificate-based authentication, and security negotiations over an established Telnet or FTP connection. See TLS for Host On-Demand for details.
- The Redirector. Supports TLS between Host On-Demand clients and the Host On-Demand server. See The Redirector for details.
- Firewalls. You can configure Host On-Demand to go through a firewall. See Using Host On-Demand with a firewall for details.
- User ID security. Includes Web Express Logon, Native Authentication, and Windows Domain logon. See User ID security for details.
- Federal Information Processing Standards (FIPS) environments. See FIPS environments if your environment requires that your security components use FIPS-certified components/modules.
Transport Layer Security (TLS)
How TLS security works
TLS is based on the SSL protocol. TLS uses the initial handshake protocol for establishing client/server authentication and encryption. For detailed information on TLS, see The TLS Protocol Version 1.0.
The TLS protocol uses public-key and symmetric-key cryptographic technology. Public-key cryptography uses a pair of keys: a public key and a private key. Information encrypted with one key can be decrypted only with the other key. For example, information encrypted with the public key can be decrypted only with the private key. Each server's public key is published, and the private key is kept secret. To send a secure message to the server, the client encrypts the message by using the server's public key. When the server receives the message, it decrypts the message with its private key.
Symmetric-key cryptography uses the same key to encrypt and decrypt messages. The client randomly generates a symmetric key to be used for encrypting all session data. The key is then encrypted with the server's public key and sent to the server.
TLS provides three basic security services:
- Message privacy
- Achieved through a combination of public-key and symmetric-key encryption. All traffic between a client and a server is encrypted using a key and an encryption algorithm negotiated during session setup.
- Message integrity
- Ensures that session traffic does not change en route to its final destination. TLS uses a combination of public/private keys and hash functions to ensure message integrity.
- Mutual authentication
- Exchange of identification through public-key certificates.
The client and server identities are encoded in public-key certificates,
which contain the following components:
- Subject's distinguished name
- Issuer's distinguished name
- Subject's public key
- Issuer's signature
- Validity period
- Serial number
|
You can also use secure HTTP (HTTPS) to ensure that a client's security information is not compromised as it is downloaded from a server. |
Certificates
Security is controlled by digital certificates that act as electronic ID cards. The purpose of a certificate is to assure a program or a user that it is safe to allow the proposed connection and, if encryption is involved, to provide the necessary encryption/decryption keys. They are usually issued by Certificate Authorities (CAs), which are organizations that are trusted by the industry as a whole and whose business is the issuing of Internet certificates. A CA's certificate, which is also known as a root certificate, includes (among other things) the CA signature and a validity period.
Encryption and authentication are performed by means of a pair of keys, one public, one private. The public key is embedded into a certificate, known as a site or server certificate. The certificate contains several items of information, including the name of the Certificate Authority (CA) that issued the certificate, the name and public key of the server or client, the CA's signature, and the date and serial number of the certificate. The private key is created when you create a self-signed certificate or a CA certificate request and is used to decrypt messages from clients.
A TLS session is established in the following sequence:
- The client and the server exchange hello messages to negotiate the encryption algorithm and hashing function (for message integrity) to be used for the session.
- The client requests an X.509 certificate from the server to prove its identity. Optionally, the server can request a certificate from the client. Certificates are verified by checking the certificate format and the validity dates and by verifying that the certificate includes the signature of a trusted certificate authority (or is self-signed).
- The client randomly generates a set of keys that is used for encryption. The keys are encrypted with the server's public key and securely communicated to the server.
TLS for Host On-Demand
There are three areas where you can configure security for Host On-Demand: session security, Web server security, and configuration security.
Session security
Host On-Demand Version 15.0.1 uses the TLS protocol to provide security for emulator and FTP sessions.
The TLS protocol provides communications privacy across a TCP/IP network. TLS is designed to prevent eavesdropping, message tampering, or message forgery. TLS also provides a framework that allows new cryptographic algorithms to be incorporated easily. Host On-Demand supports encryption of emulation and FTP sessions and server/client authentication according to TLS Protocol Version 1.0.
Support is provided for the following:
- RSA type-4 data encryption on connections between the Host On-Demand clients and Telnet or FTP servers that support TLS version 1.0, 1.1, 1.2.
- X.509 certificates.
- Bulk encryption algorithms using keys up to 168 bits in length.
- Authentication algorithms using keys up to 2048 bits in length.
- Server and client authentication.
- Support for storage and use of client certificates on the client system.
- Optional prompting of user for client certificate when requested by server.
- Secure session indicators. A lock icon is displayed on the session status bar to indicate to the user that the session is secure. The encryption strength, for example, 64, 128, or 256, is also displayed next to the lock icon and when the mouse hovers over the lock icon.
A graphical Certificate Management utility (available on Windows and AIX platforms) is provided to:
- Create certificate requests
- Receive and store certificates
- Create self-signed certificates
IKEYCMD is a tool, in addition to the Certificate Management utility, that you can use to manage keys, certificates, and certificate requests. IKEYCMD is functionally similar to Certificate Management and is meant to run from the command line without a graphical interface. For more information, refer to Using the IKEYCMD command-line interface.
To support TLS services, Host On-Demand uses six databases:
- HODServerKeyDb.kdb
- You create the HODServerKeyDb.kdb the first time you configure TLS for the Host On-Demand Redirector. This database contains the server's private key and certificate as well as a list of CA (or signer) certificates. These CAs are considered well-known and are trusted by the Host On-Demand server. You can add certificates from other CAs (unknown CAs) and certificates that you create and sign yourself (self-signed) to this database. Refer to The Redirector for more information.
- HODServerKeyStore.jks
- Redirector can be configured to use Java Secure Socket Extenstion(JSSE) instead of GSKit. When configured with JSSE, redirecor reads the private key and certificates from HODServerKeyStore.jks. Refer to The Redirector for more information.
- CustomizedCAs.p12
- The CustomizedCAs.p12 is a PKCS#12 format file that contains the root certificates of
unknown CAs and self-signed certificates that are not in the WellKnownTrusted list.
CustomizedCAs.p12 file is used with SSLite, where CustomizedCAs.jks is used with JSSE
support. If you use a self-signed certificate or a certificate from an unknown authority
(CA), you need to create or update the CustomizedCAs.p12. Host On-Demand does not install a
CustomizedCAs.p12 file by default. The function of the CustomizedCAs.p12 is to make the
certificates available to the client and is used during the TLS handshaking process
between the client and the host.
The CustomizedCAs.p12 file is the preferred version of the CustomizedCAs.class file, which you may have created with an earlier release of Host On-Demand. The CustomizedCAs.class file supports Host On-Demand Version 7 and earlier clients, and is located in your publish directory by default. If you are running Windows or AIX, when you upgrade to version 15, the Host On-Demand installation automatically detects the CustomizedCAs.class file, creates the new CustomizedCAs.p12 file, and places it in the publish directory. Both files remain in your publish directory and are available to clients of different versions. If you have an separate user publish directory and not the default publish directory, the Host On-Demand installation will not be able to detect the CustomizedCAs.class file and you will need to run the migration tool manually on the command line.
If you create the CustomizedCAs.p12 file for the first time using the Host On-Demand Certificate Management utility (IKEYMAN), you will also want to have the older CustomizedCAs.class file in your publish directory so that older clients can still operate with the new server. Also, when you subsequently update the CustomizedCAs.p12 file, you will want to make sure these changes are picked up by the CustomizedCAs.class file. For Windows platforms, if these files are in the default publish directory, c:\Program Files\IBM\Host On-Demand\HOD, each time you open IKEYMAN to update the CustomizedCAs.p12 file and then close IKEYMAN, the CustomizedCAs.class file is automatically updated along with the CustomizedCAs.p12 file. If these files are not in the default publish directory, you need to manually run the reverse-migration tool from your publish directory using the following command. The command appears on three lines, but you should type it on one line...\hod_jre\jre\bin\java -cp ..\lib\sm.zip; com.ibm.eNetwork.HOD.convert.CVT2SSLIGHT CustomizedCAs.p12 hod CustomizedCAs.classOn AIX, for the CustomizedCAs.class file to pick up the changes you make to the CustomizedCAs.p12 file, you need to run this reverse-migration tool manually from your publish directory using the following command. The command appears on three lines, but you should type it on one line.../hod_jre/jre/bin/java -cp ../lib/sm.zip com.ibm.eNetwork.HOD.convert.CVT2SSLIGHT CustomizedCAs.p12 hod CustomizedCAs.class - CustomizedCAs.class
-
The CustomizedCAs.class is a Java class file that contains the certificates of unknown CAs and self-signed certificates that are not in the WellKnownTrusted list. If you use a self-signed certificate or a certificate from an unknown authority (CA), you need to update the CustomizedCAs.class file. However, note that you can no longer create or update the CustomizedCAs.class file using the Certificate Management utility on Windows or AIX platforms. In Host On-Demand Versions 9 or later, you can only create a newer version of this file called CustomizedCAs.p12. All clients still support the older format, however. For more information, refer to the description of CustomizedCAs.p12 above.
- WellKnownTrustedCAs.class, WellKnownTrustedCAs.p12, and WellKnownTrustedCAs.jks
- The WellKnownTrustedCAs.class, WellKnownTrustedCAs.p12, and WellKnownTrustedCAs.jks are the files supplied by Host On-Demand that contain the public certificates of all the CAs that Host On-Demand trusts. You should not modify these files.
WellKnownTrustedCAs.class/WellKnownTrustedCAs.p12 and WellKnownTrustedCAs.jks, CustomizedCAs.p12 and/or CustomizedCAs.class and CustomizedCAs.jks must be present in the Host On-Demand publish directory. The Host On-Demand client uses these files to trust the server's certificate during the TLS handshake.
- CustomizedCAs.jks
- The CustomizedCAs.jks file is different from the CustomizedCAs.p12 file, but both files have the same function. You can create a CustomizedCAs.jks file either by converting the existing CustomizedCAs.p12 to JKS format or by creating a new file in this format. You can use the Certificate Management utility that is installed with Host On-Demand or keytool.exe command-line tool, which is a Java Key and Certificate Management Tool available in the JRE for this purpose.
Basic TLS enablement for Host On-Demand clients
When you select the TLS protocol for the Host On-Demand client, a basic TLS session is established. During the TLS negotiation process, the server presents its certificate to the client. With basic TLS enablement, the certificate must be signed by an authority that the client trusts. The client checks WellKnownTrustedCAs.class/WellKnownTrustedCAs.p12 first, followed by the CustomizedCAs.p12 or the CustomizedCAs.class. If Host On-Demand is configured to use JSSE for TLS enablement, WellKnownTrustedCAs.jks and CusomizedCAs.jks files will be used. The client rejects the session if it does not find the signer in these files. If the client finds the signer in these files, the session is established. This is basic Server Authentication. Host On-Demand allows you to configure a more enhanced form of Server Authentication in its client configuration. Refer to the following section for more information.
- Server authentication
- Encrypting the data exchange between the client and the server does not guarantee the client is communicating with the correct server. To help avoid this danger, you can enable server authentication, so that the client, after making sure that the server's certificate can be trusted, checks whether the Internet name in the certificate matches the Internet name of the server. If they match, the TLS negotiation will continue. If not, the connection ends immediately. See server authentication.
- Client authentication
- Client authentication is similar to server authentication except that the Telnet server requests
a certificate from the client to verify that the client is who it claims to be. Not all
servers support client authentication, including the Host On-Demand Redirect. To configure
client authentication, you need to do the following:
- obtain certificates for clients
- send the certificates to the clients
- configure the clients to use client authentication
- Express Logon
- There are two types of Express Logon:
- Web Express Logon: Web Express Logon allows users to log on to host systems and host applications without having to provide a user ID and password. This feature works in conjunction with your network security application by acquiring the user's network credentials and mapping them to their host credentials, eliminating the need to log on multiple times. Depending on your host, the logon automation process can be macro-based or connection-based. For more information, refer to the https://www.ibm.com/docs/en/SSS9FA_15.0.0/info_docs/intro.html.
- Certificate Express Logon: Certificate Express Logon is macro-based and also allows
users to log on without having to enter a user ID and password. It is functionally
similar to Web Express Logon, although it requires you to configure your session for
TLS and client authentication, and the Communications Server must support and be
configured for Express Logon. For more information, see Express
logon.
Table 3. Tip
Starting with Host On-Demand V9, Web Express Logon offers a type of logon automation that uses client-side certificates. This model is called certificate-based Web Express Logon and is significantly different than Certificate Express Logon. With Certificate Express Logon, client certificates are used to authenticate users to an Express Logon-enabled TN3270 server that is configured to automate the login process. With certificate-based Web Express Logon, however, client certificates are used to authenticate users to a Web server or a network security application, and the login process is automated by a plug-in and a macro. For more information, refer to https://www.ibm.com/docs/en/SSS9FA_15.0.0/info_docs/intro.html.
- TLS-based Telnet security
- Telnet-negotiated security allows the security negotiations between the client and the Telnet
server to be done on the established Telnet connection. You can configure
Telnet-negotiated security for Host On-Demand 3270 display and printer
sessions.
The Telnet server must support TLS-based Telnet security (as described in the IETF Internet-Draft TLS-based Telnet Security) for the Host On-Demand clients to use Telnet-negotiated security. The Communications Server for z/OS supports TLS-based Telnet security.
For more information regarding Telnet-negotiated security, see Telnet-negotiated security overview. Refer to your Telnet server's documentation for more information about configuring TLS on the Telnet server, and see Security for more information about configuring a client to connect to a secure Telnet server.
- TLS-based FTP Security
- Host On-Demand provides TLS-based secure file transfer
for FTP sessions. The FTP session does not support implicit/unconditional
TLS negotiations to port 990/989. So, port 990 should not be used
for secure FTP sessions. It only supports explicit/conditional (AUTH
command) TLS negotiations to any other port.
The security properties of the FTP session are independent of the emulator session's security properties. For an integrated FTP session, you need to configure FTP security information using the new Security tab in FTP session properties. If you configure an emulator session to be secure and the File Transfer Type is set to FTP, the FTP session will not be secured automatically. In this situation, the following message appears when you click the OK button: If a secure file transfer session is desired, configure the security information in File Transfer Defaults.
The TLS based secure FTP function is supported by z/OS V1R2 or later.
Basic TLS enablement for Host On-Demand clients
When you select the TLS protocol for the Host On-Demand client, a basic TLS session is established. During the TLS negotiation process, the server presents its certificate to the client. With basic TLS enablement, the certificate must be signed by an authority that the client trusts. The client checks WellKnownTrustedCAs.class/WellKnownTrustedCAs.p12 first, followed by the CustomizedCAs.p12 or the CustomizedCAs.class. If Host On-Demand is configured to use JSSE for TLS enablement, WellKnownTrustedCAs.jks and CusomizedCAs.jks files will be used. The client rejects the session if it does not find the signer in these files. If the client finds the signer in these files, the session is established. This is basic Server Authentication. Host On-Demand allows you to configure a more enhanced form of Server Authentication in its client configuration. Refer to the following section for more information.
- Server authentication
- Encrypting the data exchange between the client and the server does not guarantee the client is communicating with the correct server. To help avoid this danger, you can enable server authentication, so that the client, after making sure that the server's certificate can be trusted, checks whether the Internet name in the certificate matches the Internet name of the server. If they match, the TLS negotiation will continue. If not, the connection ends immediately. See server authentication.
- Client authentication
- Client authentication is similar to server authentication except that the Telnet server requests
a certificate from the client to verify that the client is who it claims to be. Not all
servers support client authentication, including the Host On-Demand Redirect. To configure
client authentication, you need to do the following:
- obtain certificates for clients
- send the certificates to the clients
- configure the clients to use client authentication
- Express Logon
- There are two types of Express Logon:
- Web Express Logon: Web Express Logon allows users to log on to host systems and host applications without having to provide a user ID and password. This feature works in conjunction with your network security application by acquiring the user's network credentials and mapping them to their host credentials, eliminating the need to log on multiple times. Depending on your host, the logon automation process can be macro-based or connection-based. For more information, refer to the https://www.ibm.com/docs/en/SSS9FA_15.0.0/info_docs/intro.html.
- Certificate Express Logon: Certificate Express Logon is macro-based and also allows
users to log on without having to enter a user ID and password. It is functionally
similar to Web Express Logon, although it requires you to configure your session for
TLS and client authentication, and the Communications Server must support and be
configured for Express Logon. For more information, see Express
logon.
Table 4. Tip
Starting with Host On-Demand V9, Web Express Logon offers a type of logon automation that uses client-side certificates. This model is called certificate-based Web Express Logon and is significantly different than Certificate Express Logon. With Certificate Express Logon, client certificates are used to authenticate users to an Express Logon-enabled TN3270 server that is configured to automate the login process. With certificate-based Web Express Logon, however, client certificates are used to authenticate users to a Web server or a network security application, and the login process is automated by a plug-in and a macro. For more information, refer to https://www.ibm.com/docs/en/SSS9FA_15.0.0/info_docs/intro.html.
- TLS-based Telnet security
- Telnet-negotiated security allows the security negotiations between the client and the Telnet
server to be done on the established Telnet connection. You can configure
Telnet-negotiated security for Host On-Demand 3270 display and printer
sessions.
The Telnet server must support TLS-based Telnet security (as described in the IETF Internet-Draft TLS-based Telnet Security) for the Host On-Demand clients to use Telnet-negotiated security. The Communications Server for z/OS supports TLS-based Telnet security.
For more information regarding Telnet-negotiated security, see Telnet-negotiated security overview. Refer to your Telnet server's documentation for more information about configuring TLS on the Telnet server, and see Security for more information about configuring a client to connect to a secure Telnet server.
- TLS-based FTP Security
- Host On-Demand provides TLS-based secure file transfer
for FTP sessions. The FTP session does not support implicit/unconditional
TLS negotiations to port 990/989. So, port 990 should not be used
for secure FTP sessions. It only supports explicit/conditional (AUTH
command) TLS negotiations to any other port.
The security properties of the FTP session are independent of the emulator session's security properties. For an integrated FTP session, you need to configure FTP security information using the new Security tab in FTP session properties. If you configure an emulator session to be secure and the File Transfer Type is set to FTP, the FTP session will not be secured automatically. In this situation, the following message appears when you click the OK button: If a secure file transfer session is desired, configure the security information in File Transfer Defaults.
The TLS based secure FTP function is supported by z/OS V1R2 or later.
Examples of when to use session security
Refer to the following examples as situations where you might want to use session security:
- Allowing customers to order your products over the Internet. In this situation, you want to make sure the information customers give you, such as a credit-card number, is encrypted so that it cannot be stolen. You also want to make sure information you give to customers is protected.
- Giving your suppliers or business partners access to information on your host computers. You do not want anyone else to be able to access this data.
- Allowing your staff to have access to your host-computer information from remote sites or when they are traveling.
- Giving doctors access to patient records from wherever they are and making sure that unauthorized people cannot access these records.
Web server security
You can configure your Web server to use TLS, so that the data stream from your Web server to your browser is encrypted. See your Web server documentation for more information about configuring your Web server for TLS. Once the client is loaded in a browser, however, it communicates directly with the host. You can configure Host On-Demand to provide TLS security to your host sessions. For more information, see Configuring TLS.
Configuration security
If you use the HTML model, your session configuration information will be encrypted if you use HTTPS. For all other models, you need to configure Host On-Demand to use the configuration servlet over HTTPS (after configuring your Web application server) to encrypt the session configuration instead of communicating directly with the configuration server. See Installing the Configuration Servlet in this guide for more information about installing the configuration servlet, and see Configuring the configuration for more information about configuring clients to use the configuration servlet.
The Redirector
The Redirector is a service that runs on the Host On-Demand server and that allows a Host On-Demand client to communicate with a Telnet server by connecting to a Redirector port on the Host On-Demand server.
- Connects directly to the Host On-Demand server to download the client code and to access public HTML files.
- Also connects directly to a Telnet server that runs on or is connected to a 3270, 5250, VT, or CICS host.
However, when the Redirector is used, the Redirector acts as an intermediary between the client and the Telnet server. The client, instead of connecting directly to the Telnet server, connects to a Redirector port on the Host On-Demand server. The Redirector then sends to the Telnet server the data received from the client. When the Telnet server replies, the Redirector sends to the client the data received from the Telnet server. This process continues until the session ends.
Why use the Redirector?
|
Many Telnet servers support TLS (for example, IBM Communications Servers on zSeries, IBM System i, AIX, or NT). If your Telnet server supports TLS, we strongly recommend using your Telnet server. If your Telnet server does not support TLS, the Communications Server for AIX Redirector offers a more scalable alternative to the Host On-Demand Redirector. |
|
The recommended solution for a Telnet proxy is to use Load Balancer, a feature of WebSphere Application Server's Edge Components, or a similar product that provides address translation as part of the overall firewall solution, instead of the Host On-Demand Redirector. |
How the Redirector works
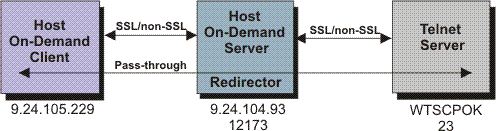
- Passthrough
- The Redirector communicates with the Telnet server and the client without changing the content of the data.
- Client-side
- The client and the Redirector communicate in a secure session using TLS (the content is encrypted/decrypted).
- The Redirector and the Telnet server communicate in a non-secure session.
- Host-side
- The client and the Redirector communicate in a non-secure session.
- The Redirector and the Telnet server communicate in a secure session using TLS (the content is encrypted/decrypted)
- Both
- The client and the Redirector communicate in a secure session using TLS (the content is encrypted/decrypted).
- The Redirector and the Telnet server communicate in a secure session using TLS (the content is encrypted/decrypted).
Before you use the Client-side, Server-side, or Both modes, you need to create the HODServerKeyDb.kdb or HODServerKeyStore.jks (if configured to use JSSE) for the Redirector.
You can use the Pass-through mode when encryption by the Redirector is not necessary, either because the data stream does not need to be encrypted, or because the data stream is already encrypted between the client and the Telnet server. you need to use the Pass-through mode if the Host On-Demand client is connecting through the Redirector to a host that requires client authentication or Express Logon.
See Adding a host to the Redirector for more information.
Redirector load capacity
For Redirector load capacity recommendations, refer to the Readme file.
Operating systems supported by the Redirector
- All operating systems that are supported by the Host On-Demand server and that also support Internet Protocol Version 4 (IPv4).
- Some operating systems that are supported by the Host On-Demand server and that also support Internet Protocol Version 6 (IPv6).
Operating systems that support IPv4
- Pass-through mode on all operating systems supported by the Host On-Demand server
- Other modes (Client-side, Host-side, and both) on only some of the operating systems supported by the Host On-Demand server
| Operating system: | Pass-through: | Client-side: | Host-side: | Both: |
|---|---|---|---|---|
| Windows | Yes | Yes | Yes | Yes |
| AIX | Yes | Yes | Yes | Yes |
| Linux | Yes | Yes | Yes | Yes |
| All other operating systems | Yes | No | No | No |
| Operating Systems | Pass-through: | Client-side: | Host-side: | Both: |
|---|---|---|---|---|
| Windows | Yes | Yes | Yes | Yes |
| AIX | Yes | Yes | Yes | Yes |
| Linux | Yes | Yes | Yes | Yes |
| All other operating systems | Yes | No | No | No |
Redirector support for IPv6
| Operating system | Pass-through: | Client-side: | Host-side: | Both: |
|---|---|---|---|---|
| Windows | Yes | Yes | Yes | Yes |
| Linux | Yes | Yes | Yes | Yes |
| AIX | Yes | Yes | Yes | Yes |
| Operating system: | Pass-through: | Client-side: | Host-side: | Both: |
|---|---|---|---|---|
| Windows | Yes | Yes | Yes | Yes |
| Linux | Yes | Yes | Yes | Yes |
| AIX | Yes | Yes | Yes | Yes |
Using Host On-Demand with a firewall
If you are configuring Host On-Demand to go through a firewall, we recommend that the firewall administrator open only those ports required for the clients to function. Telnet ports allow TLS-encrypted session traffic.
If you are using the configuration server-based or combined models, the Host On-Demand configuration servlet allows Host On-Demand clients to communicate with the configuration server across either HTTP or HTTPS.
For Host On-Demand clients connecting to a host system through open ports in the firewall, see Configuring firewall ports for details. For Host On-Demand clients connecting to a host system through a Socks or HTTP proxy server, see Connecting to a host system through a proxy server for details.
Configuring firewall ports
If you are using the configuration server-based model or the combined model, your Host On-Demand clients will need to communicate with the configuration server. To allow this through a firewall, you will need to either open the Host On-Demand Service Manager port or use the Host On-Demand configuration servlet. The Service Manager listens on port 8999 by default. You can change this default to any other available port number. For details, refer to Changing the Service Manager port. The Host On-Demand configuration servlet allows Host On-Demand clients to communicate with the configuration server across either HTTP or HTTPS. Therefore, the Service Manager port does not need to be open on the firewall. (See Figure 4.) Refer to Installing the Configuration Servlet and Configuring the configuration servlet for details on using the configuration servlet.
If you are using the HTML-based model, there is no requirement for Host On-Demand clients to access the configuration server, and the Service Manager port does not need to be open on the firewall. The clients will still attempt to contact the configuration server for license counting but will fail silently if the Service Manager port is not open.
In addition to the Service Manager port, make sure the firewall administrator opens any ports that are being used for functions your clients use. For example, if you have a TLS session with the Redirector on port 5000, port 5000 must be open for Telnet traffic. The following table summarizes the ports that Host On-Demand can use.
| Host On-Demand Function | Ports Used |
| Display emulation (3270 and VT) and 3270 Printer emulation | 23 (Telnet), 80 (HTTP), or 443 (TLS) and 8999 (config server)3 |
| 5250 Display and Printer emulation | 23 (Telnet) or 992 1 (TLS) or 80 (HTTP) or 443 (TLS) and 8999 (config server) 3 |
| 3270 file transfer | 23 (Telnet), 80 (HTTP), or 443 (TLS) and 8999 (config server)3 |
| 5250 file transfer - savfile | 80 (HTTP), 8999 (config server)3, 21 (FTP)4, >1024 (FTP)4, 446 (drda)4, 449 (as-svrmap)4, 8470 (as-central)1 2 4, 8473 (as-file)1 4, 8475 (as-rmtcmd)1 4, and 8476 (as-signon)1 4 |
| 5250 file transfer - database | 80 (HTTP), 8999 (config server)3, 446 (drda)4, 449 (as-svrmap)4, 8470 (as-central)1 2 4, 8473 (as-file)1 4, 8475 (as-rmtcmd)1 4, and 8476 (as-signon)1 4 |
| 5250 file transfer - stream file | 80 (HTTP), 8999 (config server)1 2 4, 449 (as-svrmap)4, 8470 (as-central)1 2 4, 8473 (as-file)1 4, and 8476 (as-signon)1 4 |
| FTP | 21 (FTP), 80 (HTTP), 8999 (config server)1 2 4, and >1024 (FTP)5 |
| CICS | 2006 |
| Database On-Demand | 80 (HTTP), 8999 (config server)3, 449 (as-svrmap)4, 8470 (as-central)1 2 4, 8471 (as-database)1 4, and 8476 (as-signon)1 4 |
| Host On-Demand clients | 23 (Telnet), 80 (HTTP), and 8999 (config server)3 |
| Administration clients | 80 (HTTP) and 8999 (config server)3 |
| SSH (the Secure Shell) | 22 |
| Notes: | |
| 1 | You can change the port numbers with the command
WRKSRVTBLE . The port numbers listed are the default values. |
| 2 | The port for as-central is used only if a codepage conversion table needs to be created dynamically (EBCDIC to/from Unicode). This is dependant on the JVM and the locale of the client. |
| 3 | You can change the config server port. Port 8999 is the default. |
| 4 | These ports do not need to be opened on the firewall if you are using IBM System i proxy server support. You will need to open the default proxy server port 3470. You can change this port. |
| 5 | In passive (PASV) mode, the FTP client initiates
both connections to the server, solving the problem of firewalls filtering
the incoming data port connection to the client from the server. When
opening a FTP connection, the client opens two random unprivileged
ports locally (N>1024 and N+1). The first port contacts the server
on port 21, but instead of then issuing a PORT command and allowing
the server to connect back to its data port, the client issues the
PASV command. As a result, the server then opens a random unprivileged
port (P>1024) and sends the PORT P command back to the client. The
client then initiates the connection from port N+1 to port P on the
server to transfer data.
From the server-side firewall's standpoint,
to support passive mode FTP, you need to open the following communications
ports:
|
- Use the Deployment Wizard to create HTML files that contain all configuration information. This eliminates the need to access the configuration server. When creating the HTML files, choose HTML-based model from the Configuration Model page of the Deployment Wizard.
- If you want to use the configuration server, you can configure clients to use the configuration
servlet. Refer to Configuring the configuration
servlet.
This option is only available if your Web application server supports servlets.
If you use the configuration server and it is separated from your Web browser by a firewall, you will either need to open the configuration server port on the firewall or run the Host On-Demand configuration servlet. The configuration servlet allows the browser to communicate with the configuration server across standard Web protocols, such as HTTP or HTTPS. (See Figure 4.)
Connecting to a host system through a proxy server
Host On-Demand clients can use a proxy server to transparently access host systems from behind a firewall. Two types of proxy servers are supported:
- Socks proxy servers, described in Connecting through a Socks proxy server. Both version 4 and version 5 of Socks are supported.
- HTTP proxy servers, described in Connecting through an HTTP proxy server.
Before you can connect to a host system through a proxy server, you need to find out which protocol the proxy server supports. Decide whether you want to specify the proxy server settings through the Web browser or explicitly identify a proxy server for the session. If you decide to explicitly identify a proxy server, you need to specify the protocol that the proxy server uses, the proxy server name and port number, and other information.
In general, if a Socks proxy server is available, configure Host On-Demand sessions to use it. Configure sessions to use an HTTP proxy server if that is the only type of proxy server supported at your site.
Connecting through a Socks proxy server
Many organizations use Socks proxy servers to protect computing resources behind a firewall. Socks is a protocol for TCP/IP-based network proxies. It allows applications on one side of a Socks proxy server to gain full access to hosts on the other side of the Socks proxy server without directly connecting to them. Proxy servers are generally used in conjunction with firewalls. Under the Socks protocol, a client that requests a connection to a host system through a firewall actually connects to a Socks proxy server. The Socks proxy server acts as an intermediary between the client and the host system. It authorizes communication requests, connects to the host on behalf of the client, and relays data between the two systems.
Host On-Demand supports both version 4 and version 5 of the Socks protocol.
- Socks version 4 specifies the message format and conventions to allow TCP-based application users access across a firewall. It provides access control based on TCP header information, including IP addresses and source and destination port numbers.
- Socks version 5 (also known as authenticated firewall traversal (AFT)) is an open Internet standard for network proxies. It adds authentication, better support for resolving domain names, support for IPv6 addresses, and other features to version 4. These features are very useful for clients located outside a firewall. A Socks user ID and password for the proxy server can optionally be sent over the connection between the Host On-Demand client and the proxy server. The user ID and password are not encrypted. For more information on version 5, see Socks Protocol Version 5.
The Java Virtual Machine (JVM) used in most Web browsers supports Socks version 4. A session can access either a Socks version 4 or version 5 proxy server, bypassing the proxy server settings in the Web browser. You can also have the session negotiate a Socks version 4 connection if the proxy server does not support version 5. For more information on Socks proxy server settings, see Proxy Server.
Connecting through an HTTP proxy server
HTTP proxy servers handle HTTP requests through firewalls. They act as intermediaries between private local networks and the Internet. The HTTP proxy server is connected to both the local network and the Internet. Local users configure their browsers to pass HTTP requests through the HTTP proxy server by specifying the proxy server's IP address and TCP port number. The HTTP proxy server accepts these HTTP requests and forwards them to the actual Web servers specified by the URLs entered in the browser.
For Host On-Demand clients, HTTP proxy servers act as forwarding agents for connections to a host system. The HTTP proxy server opens a connection to the host system and sends data back and forth between the host system and the client. Although an HTTP proxy server usually closes a connection after servicing an HTTP request, Host On-Demand keeps the connection open for host traffic by using the HTTP Connect method (if it is enabled for the proxy server).
To have a session use a HTTP proxy server, you need to select HTTP proxy as the proxy type and specify the proxy server name and port number. For more information on HTTP proxy server settings, refer to Proxy Server.
User ID security
Web Express Logon
If you have a network security application in place and you are using the configuration server-based model, you can select Web Express Logon in the Deployment Wizard to allow users to access hosts and host-based applications without providing an additional user ID and password. Entering the full URL of the Credential Mapper Server tells Host On-Demand where to locate the Credential Mapper Servlet, which processes the HTTPS request from the user, performs a lookup, and returns the user's credentials. The credentials are then used to perform a secure, automated Host On-Demand login.
Native Authentication
If you use the configuration server-based model, you can configure your Host On-Demand users to be natively authenticated. This option allows users to log on to Host On-Demand using the same password as they would to log on to the operating system (AIX or z/OS) where Host On-Demand is active. When a user logs on to Host On-Demand, their password is validated against the operating system password, rather than a separate Host On-Demand password. This gives the administrator a single point of control for password administration and the user a single password to remember.
See Native Authentication for more information on enabling this option.
Windows Domain logon
If your users are logged on to a Windows domain, this option (available with the configuration server-based model in the Deployment Wizard) automatically logs users on to Host On-Demand using their Windows user name. The Host On-Demand logon window does not appear and the Windows user name is used as the Host On-Demand user ID. If a Host On-Demand user ID does not already exist (matching the Windows user name), you can also choose to have a user ID automatically created in the specified Host On-Demand group.
See Logon Type for more information about choosing how users access the Host On-Demand configuration server.
FIPS environments
- You are using a Java JRE that is FIPS certified, for example, IBM 1.6.0 Service Release 5.
- You need to configure the UseJSSEforiSeries HTML parameter on the Advanced Options window of the Deployment Wizard and set its value to true.
- You need to add the certificate from the IBM System i host to the Java Secure Socket Extension (JSSE) client trust store for the Java JRE. Refer to your Java JRE provider for configuration details.
- From the menu of a display session, select Actions > Run Applet.
- Enter
com.ibm.eNetwork.HOD.util.jsse.JSSESetupin the field for the class name. - Click OK.
In earlier versions of Host On-Demand, you can enable FIPS mode authentication through an HTML parameter. The current version of Host On-Demand provides a menu option to enable or disable the FIPS mode for each session. By default, FIPS mode is enabled for all the sessions.
Planning for national language support
Host On-Demand is provided in multiple languages. The session windows, configuration panels, help files, and the documentation have been translated. In addition, display, keyboard, and processing support are provided in Arabic, Hebrew, Thai, and Hindi. Language support is fully explained in this documentation set. On documentation website, search for the language you want to learn more about.
All the translated versions are provided in the download. When you install Host On-Demand on i/OS, OS/400, Windows, AIX, Linux, and Solaris using the graphical installation program, you can choose which languages to install. On z/OS, you can choose the language via console mode.
|
National language support is operating-system dependent, so the appropriate font and keyboard support for the language you want to use must be installed in the operating system. For example, if you want to use Korean as the host-session language but do not have the Korean font and keyboard support installed, you may not be able to display the correct characters. |
|
DBCS cannot be used as the HTML file name. |
Supported languages
The languages into which Host On-Demand has been translated are listed below, along with the language suffixes you can use to load translated versions of the Host On-Demand clients. For example, IBM-supplied HTML pages have language extensions to identify different language installations and different language predefined HTML files, such as HOD_en.html for English.
| Language | Language suffix |
| Simplified Chinese | zh |
| Traditional Chinese | zh_TW |
| Czech | cs |
| Danish | da |
| Dutch | nl |
| English | en |
| Finnish | fi |
| French | fr |
| German | de |
| Greek | el |
| Hungarian | hu |
| Italian | it |
| Japanese | ja |
| Korean | ko |
| Norwegian | no |
| Polish | pl |
| Brazilian Portuguese | pt |
| Portuguese | pt_PT |
| Russian | ru |
| Slovenian | sl |
| Spanish | es |
| Swedish | sv |
| Turkish | tr |
| Catalan | Ca |
Supported host code pages
Host On-Demand supports multiple code pages. You can specify these code pages on a session-by-session basis.
3270 and 5250 code pages
The code pages specified below are supported by the 3270 and 5250 emulators. You can select them in the Session Configuration window.
| Country or region | Code page | Note |
| Arabic Speaking | 420 | |
| Austria | 273 | |
| Austria (Euro) | 1141 | |
| Belarus | 1025 | |
| Belarus (Euro) | 1154 | |
| Belgium | 037 | |
| Belgium (Euro) | 1140 | |
| Belgium (Old Code) | 274 | |
| Bosnia/Herzegovina | 870 | |
| Bosnia/Herzegovina (Euro) | 1153 | |
| Brazil | 037 | |
| Brazil (Euro) | 1140 | |
| Brazil (Old) | 275 | |
| Bulgaria | 1025 | |
| Bulgaria (Euro) | 1154 | |
| Canada | 037 | |
| Canada (Euro) | 1140 | |
| China (Simplified Chinese Extended) | 1388 | |
| Croatia | 870 | |
| Croatia (Euro) | 1153 | |
| Czech Republic | 870 | |
| Czech Republic (Euro) | 1153 | |
| Denmark | 277 | |
| Denmark (Euro) | 1142 | |
| Estonia | 1122 | |
| Estonia (Euro) | 1157 | |
| Finland | 278 | |
| Finland (Euro) | 1143 | |
| France | 297 | |
| France (Euro) | 1147 | |
| FYR Macedonia | 1025 | |
| FYR Macedonia (Euro) | 1154 | |
| Germany | 273 | |
| Germany (Euro) | 1141 | |
| Greece | 875 | |
| Hebrew (New Code) | 424 | |
| Hebrew (Old Code) | 803 | |
| Hindi | 1137 | 5250 display only |
| Hungary | 870 | |
| Hungary (Euro) | 1153 | |
| Iceland | 871 | |
| Iceland (Euro) | 1149 | |
| Italy | 280 | |
| Italy (Euro) | 1144 | |
| Japan (Katakana) | 930 | |
| Japan (Katakana Extended) | 930 | |
| Japanese (Katakana Unicode Extended;JIS2004) | 1390 | 3270 only |
| Japan (Latin Extended) | 939 | |
| 1399 Japanese (Latin Unicode Extended;JIS2004) | 1399 | |
| Kazakhstan (Euro) | 1166 | |
| Korea (Euro) | 1364 | 3270 only |
| Korea (Extended) | 933 | |
| Latin America | 284 | |
| Latin America (Euro) | 1145 | |
| Latvia | 1112 | |
| Latvia (Euro) | 1156 | |
| Lithuania | 1112 | |
| Lithuania (Euro) | 1156 | |
| Multilingual | 500 | |
| Multilingual ISO (Euro) | 924 | |
| Multilingual (Euro) | 1148 | |
| Netherlands | 037 | |
| Netherlands (Euro) | 1140 | |
| Norway | 277 | |
| Norway (Euro) | 1142 | |
| Open Edition | 1047 | |
| Poland | 870 | |
| Poland (Euro) | 1153 | |
| Portugal | 037 | |
| Portugal (Euro) | 1140 | |
| Romania | 870 | |
| Romania (Euro) | 1153 | |
| Russia | 1025 | |
| Russia (Euro) | 1154 | |
| Serbia/Montenegro (Cyrillic) | 1025 | |
| Serbia/Montenegro (Cyrillic; Euro) | 1154 | |
| Slovakia | 870 | |
| Slovakia (Euro) | 1153 | |
| Slovenia | 870 | |
| Slovenia (Euro) | 1153 | |
| Spain | 284 | |
| Spain (Euro) | 1145 | |
| Sweden | 278 | |
| Sweden (Euro) | 1143 | |
| Taiwan (Traditional Chinese Extended) | 937 | |
| Taiwan (Traditional Chinese Extended; Euro) | 1371 | |
| Thai | 838 | |
| Thai (Euro) | 1160 | |
| Turkey | 1026 | |
| Turkey (Euro) | 1155 | |
| Ukraine | 1123 | |
| Ukraine (Euro) | 1158 | |
| United Kingdom | 285 | |
| United Kingdom (Euro) | 1146 | |
| United States | 037 | |
| United States (Euro) | 1140 |
Notes:
- 3270 host print with a Printer Definition Table (PDT) supports only Latin-1, DBCS, bidirectional, and Thai code pages. Other code pages are supported either in Adobe PDF printing or on Windows platforms without a PDT.
- In order to include more characters (which are defined in the GB18030 standard by the Government of the People's Republic of China), 6582 Unicode Extension-A and 1,948 additional non-Han characters (Mongolian, Uygur, Tibetan, and Yi) were added to the Simplified Chinese code page 1388 for Host On-Demand Version 6.
VT code pages
| Language | Code page |
| Arabic | ASMO 708 and ASMO 449 |
| British | 1101 |
| DEC Greek | |
| DEC Hebrew | |
| DEC Multinational Replacement Character Set | 1100 |
| DEC Technical | |
| Dutch | 1102 |
| Finnish | 1103 |
| French | 1104 |
| French Canadian | 1020 |
| German | 1011 |
| Hebrew NRCS | |
| ISO Greek Supplemental (ISO Latin-7) | 813 |
| ISO Hebrew Supplemental | |
| ISO Latin-1 | 819 |
| Italian | 1012 |
| Norwegian/Danish | 1105 |
| PC Danish/Norwegian | 865 |
| PC International | 437 |
| PC Multilingual | 850 |
| PC Portugese | 860 |
| PRC GBK | 936 |
| PC Spanish | 220 |
| Spanish | 1023 |
| Swedish | 1106 |
| Swiss | 1021 |
| United States | 1100 |
CICS Gateway code pages
| Code page | Character set |
| 000 | Auto Detect (default) |
| 437 | Latin-1 |
| 813 | ISO Greek (8859_7) |
| 819 | ISO Latin 1 (8859_1) |
| 850 | Latin 1 |
| 852 | Latin 2 |
| 855 | Cyrillic |
| 856 | Hebrew |
| 857 | Latin 5 |
| 864 | Arabic |
| 866 | Cyrillic |
| 869 | Greek |
| 874 | Thai |
| 912 | ISO Latin 2 (8859_2) |
| 915 | ISO Cyrillic (8859_5) |
| 920 | ISO Latin 5 (8859_9) |
Japanese JIS2004 Unicode support
- Presentation space editing
- Key assignment
- File transfer
- Print screen
- Printer session
- GDI
- Adobe PDF
- Host Access Class Library (HACL)
- Macro
- Use printer definition table (PDT) in printer session
User-defined character mapping
For double-byte character set (DBCS) languages, you can use customized user-defined character (UDC) mapping in your session (3270, 5250, 3270 host print) instead of the default mapping. You can create a UDC translation table using the UDC mapping editor to store customized mapping for your session. For instructions for how to use the UDC mapping editor to change your character mapping, see Using the user-defined character (UDC) mapping editor.
Unicode Support for i/OS and OS/400
Fresh Installation, Migrate Installation, and Uninstalling Host On-Demand
Installing the Host On-Demand
The Host On-Demand needs to be installed in the Administrator user account on the system where Host On-Demand is planned to install.
The user install Host On-Demandon all the supported platforms. Using the Host On-Demand, the user install using the Host On-Demand GUI, Silent Mode or Console Mode. GUI is supported by RHEL, Windows, Ubuntu and PPC Linux. To install on z/OS, AS400, and AIX the user can use Console Mode or Silent Mode.
This chapter discusses installing the following three Host On-Demand components:
- The Host On-Demand server, which is necessary for using Host On-Demand.
- The Host On-Demand configuration servlet, which is needed only in specific instances when the user is running Host On-Demand in conjunction with a firewall. Refer to Installing the Configuration Servlet for further explanation and instructions.
- The Deployment Wizard, is an extremely useful administrative tool to generate customized Host On-Demand clients. Refer to Installing the Deployment Wizard for instructions.
IBM Host On-Demand provides cost-effective and secure browser-based and non-browser-based host access to users in intranet-based and extranet-based environments. Host On-Demand is installed on a Web server, simplifying administrative management and deployment, and the Host On-Demand applet or application is downloaded to the client browser or workstation, providing user connectivity to critical host applications and data.
Host On-Demand supports emulation for common terminal types, communications protocols, communications gateways, and printers, including the following:
- TN3270 and TN3270E terminals
- TN5250 terminals
- VT52, VT100, VT220, VT320, and VT420 terminals
- The Secure Shell (SSH)
- Transport Layer Security (TLS)
- File Transfer Protocol (FTP)
- Customer Information and Control System (CICS) Transaction Gateway
- TN3270E and TN5250 printers.
Component of Host on Demand
Host On-Demand v15.0.1 installer fresh installation, migrate installation, uninstallation, and upgrade installation ( from v15.0 onwards).
An earlier release of Host On-Demand requires the Installation manager as a dependency. Now the Host On-demand v15.0.1 does not have Installation manager dependency. Host On-Demand v15.0.1 is an easy-to-use and user-friendly installer, it supports fresh installation, migrate installation, uninstallation, and upgrade installation (from v15.0 onwards).
Before the HOD Installation
A supported version of HTTP server (for example, IBM HTTP Server or Apache server) is installed on the system.
| Operating System | Pre-requisite | Additional Information |
|---|---|---|
| Windows | Only Administrator can install Host On-Demand | Other than non-Admin user, can install with Administrator credentials. |
| AIX, Linux, Ubuntu | Root User can install Host On-Demand. | Other than non-root user, can install with root access. |
| Z-OS, I5/OS | Root User can install Host On-Demand with use on Pre installed Java | Other than non-root user, can install with root access. |
- Minimum 2GB disk space for installation and 2GB for a temporary directory for 64-bit architecture one language. This value increases by 4 to 8 MB for each language while installing more than one language.
- Minimum 4.5 GB for the multi-platform product repository (downloading and extracting).
- Java (1.8 and above) must be installed as a Prerequisite for ZOS, I5/OS, and PPC Linux Big Endian OS.
For more information, see .
Preparing to Install
Ensure the machine on which the installation takes place meets all prerequisites.
- The minimum 4.5 GB for the multi-platform product repository (downloading and extracting).
- Users are required to log on with privileges from Administrator.
- A supported version of HTTP server (for example, IBM HTTP Server or Apache server) is installed on the system.
Upgrading from Earlier Versions of Deployment Wizard
The user cannot directly upgrade the deployment wizard from v13.0 or v14.0 to v15.0.1.
- Take a backup of any customized files from the Deployment Wizard directory. The user edit any existing files with the Version v.13.0 to v14.0 Deployment Wizard.
- The new Deployment Wizard requires that an empty path be available. Hence, rename or delete the existing folder of the Deployment Wizard installation.
- Install Deployment Wizard using the Host On-Demand
- Re-deploy customized files on the Deployment Wizard installation folder.
- Launch the Deployment wizard setup using GUI or Console or Silent mode.
- It automatically detects and reads the previous configured information and performing upgrade installation.
- Retain the user defined customized files on upgrade.
.
Upgrading from Earlier Version of HACL ToolKit
The user cannot directly upgrade the HACL ToolKit from v13.0 or v14.0 to v15.0.1.
- Take a backup of any customized files from the HACL ToolKit directory. The user edit any existing files with the Version v.13.0 to v14.0 HACL ToolKit.
- The new HACL ToolKit requires that an empty path be available. Hence, rename or delete the existing folder of the HACL ToolKit installation.
- Install HACL ToolKit using the Host On-Demand
- Re-deploy customized files on the HACL ToolKit installation folder.
- The direct upgrade is not possible, either user can install v15.0.1 as a seperate path or they can uninstall and install as fresh product.
-
Launch HACL Toolkit setup using GUI or Console or Silent mode.
- It automatically detects and reads the previous configured information and performing upgrade installation.
- Retains the user defined customized files on upgrade.
Upgrading from Earlier Version of Host On-Demand
The user cannot directly upgrade the Installation Manager Host On-Demand from v13.0 or v14.0 to v15.0.1.
User must Perform the following steps for upgrading:
- User needs to stop the Host On-Demand windows service and Non-windows HOD process manually and then perform IBM Host On-Demand migrate installation.
- Host On-Demand Application must be closed.
- IBM Host On-Demand v15.0.1 supports to migrate existing installation Manager Host On-Demand.
- Host On-Demand does not support multiple instances of same version.
- Launch IBM Host On-Demand setup using GUI or Console or Silent mode.
- It automatically detects and displays the installed version on multiple instance panel, based on user selection perform upgrade or New Instance installation.
- Retains the user defined customized files on upgrade.Note: For more information refer to Muliple Instance or Upgrade Installation.
Installing the Deployment Wizard
The Deployment Wizard is automatically installed as part of the Windows Host On-Demand server installation. It is also available separately for users who do not wish to install the entire Windows Host On-Demand server.
For z/OS and iSeries, the Deployment Wizard install package can be found on the Host On-Demand server in the <install directory>/Host On-Demand/depwiz directory called DW.zip. This file can be downloaded to a Windows workstation and installed separately.
Installing the Deployment Wizard in GUI Mode
On Windows platforms, the Deployment Wizard is installed automatically when Host On-Demand is installed.
To install Deployment Wizard separately, perform the following steps:
- Right click on the HOD_DW_Windows_x64.exe.
- Click Run as Administrator, the following InstallAnywhere is preparing to install
screen displays.
- By Default, English language is displayed. The user can select the language from the
drop down list.
- Click OK. The Introduction screen displays to configure.
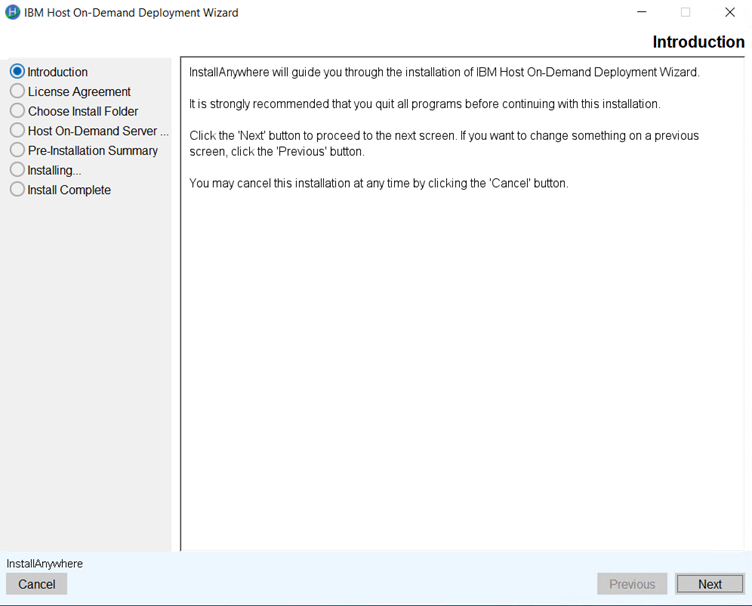
- Click Next.
- The License Agreement screen displays. Click I accept the items of the License
Agreement.
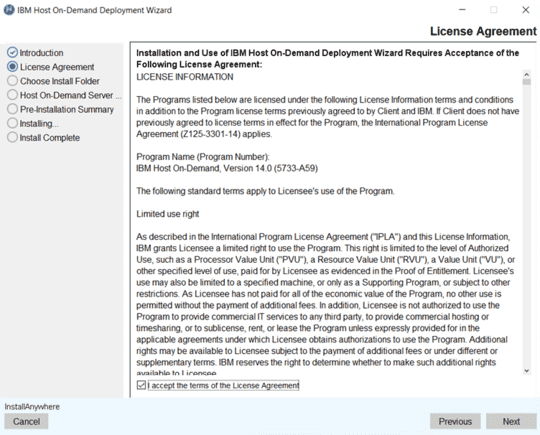
- Click Next.
- The Choose Install Folder to install the product screen displays. (Here, the user
can choose the customized folder).
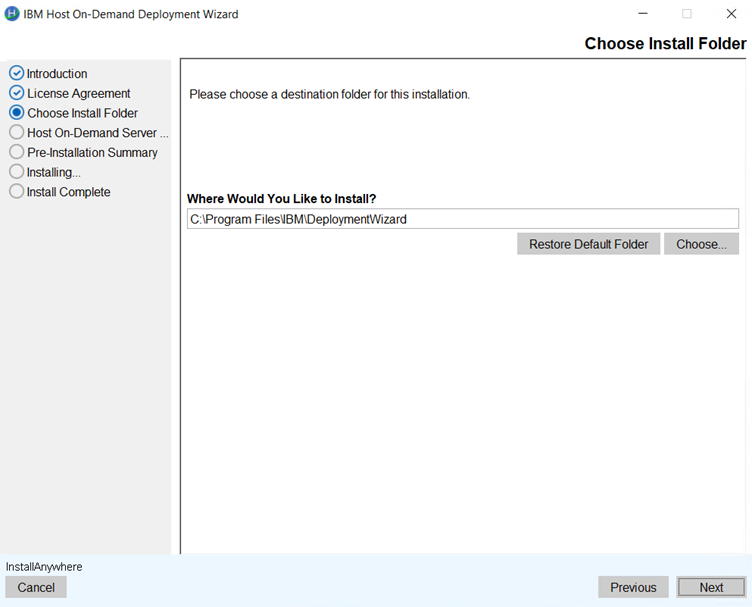 Note:
Note:- The user can restore the default folder.
- If the install folder is already existing then the error message displays; "The
installation folder C\program Files\IBM\Deployment Wizard exists and contains
files."
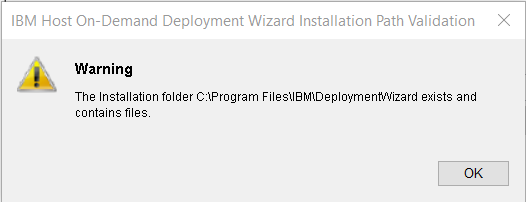
- Click OK.
- Click Next.
- The Host On-Demand Server Location configuration screen displays.
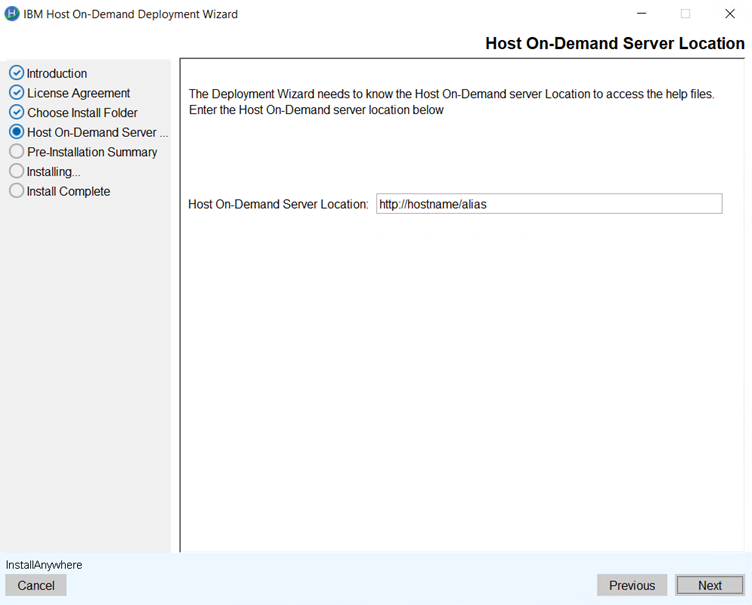
- Click Next.
- The Pre-Installation Summary screen displays to review the summary details, for
example, product name, install folder, host on-demand server location, and disk space
information.
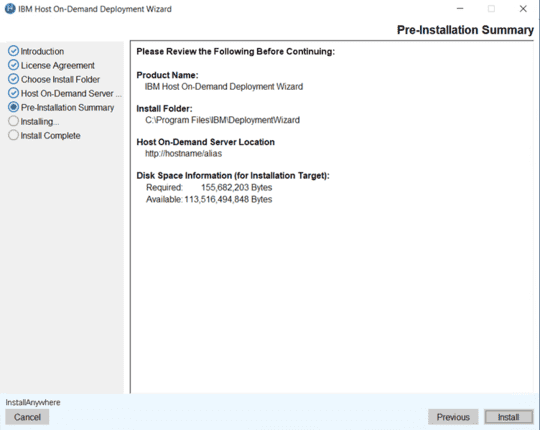
- Click Install. The installation process gets started .
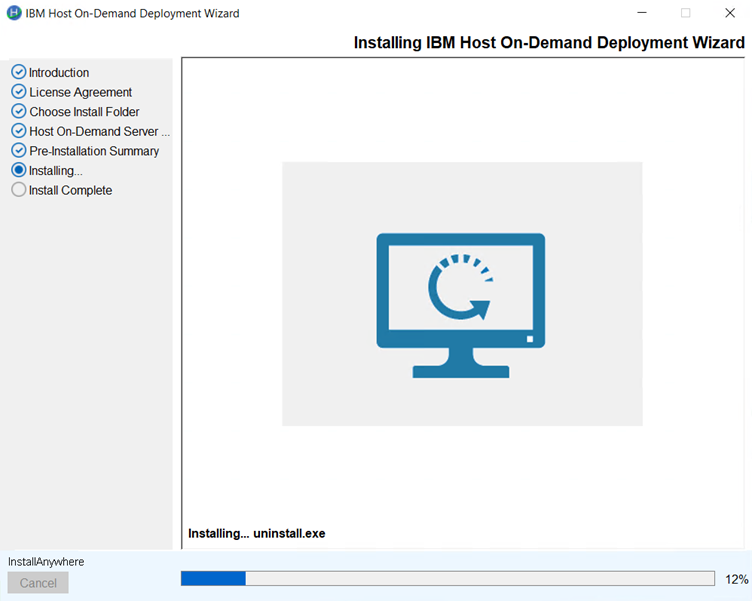
- Once the extraction is completed. The completed Installation screen displays.
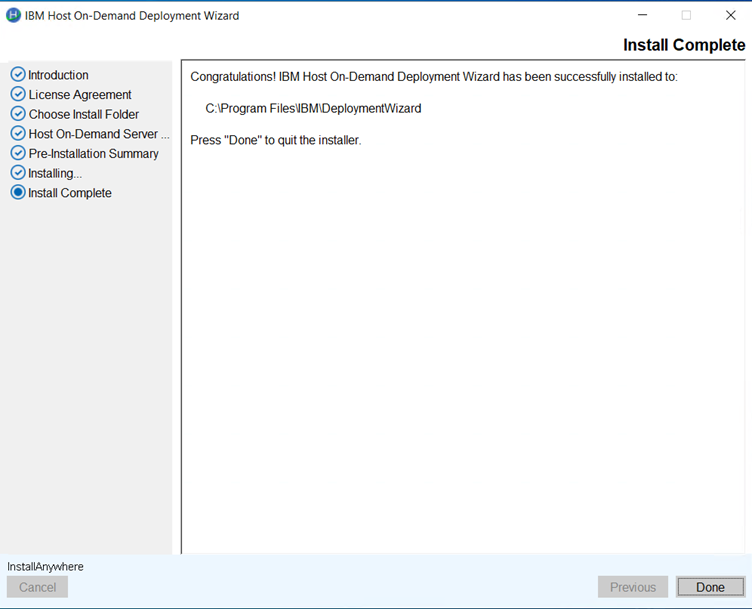
- Click Done. It creates the shortcut for easy access.
Downloading the Deployment Wizard Installation Image from a Host On-Demand Server
The Deployment Wizard image is shipped on all Host On-Demand server platforms, and it can be downloaded from the server and installed on any Windows machine.
- HODMain_xx.html page, where xx is your two-letter language suffix or ftp directly from the server.
- Downloading via HODMain_xx.html downloads through the web server.
- From your Windows machine, start your browser and point to the HODMain_xx.html file on your Host On-Demand server, where xx is your two letter language suffix.
- Click the Administrators tab 3.
- Click the Deployment Wizard link to download the Deployment Wizard installation image Windows machine.
- Install the Deployment Wizard.
- Once the installation is complete, the user start the Deployment Wizard from the Start > Programs desktop menu.
- From your Windows machine, ftp to Host On-Demand server machine.
- When prompted, log into the server.
- Enter bin to set the mode to binary.
- Enter cd to the directory the Deployment Wizard file exist. The location will be <install-directory>/Host On-Demand/depwiz.
- Enter get DW.zip to get the file.
- Extract the zip file on the Windows machine.
- Run the Installation Manager to install the Deployment Wizard.
- Start the Deployment Wizard from the Start > Programs desktop menu.
Install Host On-Demand using GUI Mode
- Right click on the HOD_Windows_x64.exe.
- Click Run as Administrator, the following InstallAnywhere is preparing to
install screen displays.
- Click OK. The Introduction screen displays to configure.

- Click Next.

- The License Agreement screen displays. Click I accept the items of the
License Agreement.

- Click Next.
- The Multiple Instance screen displays to choose:
- Installed Instance.
- New Instance.
For more detials, refer to Multiple Instance or Upgrade Installation.
- Click Next.
- By Default, the English language is displayed. The user can select multiple
language by selecting the checkbox.
 Note:
Note:- By default, the English language is installed, if the user wants to install multiple languages select the appropriate language checkbox to install
- The user can select multiple languages.
- To clear the selected language click Clear All.
- Click Next.
- The Choose Install Folder to install the product screen displays. (Here,
the user can choose the customized folder).
 Note:
Note:- The user can restore the default folder.
- If the install folder is already existing then the error message
get displayed.

- Click OK.
- Click Next.
- The Publish Information screen displays.

Note: Service Manager port must be system free port. If port number is used by other applications Host On-Demand Server will not started. - Click Next.
- The Web Server Configuration screen displays.
 Note:
Note:- By default, it displays an embedded web server.
- Select the appropriate web server configuration to install.
- Select from the list of detected web server(s).
- Select from the list of detected web server: The user can select
the Web server installed folder and configure it.

- Manually select Specific web server: The user can select the
folder and install it.

- No Web Server: If the web server is not installed, then chosse
this.

- Click Next.
- The App Server Configuration, select the WebSphere Application Server
when you would like Host On-Demand Configuration Servlet to be installed.

- Click Next.
- Select the WebSphere Application Server details to install the Application
Server.
 Note: IBM Host On-Demand will not support Administrative Security enabled webserver.
 - Click Next. The validating message window pop-ups as displayed in the
below screen.

- Click Ok.
- Click Next.
- The Installation Summary screen displays to review the summary details,
for example, product name, install folder, host on-demand server location, and
disk space information.

- Click Install. The product gets installed.

- Once the extraction is completed. The Install Complete screen displays.

- Click Done. It creates the shortcut for easy access.
Installing the Host Access Toolkit
Perform the following basic steps to install the Host Access Toolkit on a Windows system:
- Right click on the HOD_HACL_Windows_x64.exe.
- Click Run as Administrator, the following InstallAnywhere is preparing to install
screen displays.
- Select Language. By Default, the English language is displayed. The user can select the
appropriate language from the drop down list.
- Click OK.
- The Introduction screen displays.
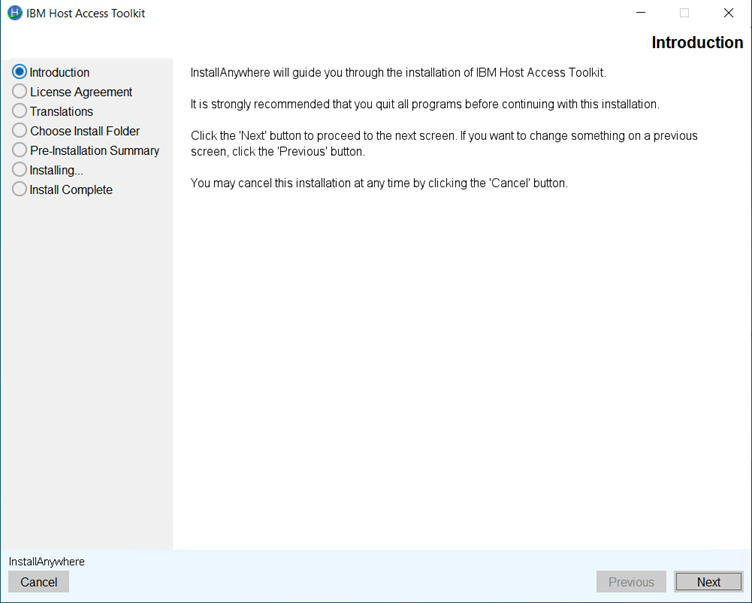
- Click Next.
- The License Agreement screen displays. Click I accept the items of the License
Agreement.
- Click Next.
- The Translation screen displays. The user can select the multiple language
translation.
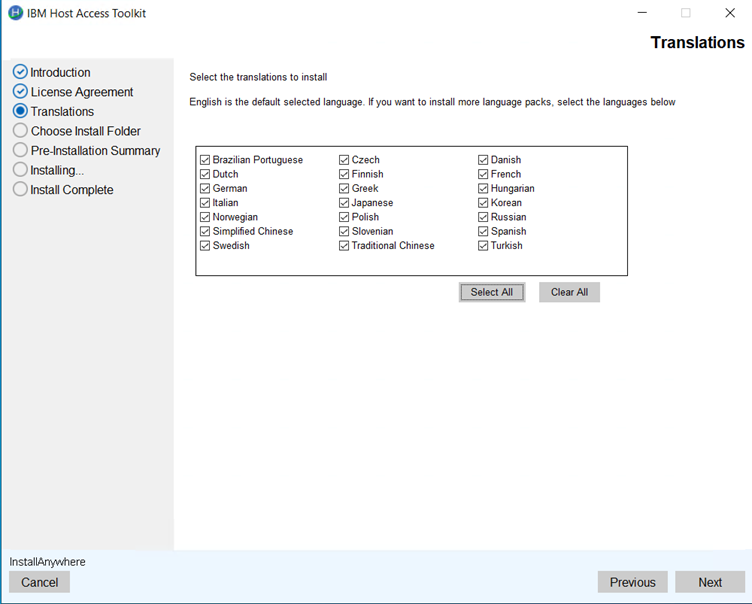
- Click Next.
- The Choose Install Folder to install the product screen displays. (Here, the
user can choose the customized.
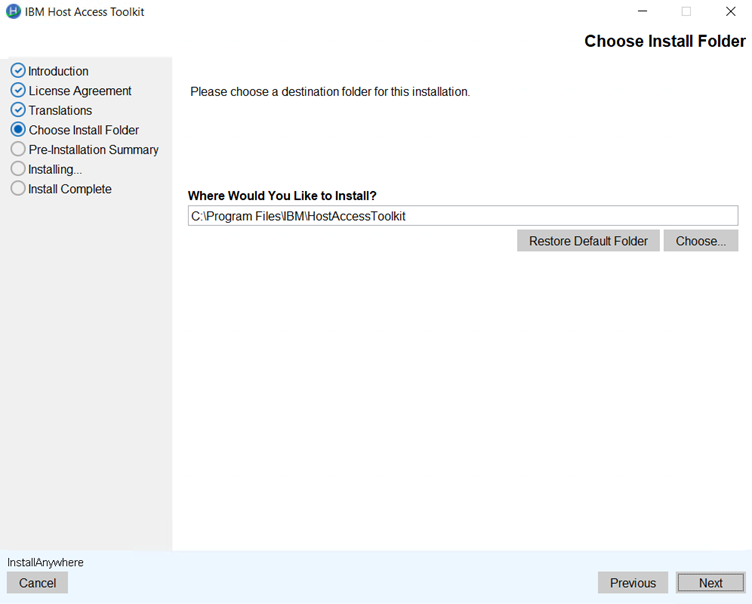 Note:
Note:- The user can restore the default folder.
- If the install folder is already existing then the error message get displayed as:
"C\Program Files\IBM\HostAcccessToolKit exists and contails files".
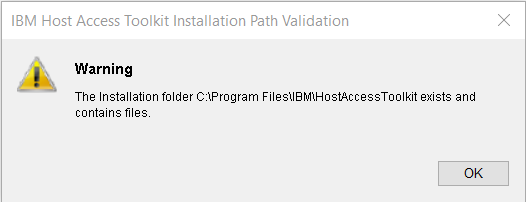
- Click OK.
- Click Next.
- The Pre- installation Summary screen displays to review the summary details, for
example, product name, install folder, host on-demand server location, and disk space
information.
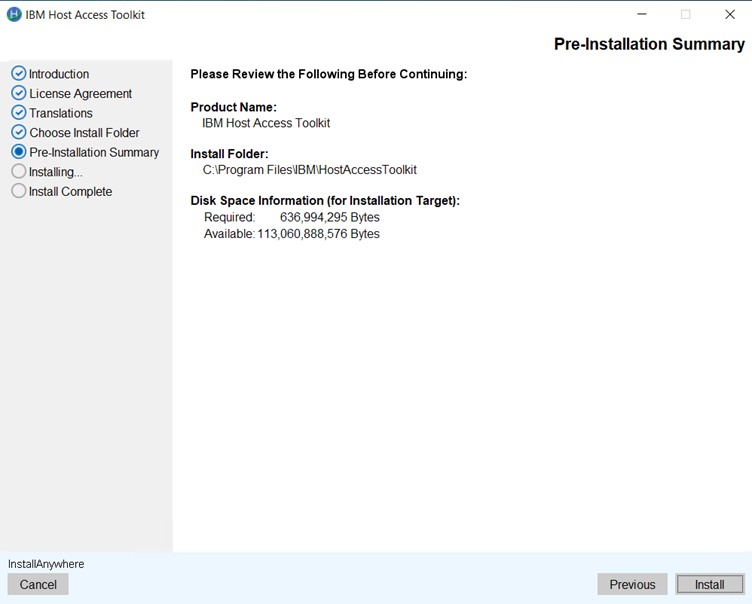
- Click Install. The installation process gets started.
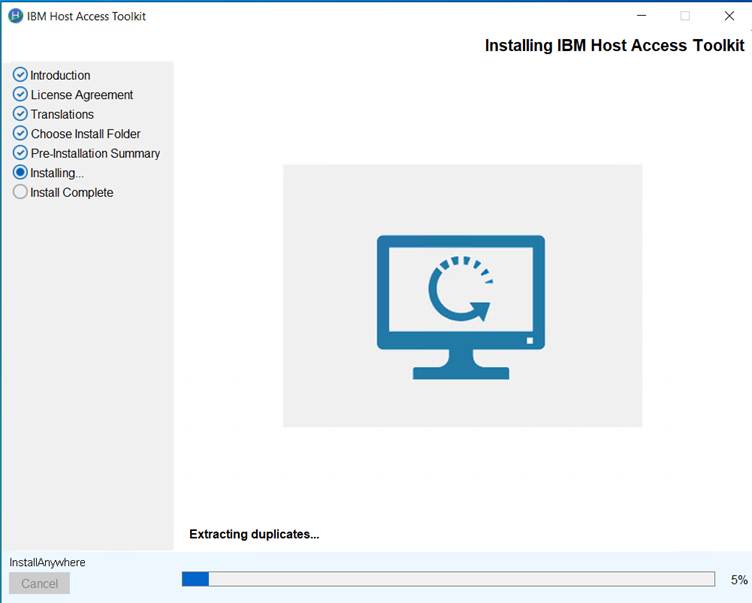
- Once the extraction is completed. The Install Complete screen displays.
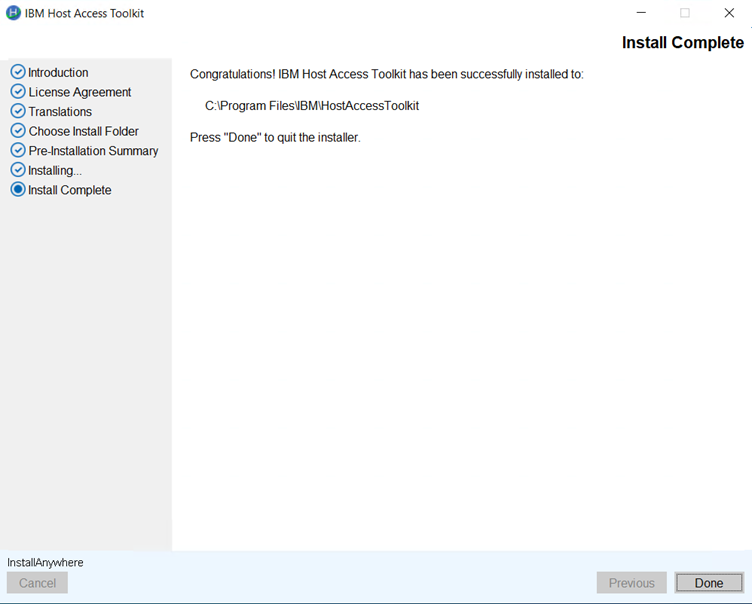
- Click Done. It creates the shortcut for easy access.
Installing the IBM Host On-Demand, Deployment Wizard and HACL Tool kit in the Console Mode
This chapter contains instructions of using Installation Manager console mode to install Host On-Demand on platforms that do not support a Graphical User Interface.
Console mode installation user needs to enter the required input on panel input prompt displayed by installer.
Language console panel is displays the supported Language pack ID started from 1 to 24, suppose the user wants to support more than one language should enter the input using comma specified language ID (Ex : 1,5,8).
| OS Type | Command | More Information | |
|---|---|---|---|
| Windows | IBM Host On-Demand | HOD_Windows_x64.exe -i console | Administrator user Command Prompt |
| Deployment Wizard | HOD_DW_Windows_x64.exe -i console | Administrator user Command Prompt | |
| HACL Tool kit | HOD_HACL_Windows_x64.exe -i console | Administrator user Command Prompt | |
| AIX | Host On-Demand | sh ./setup.bin -i console | Root user Terminal client |
| Linux | Host On-Demand | sh ./setup.bin -i console | Root user Terminal client |
| Ubuntu | Host On-Demand | sh ./setup.bin -i console | Root user Terminal client |
| I5/OS | Host On-Demand | java -jar setup.jar -i console | Root (qsh) shell Prompt |
| Z/OS | Host On-Demand | java -jar setup.jar -i console | Root user account OMVS or ISPF shell prompt |
Refer Console Mode procedure to install the.
About Installing in the Console Mode
Administrators can use the console-based interface to install Host On-Demand on Linux, UNIX, and z/OS systems that do not support a graphical user interface (GUI).
- Installation
- Migrate Installation
- Uninstallation
Before Installing Host On-Demand on IBM iSeries
Installation of Host On-Demand on IBM iSeries platforms is supported through the console mode of Installation Manager. The GUI mode of installation is not available on IBM iSeries.
-
Installation is performed by a user with administrator or root privileges.
- Remote installation on IBM i is not available in HOD V15.0.1.
- Copy the Host On-Demand IBM_HOD_os400.jar files to the IBM from FTP (File Transfer Protocol) or by any regular means and extract the tar file.
- Proceed with the remaining steps provided in the console mode installation.
Installing Host On-Demand on Console Mode
To install Host On-Demand on console mode, perform the following steps:
- Type in the Command Line to configure the Console
mode.
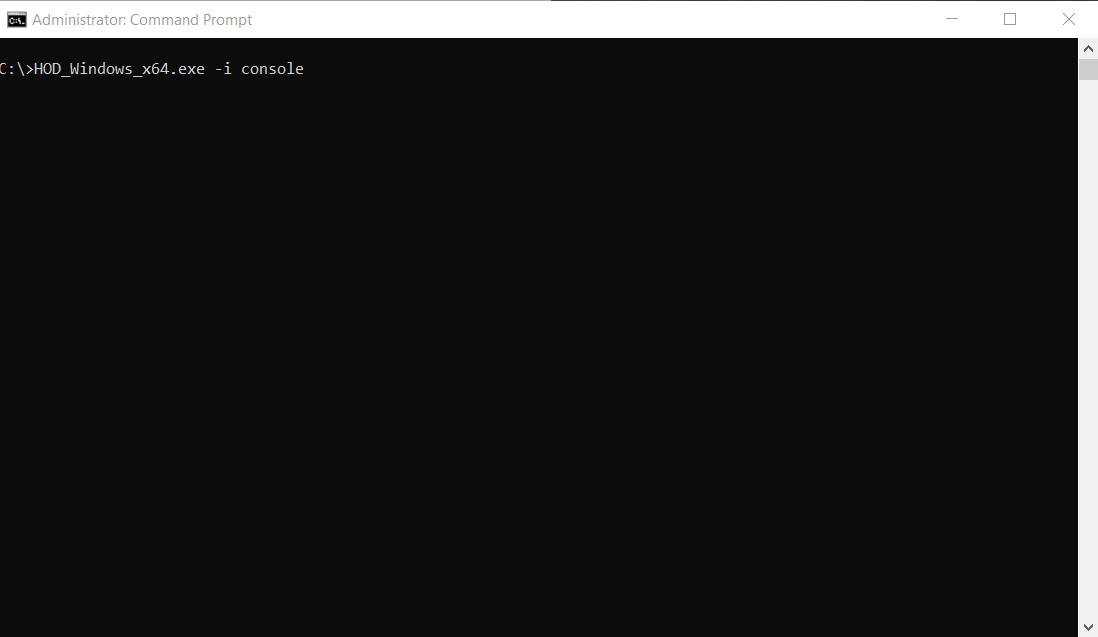

- The preparing console mode installation screen
displays.

- The License Agreement configuration screen
displays.

- For IBM Host-on Demad multiple instance or upgrade, refer to Muliple Instance or Upgrade Installation.
- Multiple language configuration screen displays. By default, the
English language is displayed.
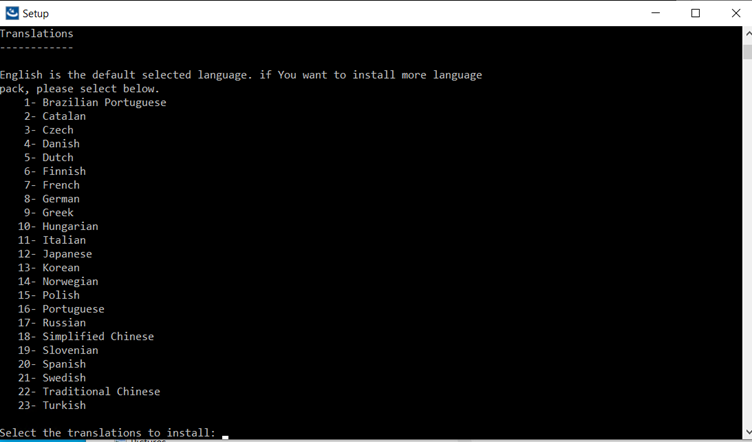
- Choose Install Folder configuration to install the
product screen displays. (Here, the user can choose the
customized folder).

- The Publish Information screen displays.

- The configuration of the Web Server screen displays.
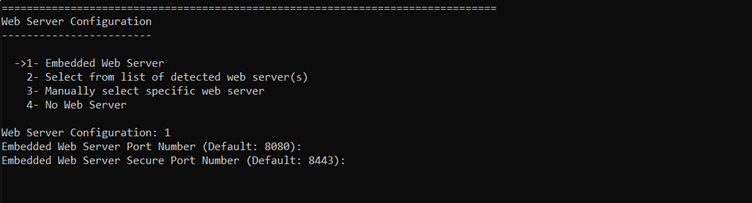
- The configuration Application Server screen displays.
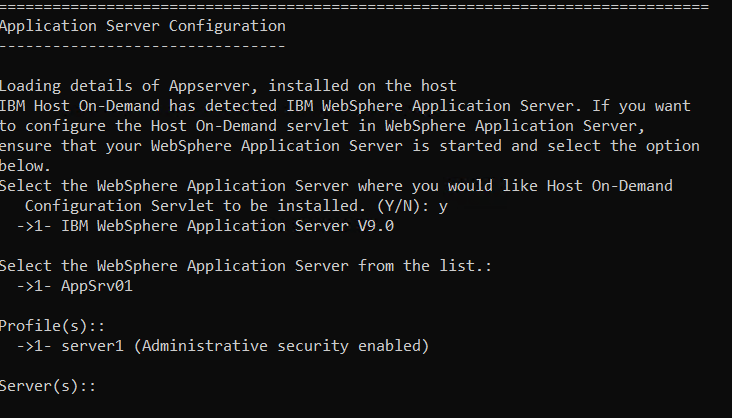
- Validating the Application Server Console Panel screen
displays
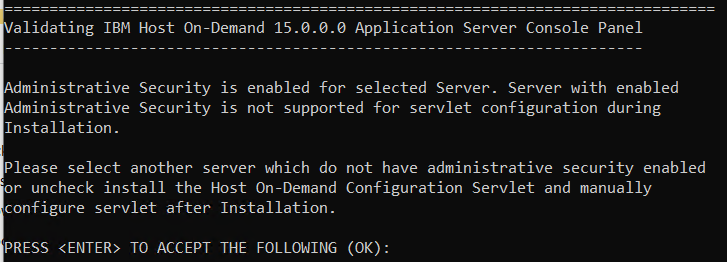
- The Application Server configuration is configured based
on the user-selected application server.
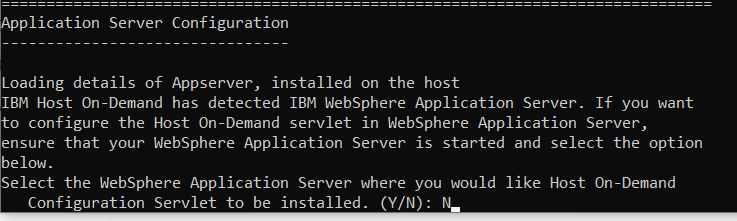
- The Pre-installation Summary configuration screen
displays to review the product details. Example, product
name, installer folder, HOD server location, etc.

- The configuration of the installation process gets
started.

- Once the extraction is completed. The Installation
Complete screen displays.

Installing Deployment Wizard in Console Mode
The Deployment Wizard is automatically installed as part of the Windows Host On-Demand server installation. It is also available separately for those customers who do not wish to install the entire Windows Host On-Demand server. Users can select only Deployment Wizard Option during Installation.
Refer to Installing the IBM Host On-Demand, Deployment Wizard and HACL Tool kit in the Console Mode for more details.
To install and run the Deployment Wizard on Console Mode, perform the following tasks:
- Type in the Command Line to configure the deployment wizard Console mode.

- Multiple language configuration screen displays. By default, the English
language is displayed. .
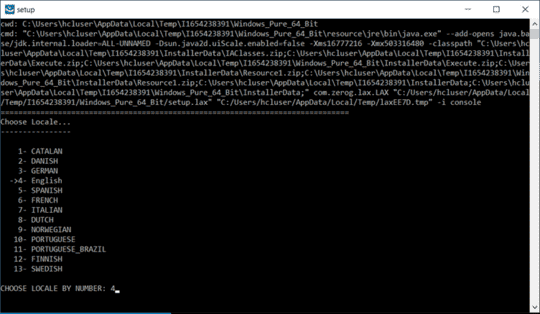
- The Introduction screen displays with preparing console mode
installation.
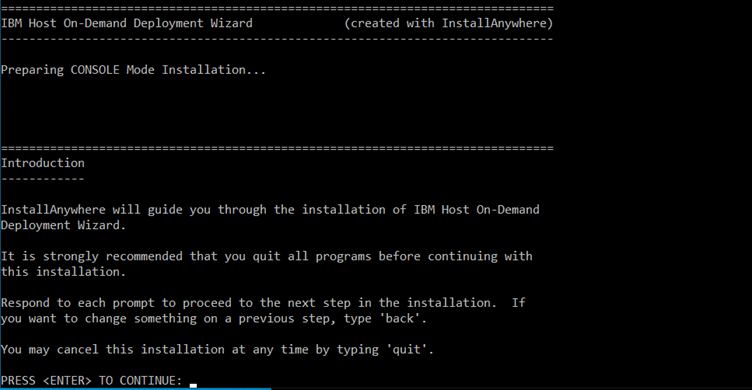
- The License Agreement screen displays. Click I accept the items of the
License Agreement.
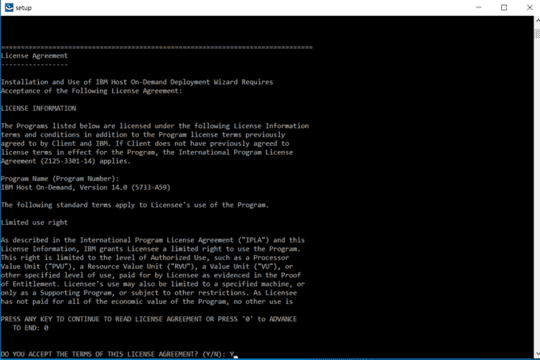
- The Choose Install Folder configuration to install the product screen
displays. (Here, the user can choose the customized
folder).
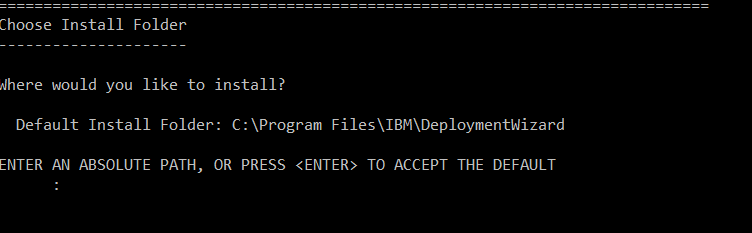
- The Host On-Demand Server Location configuration screen displays.
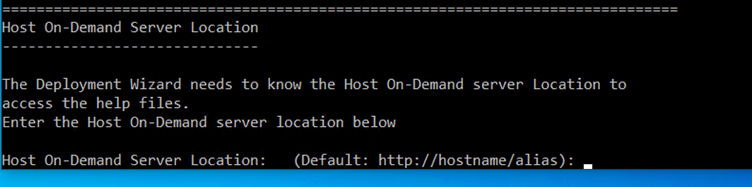
- The Pre-installation Summary configuration screen displays to review the
product details. Example, product name, installer folder,
HOD server location, etc.
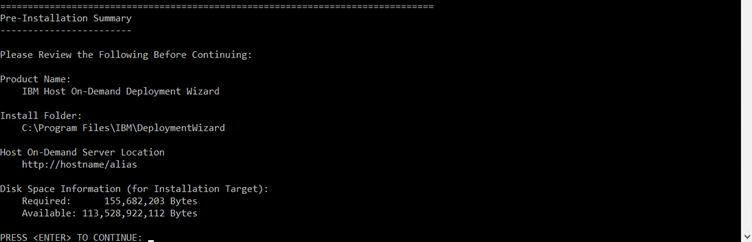
- The configuration of the installation process gets started.

- Once the extraction is completed. The Installation Complete screen
displays.
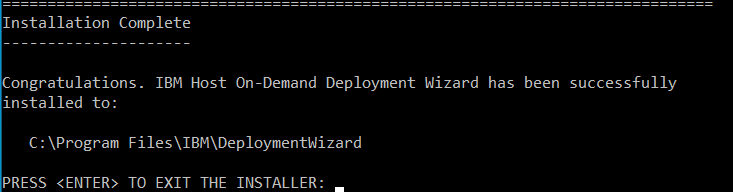
- It creates the shortcut for easy access.
Installing Host Access Toolkit in Console Mode
The Host Access Toolkit is automatically installed as part of the Windows Host On-Demand server installation. It is also available separately for those customers who do not wish to install the entire Windows Host On-Demand server. Users can select only Host Access Toolkit option during Installation.
Refer to Installing the IBM Host On-Demand, Deployment Wizard and HACL Tool kit in the Console Mode for more details.
Find the steps to install:
- Type in the Command Line to configure the Host Access Toolkit Console mode.

- Multiple language configuration screen displays. By default, the English language is
displayed.
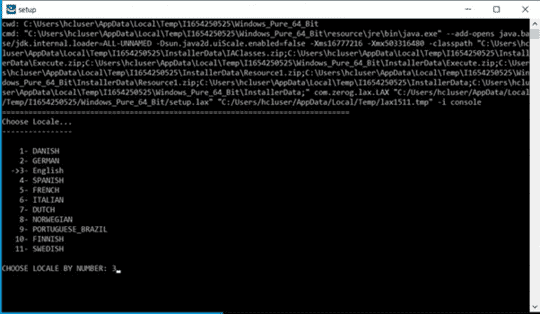
- The Introduction screen displays with preparing console mode installation.
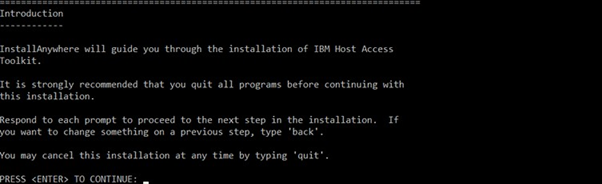
- The License Agreement configuration screen displays.
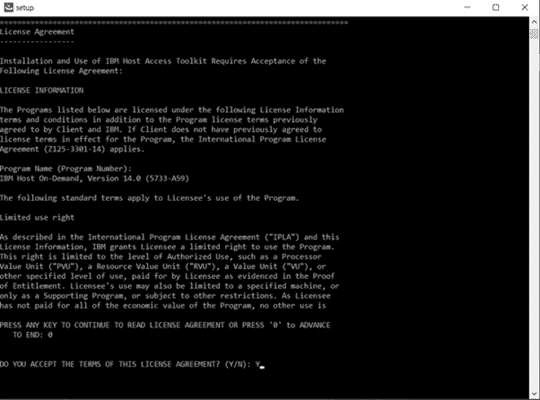
- Translations configuration screen displays. By default, the English language is displayed.
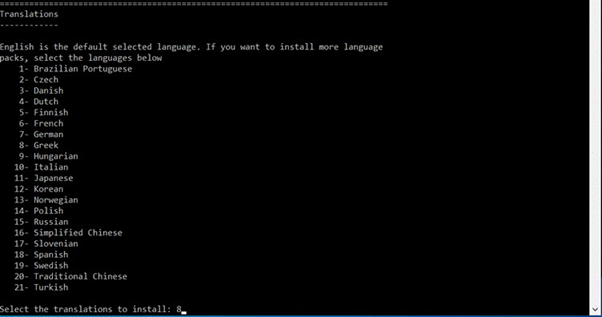
- The Choose Install Folder configuration to install the product screen displays.
(Here, the user can choose the customized folder).

- The Pre-installation Summary configuration screen displays to review the product
details. Example: product name, installer folder, HOD server location, etc.
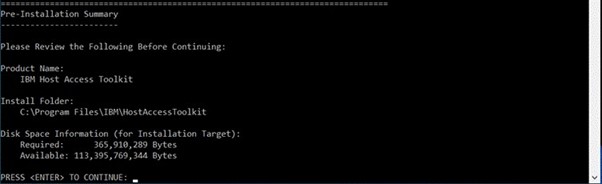
- The configuration of the installation process gets started.

Installing the IBM Host On-Demand, Deployment Wizard and HACL Tool kit in Silent Mode
Installing Host On-Demand using silent mode with use of command line Silent argument. For more information refer the below table.
- Z/OS ISPF shell prompt supports only silent installation.
- If installer.properties files exists on setup file path, installer automatically takes the input from properties file.
Silent installation the user needs to update the installer.properties files with proper input.
| OS Type | Command | More Information | |
|---|---|---|---|
| Windows | IBM Host On-Demand | HOD_Windows_x64.exe -i silent -f installer.properties | Administrator user Command Prompt |
| Deployment Wizard | HOD_DW_Windows_x64.exe -i silent -f installer.properties | Administrator user Command Prompt | |
| HACL Tool kit | HOD_HACL_Windows_x64.exe -i silent -f installer.properties | Administrator user Command Prompt | |
| AIX | Host On-Demand | sh ./setup.bin -i silent -f installer.properties | Root user Terminal client |
| Linux | Host On-Demand | sh ./setup.bin -i silent -f installer.properties | Root user Terminal client |
| Ubuntu | Host On-Demand | sh ./setup.bin -i silent -f installer.properties | Root user Terminal client |
| I5/OS | Host On-Demand | java -jar setup.jar -i silent -f installer.properties | Root (qsh) shell Prompt |
| Z/OS | Host On-Demand | java -jar setup.jar -i silent -f installer.properties | Root user account OMVS or ISPF shell prompt |
- Host On-Demand Silent installer property HOD_JRE_HOME is applicable only for I5/OS, Z/OS, and Linux PPC Big Endian operating systems, for other supporting operating system this properties will not consider by installer, JAVA JRE supports form 1.8 and above releases.
- Host On-Demand installation logs are stored in the user’s temporary path (%temp%\IBM_HostOnDemand\Logs). The Log File format with the product name and time stamp is stored (IBM_Host_OnDemand_Install_07_05_2021_10_33_33.log). .
- GUI input validation are logged in logged file and displays the error messages.
- Silent variable inputs are validated, and Errors, Warning and Information logs are logged on log file.
- If user provided installation folder which is already exists, it throws an error message: "The installation folder C\program Files\IBM\Deployment Wizard exists and contains files".
- Host On-Demand does not support Repair and Modify installation.
-
Host On-Demand Silent installer properties file, if the user specifies IM_UPGRADE_SUPPORT=0, then the IBM Host on Demand 15.0.1 is installed as a New Instance.
If the user specifies IM_UPGRADE_SUPPORT=1 and IM_PRODUCT_NAME=Host On-Demand 14.0.4.0 (C:\\Program Files\\IBM\\HostOnDemand). Then, the IBM Host On-Demand 15.0.1 performs migrate installation.
Host On-Demand Silent Installer Properties Files
# /*
# *+------------------------------------------------------------------------+
# *| Licensed Materials - Property of HCL |
# *| (c) Copyright HCL Technologies Ltd. 2021. All Rights Reserved. |
# *+------------------------------------------------------------------------+
# */
# ---------------------------------------------------------------------------
# Silent Installation properties file
# ---------------------------------------------------------------------------
INSTALLER_UI=silent
# ---------------------------------------------------------------------------
# IBM Host On-Demand supports Multiple/Upgrade Instance Support
# 0 -> To install only one instance
# 1 -> To Support More than one instance or Upgrade Instance
# ---------------------------------------------------------------------------
MI_SUPPORT=0
# ---------------------------------------------------------------------------
# Specify Product Name to install as New instance or Upgrade Instance
# For Upgrade instance Product name with Version
# MI_PRODUCT_NAME=IBM Host On-Demand 2.1.1
# For Multiple/New Instance support
# MI_PRODUCT_NAME=IBM Host On-Demand New Instance
# ---------------------------------------------------------------------------
MI_PRODUCT_NAME=IBM Host On-Demand New Instance
# ---------------------------------------------------------------------------
# IBM Host On-Demand IM Instance upgrade Support
# 0 -> Does Not IM HOD Upgrade Installation
# 1 -> To Support IM HOD Upgrade Installation
# ---------------------------------------------------------------------------
IM_UPGRADE_SUPPORT=0
# Specify Product Name with Installation Path to Migrate Installation Manager installed Instance
IM_PRODUCT_NAME=Host On-Demand 14.0.4.0 (C:\\Program Files\\IBM\\HostOnDemand)
# ---------------------------------------------------------------------------
# IBM Host On-Demand Installation Path
# ---------------------------------------------------------------------------
USER_INSTALL_DIR=C:\\Program Files\\IBM\\HostOnDemand_15.0.0.0
# ---------------------------------------------------------------------------
# IBM Host On-Demand Language Pack Support
# 0 -> Not Install Language Pack
# 1 -> To Install Language Pack
# ---------------------------------------------------------------------------
# For Brazilian Portuguese Language Pack
LANG_PT_BR=0
# For Catalan Language Pack
LANG_CA=0
# For Czech Language Pack
LANG_CS=0
# For Danish Language Pack
LANG_DA=0
# For Dutch Language Pack
LANG_NL=0
# For Finnish Language Pack
LANG_FI=0
# For French Language Pack
LANG_FR=0
# For German Language Pack
LANG_DE=0
# For Greek Language Pack
LANG_EL=0
# For Hungarian Language Pack
LANG_HU=0
# For Italian Language Pack
LANG_IT=0
# For Japanese Language Pack
LANG_JA_JP=0
# For Korean Language Pack
LANG_KO=0
# For Norwegian Language Pack
LANG_NO=1
# For Polish Language Pack
LANG_PL=0
# For Portuguese Language Pack
LANG_PT=0
# For Russian Language Pack
LANG_RU=0
# For Simplified Chinese Language Pack
LANG_ZH_CN=0
# For Slovenian Language Pack
LANG_SL=0
# For Spanish Language Pack
LANG_ES=0
# For Swedish Language Pack
LANG_SV=0
# For Traditional Chinese Language Pack
LANG_ZH_TW=1
# For Turkish Language Pack
LANG_TR=0
# ---------------------------------------------------------------------------
# IBM Host On-Demand Publish Information
# ---------------------------------------------------------------------------
# Publish alias Name
PUBLISH_ALIAS_NAME=hod
# Publish Director name to install publish files
PUBLISH_DIR=HOD
# Publish Port
PUBLISH_PORT=8999
# ---------------------------------------------------------------------------
# IBM Host On-Demand Web Server Configuration
# Web Server Type
# 1 -> Embedded Web server Type
# 2 -> Detected Web server Type
# 3 -> Manually select specific Web server Type
# 4 -> No Web server Type
# ---------------------------------------------------------------------------
WS_TYPE=1
# ---------------------------------------------------------------------------
# Embedded Web Server Type IBM Host On-Demand Installation
# ---------------------------------------------------------------------------
# Web Server Port
WS_PORT=8080
# Web Server SSL Port
WS_SSL_PORT=8443
# ---------------------------------------------------------------------------
# Detected Web server Type IBM Host On-Demand Installation
# ---------------------------------------------------------------------------
#Supported Web Server are APACHE or IIS
WS_DTD_SERVER_TYPE=IIS
# If IIS Webserver type then specify ISS Website Name
WS_DTD_IIS_APPNAME=Default Web Site
# If Apache is selected for installation need to specify apache installed Config Path
# C:\\Program Files (x86)\\Apache Software Foundation\\Apache2.2\\conf\\httpd.conf
WEB_SERVER_CONFIG_FILE=C:\\Program Files (x86)\\Apache Software Foundation\\Apache2.2\\conf\\httpd.conf
# ---------------------------------------------------------------------------
# Manual specify web server Type IBM Host On-Demand Installation
# 1 -> Apache HTTP Server 2.2 or newer
# 2 -> IBM HTTP Server 8.5 or newer
# ---------------------------------------------------------------------------
WS_MAN_SERVER_TYPE=1
# If Apache or HTTP Server is selected for installation need to specify Server Config Path
WS_MAN_CONFIG_FILE=C:\\Program Files (x86)\\Apache Software Foundation\\Apache2.2\\conf\\httpd.conf
# ---------------------------------------------------------------------------
# IBM WebSphere Application Server Configuration
# 0 -> without Application Server Configuration
# 1 -> To Configure WAS Application Server
# ---------------------------------------------------------------------------
APP_SERVER_SELECTED=0
# Application Server Name
APP_SERVER=IBM WebSphere Application Server V9.0
# Application server Profile Name
WAS_PROFILE=AppSrv01
# WAS Server Name
WAS_SERVER=Server1
# ---------------------------------------------------------------------------
# System Level Configuration: Don't change below values until it requires.
# Reboot Parameter on uninstall and install scenarios
# ---------------------------------------------------------------------------
USER_REQUESTED_RESTART=NO
RESTART_NEEDED=NO
Deployment Wizard Slient Installer Properties Files
# /*
# *
+------------------------------------------------------------------------+
# *| Licensed Materials - Property of HCL
|
# *| c) Copyright IBM Corp. 1998, 2020, 2022 all rights reserved.
Copyright HCL Technologies, Ltd. 2020, 2021, 2022.
|
# *
+------------------------------------------------------------------------+
# */
#
---------------------------------------------------------------------------
# Silent Installation properties file
#
---------------------------------------------------------------------------
INSTALLER_UI=silent
#
---------------------------------------------------------------------------
# IBM Deployment Wizard Installation Path
#
---------------------------------------------------------------------------
USER_INSTALL_DIR=C:\\Program Files\\IBM\\DeploymentWizard
#
---------------------------------------------------------------------------
# IBM Host On-Demand Server Location
#
---------------------------------------------------------------------------
HOD_SERVER=http://hostname/alias
#
---------------------------------------------------------------------------
# System Level Configuration: Don't change below values until it requires.
# Reboot Parameter on uninstall and install scenarios
#
---------------------------------------------------------------------------
USER_REQUESTED_RESTART=NO
RESTART_NEEDED=NOHost Access ToolKit Slient Installer Properties File
# /*
# *+------------------------------------------------------------------------+
# *| Licensed Materials - Property of HCL |
# *| (c) Copyright IBM Corp. 1998, 2020, 2022 all rights reserved.
Copyright HCL Technologies, Ltd. 2020, 2021, 2022. |
# *+------------------------------------------------------------------------+
# */
# ---------------------------------------------------------------------------
# Silent Installation properties file
# ---------------------------------------------------------------------------
INSTALLER_UI=silent
# ---------------------------------------------------------------------------
# IBM Host Access Tool kit Installation Path
# ---------------------------------------------------------------------------
USER_INSTALL_DIR=C:\\Program Files\\IBM\\HostAccessToolkit
# ---------------------------------------------------------------------------
# IBM Host Access Tool kit Language Pack Support
# 0 -> Not Install Language Pack
# 1 -> To Install Language Pack
# ---------------------------------------------------------------------------
# For Brazilian Portuguese Language Pack
LANG_PT_BR=0
# For Czech Language Pack
LANG_CS=0
# For Danish Language Pack
LANG_DA=0
# For Dutch Language Pack
LANG_NL=0
# For Finnish Language Pack
LANG_FI=0
# For French Language Pack
LANG_FR=0
# For German Language Pack
LANG_DE=0
# For Greek Language Pack
LANG_EL=0
# For Hungarian Language Pack
LANG_HU=0
# For Italian Language Pack
LANG_IT=0
# For Japanese Language Pack
LANG_JA_JP=0
# For Korean Language Pack
LANG_KO=0
# For Norwegian Language Pack
LANG_NO=1
# For Polish Language Pack
LANG_PL=0
# For Russian Language Pack
LANG_RU=0
# For Simplified Chinese Language Pack
LANG_ZH_CN=0
# For Slovenian Language Pack
LANG_SL=0
# For Spanish Language Pack
LANG_ES=0
# For Swedish Language Pack
LANG_SV=0
# For Traditional Chinese Language Pack
LANG_ZH_TW=1
# For Turkish Language Pack
LANG_TR=0
# ---------------------------------------------------------------------------
# System Level Configuration: Don't change below values until it requires.
# Reboot Parameter on uninstall and install scenarios
# ---------------------------------------------------------------------------
USER_REQUESTED_RESTART=NO
RESTART_NEEDED=NO- Actors /Impacted users: IBM Host On-Demand for Windows, AIX, Linux, Ubuntu, and IBM supported Platform users.
- Post-Conditions: In rear scenario, if service or process are not configured and running state, configure manually and start the service.
Migrate Installation for Host On-Demand
Host On-Demand supports migrate installation from v14, and v15.
- IBM Host On-Demand v15.0.1 search the IBM Installation manager installed Host On-Demand displays on Migrate installation Dialog.
- Host On-Demand v15.0.1 search installation manager Host On-Demand installed path
only on below system location:
- Linux Platform -> /usr/ /opt/ /home/
- OS400(i5/OS) -> /usr/ /opt/ /QIBM/ /home/
- OS390(IBM z/OS) -> /usr/ /opt/
-
On Silent installation, if the user wants to use the installation manager's custom installation location, they need to add an extra argument with the installation path of the Installation manager.
(IM_INSTALLED_PATH= /OPT/IBM/INSTALLATIONMANAGER).
Note: On Console mode installation, if user use custom installed location of installation manager, it need to pass extra argument with proper installation path of installation manager. (-DIM_INSTALLED_PATH=/OPT/IBM/INSTALLATIONMANAGER).Note: In case migrate installation fails, the user needs to install v15.0.1 and then copy the user configured files from installation Manager Host On-Demand installed path to v15 installation path manually.
Host On-Demand Migrate in GUI Mode
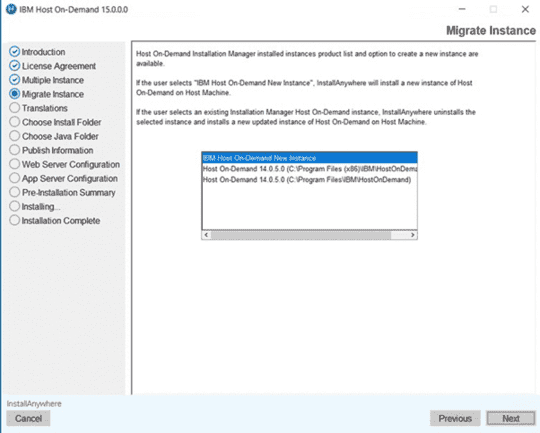
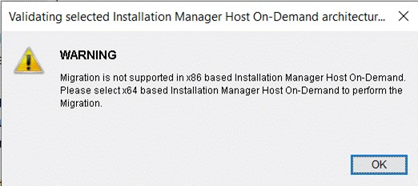
Host On-Demand Migration in Console Mode
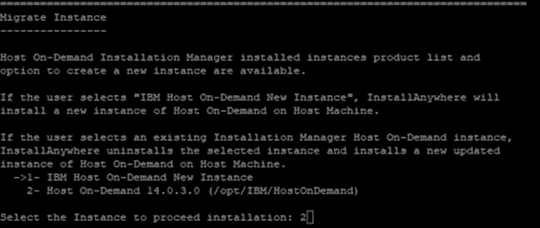
Muliple Instance or Upgrade Installation
- IBM Host On-Demand v15.0.1 search the previous installed release of IBM Host On-Demand v15.0 and displays on Multiple Instance dialog.
- IBM Host On-Demand v15.0.1 supports multiple instances, suppose user wants to install latest release as separate product whichever version is already installed needs to select "IBM Host On-Demand New Instance" in multiple instance dialog and provide different installation path and port to configure as multiple instance installation.
- IBM Host On-Demand v15.0.1 supports upgrade instance from v15.0, suppose user wants to
perform upgrade installation from v15.0 to v15.0.1, then needs to select "IBM Host
On-Demand 15.0.0.0" in multiple instance dialog and it performs upgrade installation with
base product configurations.Note: In case Upgrade installation fails, the user needs to install v15.0.1 in separate path and different portals multiple instance type installation and then copy the user configured files from previous installed Host On-Demand location to v15.0.1 installation path manually.
GUI Mode Multiple Instance or Upgrade Installation
The IBM Host On-Demand v15.0 is installed on the host. IBM Host On-Demand 15.0.1 displays a multiple instance dialog with IBM Host On-Demand New Instance and IBM Host
On-Demand installed product list. If the user selects "IBM Host On-Demand New Instance," it is installed as New Instance (Multiple versions installed on same host with different configurations). If the user selects IBM Host On-Demand 15.0.0.0, it performs upgrade installation with base configurations.
Console Mode Multiple Instance or Upgrade Installation
The IBM Host On-Demand v15.0 is installed on the host. IBM Host On-Demand 15.0.1 displays a multiple instance console dialog with IBM Host On-Demand New Instance and IBM Host
On-Demand installed product list. If the user selects "IBM Host On-Demand New Instance," it is installed as New Instance (Multiple versions installed on same host with different configurations). If the user selects IBM Host On-Demand 15.0.0.0, it performs upgrade installation with base configurations.


Silent Mode Multiple Instance or Upgrade Installation
The IBM Host On-Demand v15.0.1.0 supports silent mode installation either upgrade scenario or multiple instance type installation.
For more information, refer to Installing the IBM Host On-Demand, Deployment Wizard and HACL Tool kit in Silent Mode.
Deployment Wizard Upgrade Installation
IBM Host On-Demand Deployment Wizard supports Upgrade installation from v15.0.1
- Launch the v15.0.1 Deployment Wizard installer.
- The IBM Host On-Demand Deployment Wizard window appears, click OK.

- The Introduction screen appears, click Next.

- The License Agreement screen appears. Click the I accept the terms of the License
Agreement check box, and click Next.

- The Select Install Folder screen appears, click Next.
 Note: During upgrade, the user will not able to change the installation path.
 - The Host On-Demand Server Location screen appears. Enter the Host On-Demand
server location in the field, and click Next.
 Note: Previous configured Host On-Demand server location will be retained.
 - The Pre-Installation Summary screen appears. Review the summary details, and
click Upgrade.

- The upgrade process gets start .
 Note: During an upgrade, the installer uninstalls the existing version and installs the latest version.
 - After successful upgradation, the Install Complete screen appears. Click
Finish.

Host Access Toolkit Upgrade Installation
IBM Host Access Toolkit supports Upgrade installation from v15.0.1.
- Launch the v15.0.1 IBM Host Access Toolkit installer.
- The IBM Host On-Demand Deployment Wizard window appears, click OK.

- The Introduction screen appears, click Next.

- The License Agreement screen appears. Click the I accept the terms of the
License Agreement check box, and click Next.

- The Translation screen appears. Select the translations, and click Next.

- The Select Install Folder screen appears. Select the required folder path, and
click Next.

- The Pre-Installation Summary screen appears. Review the summary details, and
click Upgrade.

- The upgrade process gets start .

- After successful upgradation, the Installation in Progress screen
appears.

- After successful installation, the Install Complete screen appears. Click
Finish.

Installing the Configuration Servlet
During the Host On-Demand installation, the user choose to have the configuration servlet installed and configured on i/OS, OS/400, Windows, AIX, Linux, and Solaris for HOD Application Server.
|
All Web servers and servlet engines are configured differently. Check the Web server and servlet engine documentation for servlet configuration details on the operating system. |
- The user plan to configure Host On-Demand so that client communication with the Service Manager is necessary (as in the configuration server-based and combined deployment models, if the user enable License-Use Counting, or if the user use the Redirector).
- A firewall protects the server(s) on which the user plan to maintain session configuration information, and the user do not want to open a port in that firewall to give outside clients access to the Service Manager.
App Server Configuration
App Server Configuration Panel displays only when the IBM WebSphere application server is installed on the host. If not, this panel will skip during the installation phase.
For more information refer, Install Host On-Demand using GUI Mode.
For the Non-Windows platform, the IBM Host On-Demand 15.0.1 Application server configuration supports only when IBM WebSphere is installed on this location (/usr or /opt or /home).
An IBM WebSphere Application Server with administrative security is enabled and it does not support servlet configuration.
Deploying the servlet on WebSphere Application Server
During Host On-Demand installation on Windows, AIX, Linux, and Solaris, the install utility searches your system for an instance of WebSphere Application Server. If it detects an instance, the install utility can automatically install and configure the configuration servlet on WebSphere Application Server Versions 7.0, 8.0, and 9.0
For platforms that do provide an installation program such as System
z and others, you will need to manually install the configuration
servlet. Refer to your WebSphere Application Server documentation
for steps on installing enterprise applications. You can also go to http://www.ibm.com/software/webservers/ and
navigate to the WebSphere Application Server support page, where you
can find a link to the documentation of your version.
The Host On-Demand configuration servlet EAR file, cfgservlet.ear, is located in the lib directory of your Host On-Demand installation.
|
For WebSphere Application Server 5: After you save your deployment settings in the administrative console, you need to start the Host On-Demand configuration servlet in the Enterprise Applications window of WebSphere Application Server. Then go to the Environment window and select Update Web Server Plug-in. |
After the configuration servlet is installed, you can configure
your clients to use the configuration servlet instead of directly
accessing the Service Manager. You can use the Deployment Wizard to
build customized HTML client pages. The wizard sets the applet parameters
in the HTML based on your input, so you do not have to learn the syntax
and valid parameter values. IBM recommends that you use the Deployment
Wizard to set the ConfigServerURL parameter in the client HTML to HODConfig/HODConfig/hod.
For more information regarding configuration servlet parameters, configuration and examples, see Configuring the configuration servlet.
Uninstalling the Host On-Demand Server
Host On-Demand supports uninstallation when user installs the product on Host Server ( Windows, Linux, AIX, IBM Z/OS and IBM i5/OS) Operating systems.
HOD, DW and HACL supports three modes of uninstallation, they are:
Pre-requistes for Uninstalling the Host On-Demand Server
| Operating System | Prerequisite | Additional Information |
|---|---|---|
| Windows | Only Administrator can uninstall Host On-Demand | Other than non-Admin user, can uninstall with Administrator credentials. |
| AIX, Linux, Ubuntu, Z-OS, I5/OS | Root user can uninstall Host On-Demand | Other than non-root user, can uninstall with root access. |
| Z-OS, I5/OS | Java 11 and Root user to uninstall Host On-Demand | Other than non-root user, can uninstall with root access. |
- The IBM Host On-Demand for Windows, AIX, Linux, Ubuntu, and IBM supported Platform users.
- In case, if IBM Host On-Demand service or process are not deleted, please stop the process, and delete it manually.
Uninstall Host On-Demand in GUI MODE
Find the following procedure to Uninstall Host On-Demand GUI Mode:
- Open Control Panel.
- In Program, go to Uninstall a Program.
- Select the appropriate file to Uninstall.

- Right-click on the selected file and Click Uninstall.
- The Uninstall IBM Host On-demand screen displays

- Select the Uninstalling… radio button and click Uninstall

. - Once the Uninstall is complete, the following screen get displayed as below.

- Click Done.
Host On-Demand supports GUI uninstallation, refer the below table. The uninstall file exists on the Host On-Demand installed path → "install" directory.
| Operating System | Command | More Information |
|---|---|---|
| AIX | sh ./uninstall | Root user Terminal client |
| Linux | sh ./uninstall | Root user Terminal client |
| Ubuntu | sh ./uninstall | Root user Terminal client |
- All files and folders will be deleted except ‘private’ directory.
- User created files are retained on uninstallation.
- AIX, Linux, and Ubuntu Process “admin.NCServiceManager” Process are stopped on uninstallation.
- Product Symbolic links are deleted on uninstallation
- Host On-Demand uninstall log are stored on User temp Path (%temp%\ IBM Host
On-Demand\Logs). File name format with product name and time stamp
(IBM_Host_On-Demand_Uninstall_07_05_2021_10_33_33.log).Note: IBM Host On-Demand for AIX, Linux, and Ubuntu supported Platform users. In case, if the process are not deleted, please stop the process, and delete it manually.
Uninstalling the Deployment Wizard
- Open Control Panel.
- In Program, go to Uninstall a Program.
- Select the appropriate file to Uninstall.

- Right-click on the selected file and Click Uninstall.
- The Uninstall IBM Host On-demand screen displays.
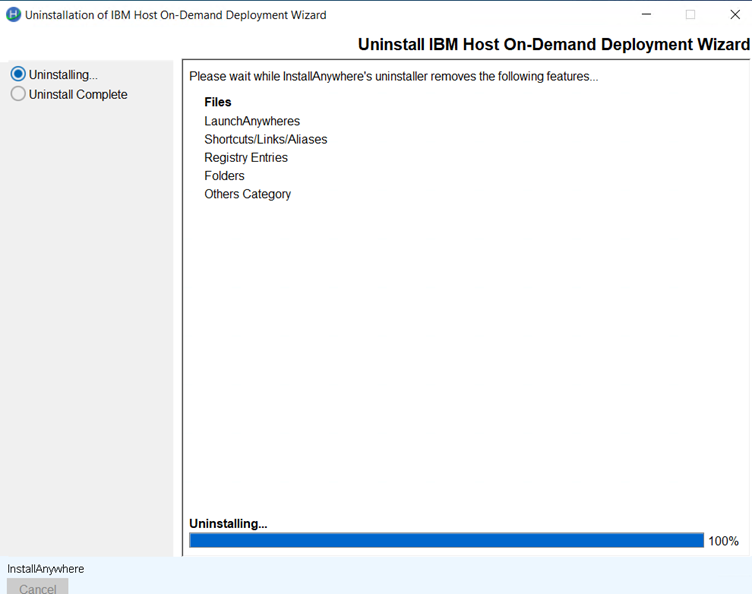
- Select the Uninstalling… radio button and click Uninstall.
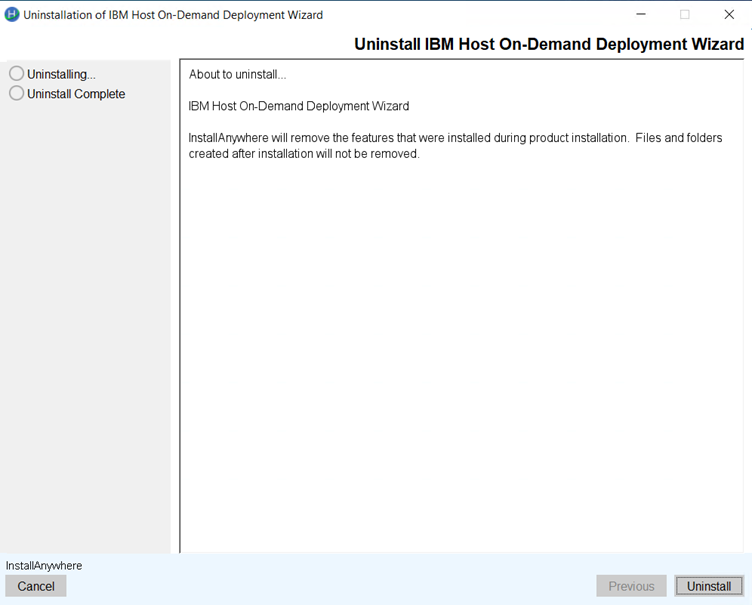
- Once the Uninstall is complete.
- Click Done.
Deployment Wizard Uninstallation Flow Command line Console Mode
Find the below procedure to Uninstall the deployment wizard using console mode:
- Type in the Command Line to uninstall the deployment wizard Console
mode.
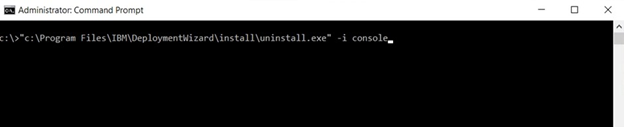
-
The preparation to uninstall screen displays.
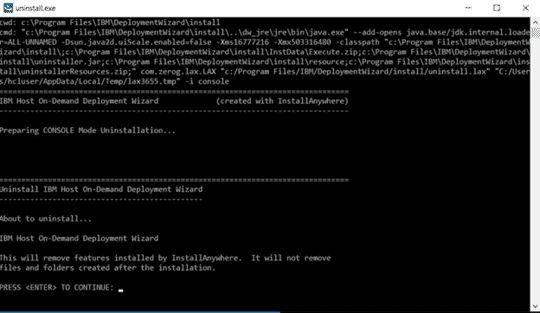
- The Uninstall Progress screen displays.
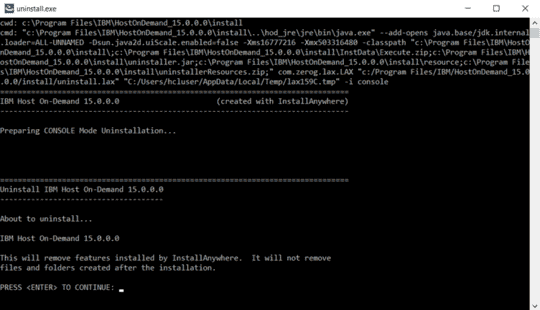
Uninstalling Host On-Demand using Console Mode
The user use console mode to uninstall packages. To uninstall, the user must be the administrator or log in with the administrator privilege.
| Operating System | Command | More Information |
|---|---|---|
| Windows | Uninstall.exe -i console | Administrator user Command Prompt |
| AIX | sh ./uninstall -i console | Root user Terminal client |
| Linux | sh ./uninstall -i console | Root user Terminal client |
| Ubuntu | sh ./uninstall -i console | Root user Terminal client |
| I5/OS | Java -jar uninstall.jar -i console | Root (qsh) schell Prompt |
| Z/OS | Java -jar uninstall.jar -i console | Root user account OMVS or ISPF shell prompt |
HOD Uninstall Console mode Command Line
- Type in the Command Line to uninstall the Host
On-Demand.

- The preparing to uninstall screen displays.

- The Uninstall Progress screen displays.

Uninstalling Host On-Demand using Silent Mode
The user use silent mode to uninstall packages. To uninstall, the user must be the administrator or log in with the administrator privilege.
Uninstallation of IBM Host On-Demand on silent mode, user needs to launch the uninstalled setup files using the Administrator command prompt with use of uninstall setup file (uninstall.exe for Windows, uninstall for Linux Platform and uninstall.jar for I5/OS and Z/OS), file exists on HOD installation directory /install folder.
Follow below table to perform the uninstallation.
| Operating System | Command | More Information |
|---|---|---|
| Windows | uninstall.exe -i silent | Administrator user Command Prompt |
| AIX | sh ./uninstall -i silent | Root user Terminal client |
| Linux | sh ./uninstall -i silent | Root user Terminal client |
| Ubuntu | sh ./uninstall -i silent | Root user Terminal client |
| I5/OS | Java -jar uninstall.jar -i silent | Root (qsh) schell Prompt |
| Z/OS | Java -jar uninstall.jar -i silent | Root user account OMVS or ISPF shell prompt |
- All files and folders will be deleted except ‘private’ directory.
- User created files are retained on uninstallation.
- Services and process
- Windows “IBM Host On-Demand” service deleted on Service control manager during uninstallation.
- AIX, Linux, Ubuntu, IBM I5/OS and Z/OS Process “admin.NCServiceManager” Process are stopped on uninstallation.
- Windows Start Menu -> IBM Host On-Demand shortcuts folders are deleted on uninstallation
- Product Registry entries are deleted on uninstallation
- Product Shortcuts are deleted on uninstallation
- Product Symbolic links are deleted on uninstallation
- Host On-Demand uninstall log are stored on User temp Path (%temp%\ IBM Host On-Demand\Logs). File name format with product name and time stamp (IBM_Host_On-Demand_Uninstall_07_05_2021_10_33_33.log).
- If user installs on console mode installation, from Control panel Add/Remove
program uninstallation will perform on silent mode. If user uninstalls command
line with console argument, then it will display uninstallation steps to
proceed uninstallation.Note: IBM Host On-Demand for Windows, AIX, Linux, Ubuntu, and IBM supported Platform users. In case, if service or process are not deleted, please stop the process, and delete it manually.
Uninstalling the Host Access Toolkit
Find the following procedure to Uninstall Host Access Toolkit:
- Open Control Panel.
- In Program, go to Uninstall a Program.
- Select the appropriate file to Uninstall
- Right click on the installed program, the following screen displays
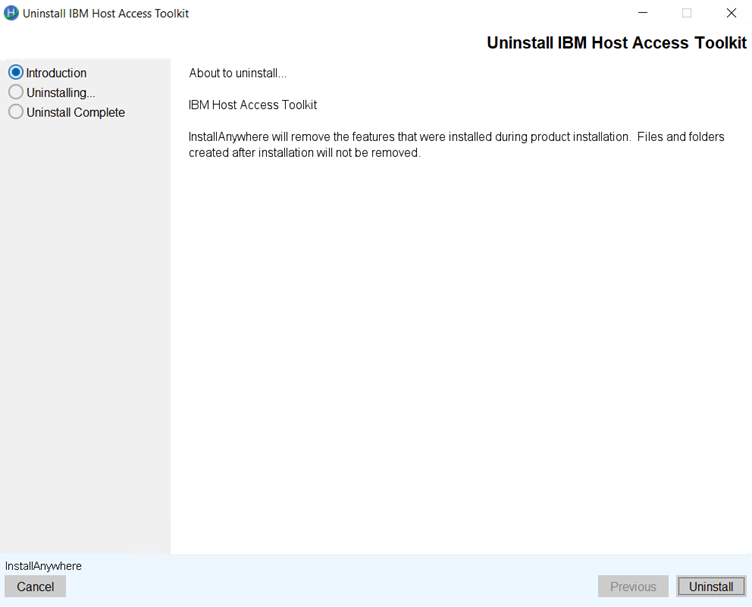
- Select the radio button and click Uninstall. The following Uninstall in
progress screen get displays.
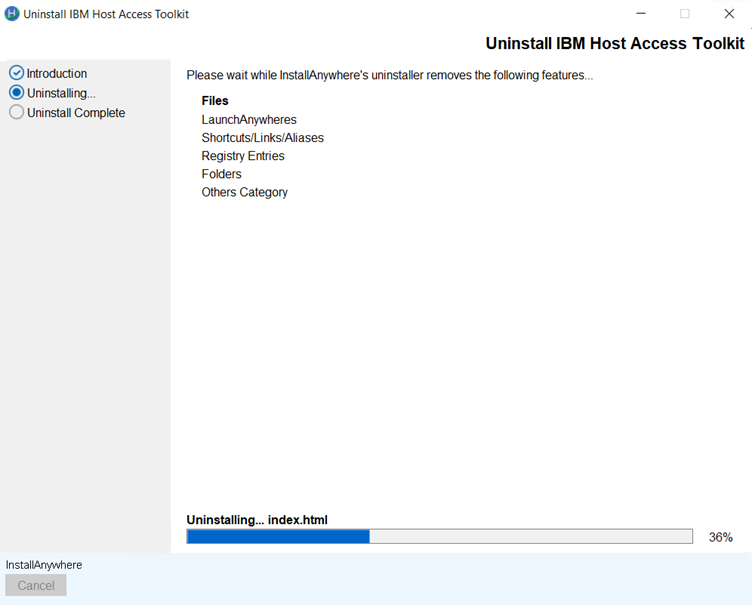
- Once the Uninstall is complete, the following screen get displays.

- Click Done.
Host Access Tool Kit Uninstallation Flow Command Line
- Type in the Command Line to uninstall the Host On-Demand.

- The preparing to uninstall screen displays.
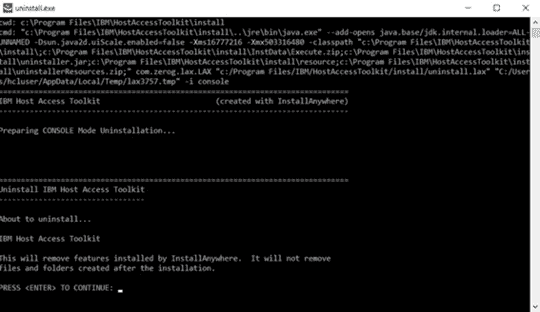
- The Uninstall Progress screen displays.

Configuring Host On-Demand
Configuring Host On-Demand emulator clients
After installing Host On-Demand, you need to create HTML files and configure Host On-Demand sessions for your users.
|
Host On-Demand provides a sample HTML file
of ready-to-use 3270, 5250, VT, and FTP emulator sessions pre-configured
with download client and Java auto-detection components. These sessions
use the HTML-based configuration model and are provided to allow you
to get Host On-Demand up and running and access your host systems
quickly. To use these emulator sessions, take the following steps:
|
Creating Host On-Demand HTML files
The best way to create and set up your HTML files for Host On-Demand is to use the Deployment Wizard. The Deployment Wizard allows you to easily create custom HTML files that contain all of the Host On-Demand features tailored for your environment. The following is a list of some of the many features that can be configured using the Deployment Wizard:
- Configuration models. Configuration models define the high-level approach you wish to follow with regard to where you define your sessions and where any user preferences are kept. For more information about configuration models, refer to Planning for deployment.
- Preloads. Host On-Demand runs as an applet or application and must download code to the users' machines. By default, the Host On-Demand client downloads all of the components, but you may reduce the download size by removing those components that are not needed.
- Cached client, Web Start client, or Download client. Cached clients retain the code the first time users access the HTML file, and store it on the users' machines. The Web Start client caches the client code like the Cached client but additionally allows you to run Host On-Demand without a browser. Download clients download the necessary applet files each time users access the HTML files.
- Web page appearance (custom HTML templates). You can easily set up a template that the Deployment Wizard will use to generate your HTML files. This feature makes it easy to add your own background, banners, etc.
- Cached Client/Web Start options. When running the cached client or Web Start client, the code must be upgraded when newer versions of the client are available. You can use a number of Deployment Wizard options to control the upgrades.
- Location of the Host On-Demand install (code base). Usually, Deployment Wizard files are placed in the Host On-Demand server's publish directory. However, sometimes it may be useful to put these files in a location that is independent of the Host On-Demand server so that they can be granted different security controls or make Host On-Demand server upgrades easier, for example.
- WebSphere Portal. WebSphere Portal provides a framework for plugging content extensions known as portlets into a Web site. Portlets are applications that organize content from various sources and display it on a single HTML file in a browser window. The HTML files that are used to launch Host On-Demand sessions can be deployed as portlets, allowing users to access Host On-Demand through a portal interface.
- Windows Domain logon. If your users are logged on to a Windows domain, this option automatically logs users on to Host On-Demand using their Windows user name. This option is available only when using the configuration server-based model in the Deployment Wizard.
- Session Manager APIs. The Host On-Demand Session Manager provides JavaScript APIs for managing host sessions and text-based interactions with host sessions. These APIs are intended to provide support for embedding host sessions into a Web page using JavaScript and can be enabled with the Deployment Wizard.
|
To use the Web Start client, you need to use the Deployment Wizard. Predefined files for this client type are not provided. |
Configuring Host On-Demand sessions
In addition to setting up your HTML files, you need to define sessions for your users. If you are using the HTML-based model, then you configure your sessions in the Deployment Wizard at the same time that you create the HTML files. Otherwise, if you are using the configuration server-based model or the combined model, or using one of the predefined clients, you will need to create groups, users, and sessions in the configuration server using one of the administration clients.
There is a full range of options available to you when you are configuring your sessions, regardless of whether you need to use the Deployment Wizard or one of the administration clients:
- Session properties. All of the session properties can be configured, including connection information, security, etc. Each of the fields may be locked to prevent users from updating them.
- Runtime options. When configuring a session, you can launch the session and configure features such as session size and placement, colors, toolbar customization, and macros. You can configure runtime options in the Deployment Wizard and the Full administration client.
- Disabling user functions. You can disable almost any of the functions that users normally receive as part of their Host On-Demand session, such as bookmarking, creating or running macros, etc.
Using the Deployment Wizard
- If you automatically installed the Deployment Wizard as part of the Windows Host On-Demand server, go to Start > Programs > Host On-Demand > Administration > Deployment Wizard.
The Deployment Wizard guides you through configuration choices and provides comprehensive help for the features. When you have finished selecting features, the Deployment Wizard creates the HTML and supporting files for you. These files need to be placed on the Host On-Demand server in a directory known to your Web server; usually, this directory is your Host On-Demand server's publish directory.
Distributing the Deployment Wizard output to your Host On-Demand server
If your Host On-Demand server is on a Windows or IBM System i platform, you might be able to write your Deployment Wizard HTML and configuration files directly to your Host On-Demand server's publish directory. On the final screen of the Deployment Wizard, you can select where to write the generated files. You may select any local or network drive accessible by the machine where your Deployment Wizard is running. In this case, you would direct the Deployment Wizard output to a publish directory on the Host On-Demand server and specify an output format of HTML. Assuming that you have already defined your sessions, the HTML page is then ready to be accessed by your users.
Otherwise, if your Deployment Wizard cannot directly write to your Host On-Demand server, then you should select to have the Deployment Wizard generate a zip file for the output format. The Deployment Wizard will then produce a single zip file containing all of the HTML and supporting files. You will need to move the zip file to the Host On-Demand server and use DWunzip to extract the zip file into the the publish directory. Assuming that you have already defined your sessions, the HTML page is then ready to be accessed by your users.
Using Host On-Demand administration and new user clients
Host On-Demand supplies several predefined clients for administering Host On-Demand and creating new user accounts. Before accessing an emulator client or a Database On-Demand client that uses the configuration server-based or combined deployment models, you need to add users and configure sessions for them with one of the administration or full administration clients.
Loading administration and new user clients
To load an administration or new user client, do one of the following:
- Specify the full URL of the HTML file in your browser:
where server_name is the host name or IP address of the Host On-Demand server, hod_alias is the alias (or path) of the publish directory, and client_name is the HTML file name of the administration or new user client. For example, you can download the cached version of the administration client from the Web server by specifying a URL such as the following:http://server_name/hod_alias/client_name.htmlhttp://host.yourcompany.com/hod/HODAdminCached.htmlTo log on as the administrator the first time after the initial installation:- Type the default user ID: admin.
- Type the default password: password.
- Click Log On.
- Load the HODMain_xx.html file, where xx is your two-letter language suffix, into your browser to view links to all the available administration and new user clients, plus other predefined clients. HODMain_xx.html is located in the publish directory.
Administration clients
- Manage users, groups, and sessions
- Configure, manage and trace the Re-director service
- Configure Database On-Demand
- Enable security
- View trace and message logs
- Disable functions to end users
Administration clients run on all Host On-Demand client platforms except the Macinstosh operating system. If you are creating HTML files in the Deployment Wizard using either the configuration server-based or combined models, you need to configure sessions on the configuration server using an administration client. Refer to Basic Configuration Steps for more detailed information about configuring the Host On-Demand configuration server.
Host On-Demand supplies the following predefined administration and full administration clients:
- Administration client (HODAdmin.html)
- Loads the download version of the administration client.
- Administration client cached (HODAdminCached.html)
- Loads the cached version of the Administration client. The advantage
of using this client is that it can be cached along with the cached
client in the browser.
To bookmark the cached Administration client, you need to manually create the bookmark. It must point to HODAdminCached.html, so that Host On-Demand can compare the cached version to the server version. This allows Host On-Demand to recognize and notify you that a newer version of the cached Administration client is available at the server. - Administration client cached with problem determination (HODAdminCachedDebug.html)1
- Loads the Administration client in a cached environment with problem determination (session logging and tracing) enabled.
- Full Administration client (HODAdminFull.html)2
- Loads the download version of the full Administration client. The full administration client gives the administrator the additional ability of starting sessions to configure runtime properties. However, the download size of the full administration client is larger than the download size of administration client.
- Full Administration client cached (HODAdminCachedFull.html)2
- Loads the cached version of the full Administration client. Like the cached version of the regular Administration client, this client can be cached along with the cached client in the browser.
- Full administration client cached with problem determination (HODAdminCachedDebugFull.html)1, 2
- Loads the cached version of the full Administration client with problem determination (session logging and tracing) enabled.
- Use the problem determination clients only if you are working with Support to resolve a problem with your Host On-Demand installation.
- The full Administration client is the Administration client with Start Session enabled.
- If you use a Java–enabled browser, you need to use the Java Control Panel to remove the Administration cached client. For instructions, refer to Using the Java 2 Plug-in .
Directory Utility
- Add, update, and delete groups
- Add, update, and delete users from groups
- Add, update, and delete sessions from users or groups
- List existing users and groups in output files, as products of unique searches
- List existing users and groups in output files that can be reused as input
|
|
Searches performed with the list action are either user-based (returning user-specific information) or group-based (returning group-specific information). LDAP environments, however, support only user-based searches. |
New user clients
If the administrator has enabled Allow users to create accounts in the Users/Groups window, users can use the predefined new user clients to create new accounts. See Enabling users to create accounts for more information about this client.
The following new user clients are supplied with Host On-Demand:
- New user client (NewUser.html)
- Loads the download version of the New user client.
- New user client cached (NewUserCached.html)
- Loads the New User client in a cached environment.
- New user client with problem determination (NewUserCachedDebug.html)1
- Loads the New User client in a cached environment with problem determination (session logging and tracing).
Using Host On-Demand emulator clients
This chapter discusses issues that you need to be aware of when configuring and using Host On-Demand terminal emulator clients.
- Loading emulator clients describes how to access Host On-Demand emulator clients.
- Selecting the appropriate client discusses how to decide which client is best for your needs.
- Cached clients discusses how to use cached clients, including installing and removing them, deploying them over the Internet, support for Windows and Mac OS X, and troubleshooting problems.
- Web Start client discusses how to use the Web Start client, including installing and removing it, configuring your Web browser, using Web Start with Windows restricted users, and upgrading.
- Download clients discusses how to use download clients, including installing them and loading them after downloading a cached client or Web Start client.
- Predefined emulator clients describes the predefined emulator clients supplied with Host On-Demand.
- Reducing client download size discusses strategies for reducing the download size of clients.
- Deploying customer-supplied Java archives and classes describes how to deploy Java archives and class files to your clients.
Loading emulator clients
|
Host On-Demand provides a sample HTML file of ready-to-use 3270, 5250, VT, and FTP emulator sessions pre-configured with download client and Java auto-detection components. These sessions use the HTML-based configuration model and are provided to allow you to get Host On-Demand up and running and access your host systems quickly. For more information, refer to Configuring Host On-Demand emulator clients. |
- An HTML file that you create with the Deployment Wizard.
- One of several generic predefined HTML files included with Host On-Demand
|
If your emulator client is deployed with the configuration server-based or combined deployment model, you need to add users and configure sessions with the administration client before you can use the emulator client. |
http://server_name/hod_alias/client_name.htmlhttp://host.yourcompany.com/hod/3270sessions.htmlTo launch a predefined HTML file included with Host On-Demand, point your browser to HODMain_xx.html file, where xx is your two-letter language suffix, to view links to all the available predefined clients. HODMain_xx.html is located in the publish directory.
When you access a client, a security warning appears to notify you that Host On-Demand was created by International Business Machines. Users must grant Java security privileges for this session or any future sessions by clicking the appropriate buttons in order for Host On-Demand to work properly.
Selecting the appropriate client
The types of Host On-Demand clients that you use depend on your computing environment and your personal preferences.
Cached clients and Web Start clients are stored locally and load faster than download clients (unless an updated version of the client is being downloaded from the Web server). You can use them equally well over network and dial-up connections. Cached clients and Web Start clients take up more local disk space than download clients, but on most machines this is not a problem.
The Web Start client allows users to run Host On-Demand sessions without a browser. Users start Host On-Demand sessions from the Java Web Start Application Manager. If a user closes the Host On-Demand desktop and there are active sessions running, the user is prompted to make sure he wants to close all sessions.
Download clients are generally used in LAN-connected environments because high-speed network connections reduce the time it takes to download them from the Web server. They are not recommended for use over low-speed dialup connections because they need to be downloaded every time they are used, which takes more time on dialup connections. The small disk footprint of download clients is especially well-suited for client machines that do not have a lot of local disk space, such as NetStation machines.
You can use cached, Web Start, and download clients in the same Host On-Demand environment. Refer to Removing the cached client for instructions on removing cached clients.
If you plan to use the Web Start client, you need to use the Deployment Wizard to generate your HTML file. If you plan to use cached clients or download clients, IBM recommends that you create your own clients using the Deployment Wizard instead of using one of the predefined clients. Refer to Reducing client download size for more information.
Cached clients
A Host On-Demand cached client is any Host On-Demand client whose components have been cached (stored locally for quick access) on the hard disk of a user's workstation. When a user first runs a cached client, the Host On-Demand startup code downloads the Host On-Demand client components and stores them on the hard disk of the user's workstation. This is called installing the cached client.
When the user then runs the cached client, the Host On-Demand startup code downloads only a small startup applet from the server. The startup applet in turn starts the Host On-Demand client from the cached components on the hard disk.
By using the cached client, the user avoids having to wait for the Host On-Demand client components to be downloaded because they are already immediately available on the workstation's hard disk. In addition, the cached client is persistent across operating system restarts and browser reloads. Even though the cached client was originally intended for users with slow connectivity, such as dial-up phone lines, where downloading a large applet would take a long time, many customers have preferred using the cached client even for high-speed lines.
Like all Host On-Demand clients, the cached client is started (both the first time and subsequently) by specifying the URL of a Host On-Demand HTML file in the Address field of a supported Web browser. IBM recommends that you create your own HTML file using the Deployment Wizard. However, you can also use one of the generic, predefined cached client HTML files included with Host On-Demand.
The applet that starts the cached client also determines whether the version number of any of the Host On-Demand client components on the Host On-Demand server is newer than the version number of the corresponding downloaded components. If so, then the applet upgrades the cached client by downloading and caching the newer component from the server before launching the cached client.
The user can install multiple types of a cached client on the same workstation. For example, an emulator cached client, a Database On-Demand cached client, and an administration cached client could all be installed on one workstation. Also, with the Java version of Host On-Demand, the user can install two versions of the same cached client: one with problem determination and one without problem determination.
Installing cached clients
You can install a cached client either from a Host On-Demand server or from a LAN drive or DVD drive.
Information installed for the cached client
- Host On-Demand components
These components are in the form of Java archive files (JAR).
- Control information
This information includes data such as the URL of the Host On-Demand server and the version of each downloaded component.
Java cached client
Multiple versions of the Java cached client can exist on the user's workstation because the Java cached client startup code stores the cached client components in a different directory of the workstation's hard disk for each server from which the user has downloaded a cached client.
For the Java cached client, all the client components that are downloaded from the same server are stored in the same directory on the user's hard disk. For example, if the user installs a Java emulator client and a Java Database On-Demand client from the same server, then the component files for both types of client are stored in the same directory.
For a few specialized types of Java cached clients, the client components are stored in the Java plug-in's sticky cache. These are the same cached client types that are listed in Limits of support.
Installing the cached client from the Host On-Demand server
To install the cached client from a Host On-Demand server:
- Specify the full URL of the HTML file in your browser, as described in Loading emulator clients.
- If you want to use a predefined client, click on the cached client link after loading http://server_name/hod_alias/HODMain.html, where server_name is the host name or IP address of the Host On-Demand server and hod_alias is the alias (or path) of the publish directory.
- The cached client begins installing immediately. A window shows
the progress of the installation. The upper progress bar of this window
shows the status of individual files as they download, while the lower
progress bar shows the status of the overall installation.
The installation progress window does not appear for a few types of Java cached clients. These are the same Java cached clients that are listed in Limits of support. - When the installation completes, the installation code immediately launches the Java cached client. The user does not have to restart the browser.
Installing the cached client from a LAN or DVD
You can now have some or all of your users initially download the cached client from a LAN drive or a DVD. To install the cached client, the user has to access the LAN drive or DVD only once. After the installation, the user connects to the Host On-Demand server in the usual way.
The advantages of this method are that the cached client components are installed on the user's workstation more quickly than they would be if they had to be downloaded from the Web server, and that the user is not placing an additional load on the Web server by downloading an entire set of cached client components.
This method is supported on most client platforms. However, several Java cached clients do not support this feature. The Java cached clients that do not support this feature are listed in Limits of support.
Limitations
The HTML file cannot specify a separate user publish directory. (If you specified a Code Base in the Deployment Wizard, the HTML file cannot be used to install the cached client from a LAN or DVD drive.) See Help for Advanced Options Panel for more information about the separate user publish directory.
Steps for the administrator to create the DVD or LAN image
- Use the File Name and Output Format window in the Deployment Wizard to create your customized *.html files (for example, MyHOD.html). If you need to distribute the Deployment Wizard files to another server, you might want to select Output Zip to allow you to use DWunzip. For more information, see Using DWunzip.
- For the Java cached client, you can avoid having the user type in the hostname of the Host On-Demand server during installation by specifying the additional HTML parameter WebServerHostname in the Deployment Wizard. For more information see HTML parameters.
- After loading the new Deployment Wizard files to your server, test the new files to make sure they function as expected.
- Copy or FTP the following files from the publish directory of
your Host On-Demand server installation to a network drive or DVD
(make sure you put the same version of Host On-Demand on the DVD or
LAN drive that you have on your Host On-Demand server):
- MyHOD.html
- MyHOD.jnlp (if it exists)
- z_MyHOD.html (if it exists)
- hoddetect*.html
- hodlogo.gif
- hodbkgnd.gif
- Installer.html
- Installer2.html
- *.jar
- *.properties
- *.js
- Copy the following files and directories while preserving
the directory structure:
- msgs\cached_*.properties
- HODData\MyHOD\*.*
|
If you are copying these files from a z/OS installation to a DVD image, note that you will have to remove the .ascii file extension from all HTML, PROPERTIES, JS, JNLP, and CSS files first. For example, a file named *.properties.ascii should be copied to the DVD as *properties. |
|
If you are using a DVD for cached client installation, the DVD must be distributed with the same guidelines as the License Agreement and Export and Import regulations because it contains encryption technology. |
Steps for the user
- Prepare the client machine for installation by doing the following:
- Get access to the LAN drive or DVD drive.
- Get the name and location of the HTML file, such as
f:\myPath\MyHOD.html, that the system administrator has placed on the LAN drive or DVD. (The HTML file has the same name and the same contents for all users. It is not specific to one user.) - For the Java cached client only, find
the hostname of the Host On-Demand server to which the user will attach
after installing the cached client. For example, if the user will
attach to
http://myHODServer/hod/MyHOD.html, then the hostname ismyHODServer.For the Java cached client, the system administrator can eliminate this step by adding the HTML parameter WebServerHostname to the HTML file. See HTML parameters.
- Run the HTML file:
Type the path and name of the HTML file in the browser's address input field, such as:
f:/mypath/MyHOD.html - For the Java cached client only, when
prompted by the installation code, enter the host name of the Host On-Demand server
to which the user connects after installing the cached client. For
example, if the user launches
http://myHODServer/hod/MyHOD.html, then the hostname ismyHODServer.For the Java cached client, the system administrator can eliminate this step by adding the HTML parameter WebServerHostname to the HTML file. See HTML parameters. - Wait while the Host On-Demand cached client is installed from the LAN drive or the DVD.
- When prompted, restart the browser and point it to the HTML file
of the same name on the Host On-Demand server, such as:
The name of the HTML on the Host On-Demand server is the same as the name of the HTML file on the LAN or DVD.http://myServer/hod/MyHOD.html
After completing these steps, the Host On-Demand cached client starts in the usual way.
Removing the cached client
A general purpose removal method is discussed in the following sections.
Before you begin
Removing the cached client means erasing the information that was stored on the user's hard disk when the Java cached client was installed.
A user running the Java version of the cached client has a separate version of the cached client for each Host On-Demand server for which he downloaded a cached client. For more information, refer to Information installed for the cached client.
Removing the Java cached client removes only the version
of the Java cached client that was downloaded from the server that
the user visits when he does the removal. For example, if the user
visits the server http://myHODServerA/hod/HODRemove.html for
the server myHODServerA to remove the Java cached client on the user's
workstation, then only the Java cached client that was downloaded
from myHODServerA is removed.
Finally, for the Java cached client, removing the cached client removes all the types of cached clients (such as emulation, Database On-Demand, and administration) associated with that installation.
Removing the Java cached client from a workstation while
attaching to server myHODServerA removes the emulation
cached client, Database On-Demand cached client, and administration
cached client that were previously downloaded from server myHODServerA.
However, only the cached client components downloaded from that server
are removed. Cached client components from other servers, if any,
are not removed until the user connects to that server and performs
a remove.
Removing Java cached clients
- Start your browser.
Start a Java-enabled browser to remove a Java cached client.
- Connect to HODMain.html on the Host On-Demand server. For example,
connect to the following URL:
http://myServer/HOD/HODMain.htmlIf you are removing a Java cached client, you need to connect to the same server from which you installed the Java cached client to successfully remove it. For more information, refer to Before you begin. - Click the following entry under Utilities:
Remove Cached Client
- Start your browser.
- Connect to HODRemove.html on the Host On-Demand server. For example,
connect to the following URL:
This removes the cached client.http://myServer/HOD/HODRemove.htmlIf you are removing a Java cached client, you need to connect to the same server from which you installed the Java cached client to successfully remove it. For more information, refer to Before you begin.
- Administration cached clients
- Cached clients on the Apple Mac OS X
- Emulator cached clients with JavaScript Session Manager API enabled (only Java Mozilla)
Removing a cached client shared by multiple users
If multiple users share a single cached client, and one of these users removes the cached client, then the cached client is removed for all users. For information on sharing a single cached client, refer to Cached client support for Windows.
Cached client support issues when accessing multiple Host On-Demand servers
The following sections detail issues and problems that might arise when cached client users access multiple Host On-Demand servers.
Java cached client
A Host On-Demand Java cached client installs a separate copy of the cached client code for each Host On-Demand server that the user visits. Therefore there is no problem accessing servers at different service levels. With some versions of the plug-in, users may need to increase the size of their Java cache if they are going to visit many Host On-Demand servers.
The following problems can occur with the Java cached clients.
Problem using locally stored preferences
If you are using locally stored preferences, the custom HTML files you create must have names unique to your company, because the HTML file names differentiate between the locally stored preferences of different sites. Using generic names could cause preference conflicts for your users.
See the Host On-Demand support Web site for more information
If you have problems managing cached client deployment on the internet, see the Host On-Demand support site for more information.
Cached client support for Windows
- Any supported browser with a Java plug-in
Alternatively, you can add the following parameters using the HTML parameters selection of the Advanced Options window of the Deployment Wizard:
- ShareCachedClient: allows users to share a single instance of the cached client
- SharedCachedDirectory: allows you to specify the directory location where the cached client is to be installed
When the cached client is shared but you do not specify a directory, the cached client is installed in the default directory \Documents and Settings\All Users\IBMHOD. If you specify a directory, for example SharedCachedDirectory=c:\ibm, the Host On-Demand cached client appends IBMHOD\HODCC to this string, and the cached client is installed in this new location, for example, c:\ibm\IBMHOD\HODCC. An administrator or power user must either create the install directory manually or perform the first install of the shared cached client. In either case, the administrator or power user must change the security settings for this directory so that restricted users have Read, Modify, and Write access. The Administrator can either change the security settings and then download the cached client to the directory, or download the shared cached client to the directory and then change the security settings. If the security settings are not updated and a restricted user attempts to install the shared cached client, the user receives an error message that indicates there may be a problem with the file system, and the restricted user will not be able to use or update the cached client.
Once the administrator or power user changes the security settings, a restricted user can log on to Windows and can either install the shared cached client or use (or update) a previously installed version of the shared cached client. Other restricted users can log on to Windows and use the cached client without having to download it from the Host On-Demand server again. They can also upgrade the shared cached client, if necessary.
If you do not want restricted users to share the cached client, a separate instance of the cached client is downloaded to the user directory for each restricted user.
If an administrator or a power user downloads the previous version of the cached client, and you want to allow restricted users to access it, the administrator or a power user must use HODRemove.html to remove the previous version of the cached client, and then change the security settings to the shared cached client directory to Read, Modify, and Write for restricted users, as described above.
For information about removing a shared cached client, see Removing a cached client shared by multiple users.
Cached client support for Mac OS X (Java clients only)
- Staging of Host On-Demand updates is managed on a per server basis.
- Preloading cached clients from a DVD or LAN drive serves no function. When the browser is redirected to the real Web site, the plug-in considers that to be a distinct Web server and the client is cached again.
- Host On-Demand runs as an applet and must download code to the users' machines. The Host On-Demand client downloads all of the components, but you can reduce the download size by removing the components that you do not need. On Mac OS X, you cannot install additional components after the initial download.
- The Host On-Demand Java files used to run the Host On-Demand cached client on a Java-enabled Web browser are stored in the Java Runtime Environment (JRE) cache. To remove the cached client on Mac OS X, you need to use the Java Control Panel to clear the JRE cache. For instructions, see Using the Java plug-in.
- When running the cached client, the code must be upgraded when newer versions of the client are available. There are a number of Deployment Wizard options that allow you to control when the upgrades occur. These options are not available on Mac OS X.
|
The Java cached client improvements do not apply to the Mac OS X Java cached client. For more information, refer to Limits of support. |
Troubleshooting cached clients
If you find that you cannot load the cached client, follow the troubleshooting suggestions provided below.
Microsoft Internet Explorer 11.0
After upgrading your browser to Microsoft Internet Explorer11.0, you might receive security exceptions in the Java console. When you install the Cached Client, several files are stored into the browser's directory structure. When you upgrade Internet Explorer to Version 11.0, the browser will no longer know about the CAB files that contain the Host On-Demand cached code. Since the browser cannot find the CAB files, it tries to use the class files directly from the server, causing security exceptions. To resolve this issue, you should upgrade your browser, remove Host On-Demand using HODRemove.html, and then reinstall the product using HODCached.html.
Mozilla and Firefox
With the Mozilla and Firefox browser, if nothing happens when you try to install the cached client, or if the attempt to install the cached client fails, check the browser's settings. Make sure that Mozilla and Firefox are not set to suppress popup windows that appear on top of or under the Navigator window. This setting prevents the Host On-Demand cached client from being installed.
- In Mozilla 1.2, this setting is included under Edit > Preferences > Advanced > Scripts & Plugins.
- In Mozilla 1.3, this setting is included under Edit > Preferences > Privacy & Security > Popup Windows.
After the cached client is installed, you can restore this setting to suppress popup windows. But if you need to install the entire cached client again or update to a newer version in the foreground, you need to set Mozilla or Firefox again so that it does not suppress popup windows.
|
The setting to suppress popup windows does not hinder the downloading of additional components that were not included in the initial download (preload list). |
Web Start client
The Java Web Start client allows users to start Host On-Demand without a browser. You need to use the Deployment Wizard to generate a HTML file for the Web Start client. The HTML file generated by the Deployment Wizard points to a Java Network Launch Protocol (JNLP) file. The JNLP file defines a Java Application, including parameters passed to the application and the archives that contains class files used by the application. The JNLP file and the associated archives are stored on a Web server.
When a user points to the JNLP file, the browser launches the Web Start application on the client computer. It downloads the associated archives, checks to insure that the minimum required JRE is present (if specified), stores the archives on the user's machine, sets up icons to represent the application, and launches the application.
Users can start Host On-Demand sessions from the Java Web Start Application Manager. By using the Java Web Start Application Manager, Host On-Demand sessions do not depend on a browser. Therefore, closing a browser does not end a Host On-Demand session. If the user attempts to close the Host On-Demand desktop and there are active sessions running, the user is prompted to make sure he wants to close all sessions. If so, the sessions are terminated cleanly to prevent problems that occur when there are sessions running in the browser and the browser is abruptly closed.
After the initial launch of the application, you can either point the Web browser at the JNLP file again, or click the mouse on the icons created on the client machine. After Web Start is restarted, it checks the Web server for updates to the archives and downloads any updated files.
Java Web Start is bundled with JRE 1.4.0 or higher versions of the Java Runtime Environment. If you use JRE 1.3, then JRE 1.4. For more information about Java Web Start, go to Java Web Start Overview. For best results, use Java 1.5 or later.
- JRE 1.4 or later is required to use HTTPS to access files from the Web server.
- JRE 1.4 or later is required to use an HTTP proxy with Web Start.
- Session properties that say use Browser settings (like proxy server or TLS) cannot be used with Web Start.
Installing the Web Start client
There are two ways to install the Web Start client. Typically, users install it from a Host On-Demand server over the network, either with or without using a Web browser. Alternatively, users can install it from a LAN or DVD drive, although this requires a small additional download over the network. Regardless of how users install the Web Start client, once it is installed and in the Java Web Start Application Manager, they can start it by clicking the appropriate icon in the Application Manager.
Installing the Web Start client from the Host On-Demand server
Users can install the Web Start client from the Host On-Demand server either with or without using a browser.
Using a Web browser
- Specify the full URL of the HTML file in your browser, as described
in Loading emulator clients.
The Web Start client begins installing immediately. A window shows the progress of the installation. The upper progress bar of this window shows the status of individual files as they download, while the lower progress bar shows the status of the overall installation.
- When the installation completes, the installation code immediately launches the Web Start client. You do not have to restart the browser.
Without using a Web browser
For Windows users, distribute the JNLP file that was generated
from the Deployment Wizard (for example, myhod.jnlp) to your end users.
Once the file is distributed, users can type start myhod.jnlp to
start the Web Start application and begin installing the Host On-Demand client.
Since the file extension '.jnlp' will be registered to the Web Start
application, the Web Start application will start, read the file,
and download all the appropriate archive files from the Host On-Demand server
that was specified in the Deployment Wizard-generated JNLP file. The Host On-Demand Web
Start client will start when the download completes.
If you have not distributed the JNLP file to Windows users or your clients are running platforms other than Windows, users can still download the Web Start client without a Web browser by starting the Java Web Start Application Manager directly and pointing to the JNLP file on the Web server.
- Open the Java Web Start Application Manager by double-clicking
the
javaws.exefile, typically located in theC:\Program Files\Java Web Startdirectory. - Point to the JNLP file on the Web server at
http://HODServer/HODAlias/myhod.jnlp.
For Linux clients, a user can type /javaws http://HODServer/HODAlias/myhod.jnlp to
install and run the Host On-Demand session. A Host On-Demand icon
appears in the Java Web Start Application Manager. Users can double-click
this icon to launch Host On-Demand.
Installing the Web Start client from a LAN or DVD
In order to reduce network traffic and minimize download times, some companies wish for users to install the Web Start client from a LAN or DVD. Since the Web Start client and the cached client share the same cached archives, users can install the majority of the Web Start client using the same installation procedure as the cached client. However, the Web Start client requires an additional component that must be installed directly from the Host On-Demand server over a network.
Installing the Web Start client involves two steps for the administrator followed by two steps for the end user.
- Referring to Steps for the administrator to create the DVD or LAN image, use the Deployment Wizard to generate a Cached Client HTML file.
- Use the Deployment Wizard a second time to edit the HTML file that you created in the previous step, changing the client type from Cached Client to Web Start client. (Be sure not to make any other changes so that the defined sessions and the preload component list stay the same.) This second HTML page is the one that you should publish for users to access.
- Referring to Steps for the user, install the cached client that the administrator set up on the LAN or DVD.
- Install the additional component for the Web Start client by following the steps for Installing the Web Start client from the Host On-Demand Server: Using a Web browser. The Web Start client code will determine that the Host On-Demand archive files have already been downloaded and will not download them again. The remaining component should download quickly, and the Host On-Demand Web Start client will start.
Configuring your Web server for Web Start
The administrator must register the JNLP extension as a mimetype with the Web server so the browser knows to launch the Web Start application. For example, the following sections describe how to configure Apache HTTP Server, IBM HTTP Server, and Microsoft IIS.
Apache HTTP Server or IBM HTTP Server
AddType Application/x-java-jnlp-file .jnlpMicrosoft IIS 7.0
To configure Microsoft IIS for Web Start, complete the following steps:
- From Control Panel > Administrative Tools > Internet Information Services, click Default Web Site.
- Click the HTTP Headers tab on the Properties.
- Under MIME Map, click the File Types tab and select New Type.
- In the Extension field, type
.jnlp. - In the Content Type field, type
application/x-java-jnlp-file. - Click OK.
Upgrading the Web Start client
After the initial install of the Web Start client, if users point their browsers to the HTML file generated by the Deployment Wizard and updates are available on the Host On-Demand server, Host On-Demand prompts users to update. If users want to update, Java Web Start downloads the updated archive files and launches Host On-Demand. If users decline to upgrade, Host On-Demand prompts them again the next time they launch the HTML file.
Adding Web Start components after the initial install
If users request a function that is not installed on the Java Web Start client, Host On-Demand prompts them to install the additional components required for that function. If they choose to install the additional components, they must restart the Host On-Demand client to use them.
Web Start and Windows Restricted Users
Windows Restricted Users with Java Web Start 1.0.1 should remove the JRE and Java Web Start and reinstall a newer JRE with Java Web Start 1.2.
Bookmarking sessions with Web Start
- On the Advanced Options window of the Deployment Wizard, add the HideHODDesktop parameter with a value of true.
- Configure a single session to autostart.
- Configure the session to not start in a separate window.
Using Web Start with HTTPS
If you want to use HTTPS with the Web Start client, the certificate authority used for your secure HTTP connection should come from a well known root authority. When you use Host On-Demand as an applet and use an HTTPS connection, you are given the opportunity to trust the certificate used for the HTTPS connection if the root authority is not known by the browser. Since Java Web Start runs as an application, this browser facility is not available. The Java Virtual Machine used by Java Web Start contains several root authorities that it trusts. If the certificate that comes from the HTTPS connection has a root authority of one of these authorities known by the JVM, the secure connection can be established. If you want to use a certificate authority other than ones known by the JVM by default, for example, a self-signed certificate, you need to import the certificate into the keystore of the JVM for each of the clients accessing this Java Web Start client. This is required to establish the secure HTTP connection.
Removing the Web Start client
- In the Java Web Start Application Manager, highlight your application and click Remove.
- Launch HODRemove.html in your browser.
Download clients
Unlike the cached client and Web Start client, the download client does not control how or when client components are downloaded to the workstation's hard disk. The download client leaves all caching decisions to the browser.
Use the download client if you meet both of the following requirements:
- You do not want to take up disk space on client machines by installing the cached client or Web Start client.
- Your initial download time is not an issue.
Launching the download client
Launch the download client by downloading it from the Host On-Demand server into your browser window, as described in Loading emulator clients.
Launching the download client after installing the cached client or Web Start client
Java
With Java clients, you can successfully launch the download client after installing the cached client or Web Start client.
Predefined emulator clients
Several predefined emulator client HTML files are supplied with Host On-Demand. They are included to demonstrate the range of Host On-Demand client functionality and to serve as examples for creating customized HTML files in the Deployment Wizard. All of them use the Configuration server-based model. To load one of these clients, follow the instructions in Loading emulator clients.
|
In general, it is recommended that you define your own customized HTML files with the Deployment Wizard instead of using the predefined client HTML files. |
The following predefined emulator client HTML files are provided by Host On-Demand:
- Cached client (HODCached.html)
- Provides all Host On-Demand client functions.
- Cached client with problem determination (HODCachedDebug.html)1
- Starts the cached client with problem determination (session logging and tracing).
- Download client (HOD.html)
- Provides all Host On-Demand client functions except problem
determination.
With a Java–enabled browser the predefined download client file HOD.html omits some infrequently used Host On-Demand components. For more information, including a list of excluded components and a description of workarounds, see HTML files do not contain some components. Accessing HOD.html with a Java browser works with limited functions. - Download client with problem determination (HODDebug.html)1
- Loads the download client with problem determination (session logging and tracing).
- Use the problem determination clients only if you are working with IBMto resolve a problem with your Host On-Demand installation.
Reducing client download size
In general, it is a good idea to keep the size of your Host On-Demand clients (whether download, Web Start, or cached clients) as small as possible. This speeds up their download time and conserves disk space on client machines.
The best way to minimize the size of your Host On-Demand clients is to create them by using the Deployment Wizard. The predefined clients supplied with Host On-Demand are typically larger than the custom clients created with the Deployment Wizard because they contain Host On-Demand's full range of client functionality. Clients created in the Deployment Wizard contain only the functions that you select to be pre-installed. In addition, Deployment Wizard clients are downloaded in compressed format. This further reduces their download size.
When you create a customized client with the Deployment Wizard, you can select only the functions that you know users are going to need on the Preload Options window in the Deployment Wizard. For instance, if your users are only going to need 3270 terminal and 3270 printer sessions, do not select any other session types when you are creating the client in the Deployment Wizard. Including support for unused session types increases the size of the client without improving its functionality.
If you click Auto Select on the Preload Options window, the Deployment Wizard selects the components you need based on your session configuration.
|
On Mac OS X, you cannot install additional components after the initial download. For more information, refer to Cached client support for Mac OS X (Java clients only). |
Do not use debugging or problem determination in either Deployment Wizard-generated or predefined clients. This greatly increases the size of the client and can slow down a client's performance. Debugging and problem determination clients are not intended for general use. Use them only in conjunction with Host On-Demand technical support to diagnose and solve problems with your Host On-Demand system.
Deploying customer-supplied Java archives and classes
Customer-supplied Java classes and archives are Java class files and archive files that are not included either as part of the Host On-Demand client or as part of the Java Runtime Environment. Examples of such files are Java classes or archives that you yourself have implemented or that you have obtained from third parties.
- You want your users to run macros that call customer-supplied Java methods.
- You want your users to run a customer-supplied applet with the
session (either started automatically with the session or launched
using the Actions > Run Applet... selection on the menu of the session
window).
For Java limitations on running customer-supplied applets, see Limitations with customer-supplied applets and Java.
- Using the AdditionalArchives HTML parameter in the Deployment Wizard. See Using the AdditionalArchives HTML parameter.
- Copying the files to the Host On-Demand server's publish directory. See Deploying from the Publish directory.
- The type of file deployed (Java classes and Java archives)
- Where the files will be deployed (Host On-Demand server or client workstation)
- The type of client platform and the type of browser.
The three methods available for deploying customer-supplied Java archives and classes are described in the following sections. In addition, Hints and tips for archive files provides more information about using archive files.
Using the AdditionalArchives HTML parameter
You can use this method when you want to deploy Java archives to a Host On-Demand server. This method works for the cached emulator client, the download emulator client, and for the Web Start client.
Java archives must be Java .JAR files.
The advantage of using the AdditionalArchives HTML parameter is that it causes your Java archives to be downloaded to the user's workstation automatically when one of your users connects with the cached client or download client HTML file on your Host On-Demand server.
The disadvantage of this method is that these Java archives or class files will be downloaded again every time a user connects to that HTML file regardless of whether you are using a cached client or downloaded client. The reason for downloading the archives every time your user connects is to ensure that the Host On-Demand client has the latest versions of your archives or class files. As a result, this method works best when the Java archives or class files are relatively few and relatively small, so that your users do not have to wait a long time for these files to be downloaded, and so that downloading these files to your users does not place a heavy load on your Web server.
- Place the archives in your Host On-Demand publish directory. The
default publish directory is the sub-directory HOD in your Host On-Demand server's install directory,
such as
c:\Program Files\IBM\Host On-Demand\HOD\. - Edit the HTML file with the Deployment Wizard. Then:
- On the Advanced Options panel, click HTML Parameters.
- In the Name field, enter
AdditionalArchives. - In the Values field, enter the names of your Java archives, separated by
commas, without file extensions (.jar). For example:
myCustomA,myCustomB,MyCustomC
Deploying from the Publish directory
- When you want to deploy Java class files to a Host On-Demand server. The Java class files must not belong to any Host On-Demand package.
To use this method, place the archives in your Host On-Demand publish
directory. The default publish directory is the subdirectory HOD in
your Host On-Demand server's install directory, such as c:\Program
Files\IBM\Host On-Demand\HOD\.
Hints and tips for archive files
- When you create your archive (.jar), verify that the
path of each class file is correct. For example, the path for com.mycompany.MyClass
should be
com\mycompany\. It should not beC:\MyTestDirectory\com\mycompany\, and it should not be blank (since the class file is part of a package). - Verify that the proper permissions are set for your archive files. That is, in operating systems that use file permissions, such as Linux, AIX, Unix, and z/OS, the file permissions for the archive files should be set to 755 (that is, rwxr-xr-x).
- If you have two different cached client pages that specify different AdditionalArchives parameters, you need to close and restart the browser when switching from one page to another. Otherwise, when you switch from one page to another, the cached client is not reloaded and, as a result, the AdditionalArchives parameter is not checked.
Using Database On-Demand clients
The Database On-Demand client is a Java applet that allows an end user to build SQL statements and File Upload statements, to send these SQL statements and File Upload statements to a remote database server, and to retrieve the results of SQL queries (SQL Select statements) from the remote database server.
The user can communicate with a database server running on an IBM System i server or other platform, so long as the proper Java Database Connectivity (JDBC) driver is installed on the Database On-Demand client workstation. For more information refer to Obtaining and installing a JDBC driver in this manual.
- Text and graphical interfaces for constructing SQL statements and File Upload statements.
- The ability to save and reuse SQL statements and File Upload statements.
- For SQL statements:
- The ability to run an SQL statement and display the results.
- The ability to save the results of an SQL statement into a file in various file formats, including XML (see File formats for database access in this manual).
- For File Upload statements:
- The ability to use the following File Upload types: create, replace, append, and update.
- The ability to read data files in various file formats, including XML (see File formats for database access in this manual).
The Database On-Demand client is available only through one of three predefined client HTML files (see Database On-Demand predefined clients). You cannot use the Deployment Wizard to create a Database On-Demand client.
However, as an alternative to the Database On-Demand client, you can now use database functions in Host On-Demand emulation clients and in macros (see Database functions in Display Emulation clients and in macros).
For more information, see Overview of database access.
- An end user running a Java-enabled browser automatically runs the Java version of the Database On-Demand client.
Database functions in Display Emulation clients and in macros
- 3270 Display session
- 5250 Display session
- VT Display session
You can also use SQL statements and File Upload statements in macros in display emulation client sessions (see the https://www.ibm.com/docs/en/host-on-demand/15.0?topic=actions-sqlquery-action-sqlquery-element and the in the Macro Programming Guide).
For example, while you are connected to a remote host in a 3270 Display session, you can launch a macro that automatically reads data from the 3270 Display session window and writes the data into a table in a database that is located on another remote host. Similarly, you can launch a macro that automatically reads data from a table in a remote database and writes the data into the 3270 Display session window.
For more information, see Overview of database access .
Starting a Database On-Demand client
To start a Database On-Demand client on the client workstation, use one of the following two methods:
- Connect your browser to a predefined Database On-Demand HTML file,
by typing the URL of the HTML file into the address field of your
browser (or by clicking a link that directs the browser to that URL).
The format for the URL is:
where server_name is the host name or IP address of the Host On-Demand server, hod_alias is the alias of the publish directory, and client_name is the name of the HTML file. For example, assuming that www.myHODServer.com is your Host On-Demand server and that hod is the alias of the publish directory, then the URL for the download version of the Database On-Demand client is:http://server_name/hod_alias/client_name.htmlhttp://www.myHODServer.com/hod/HODDatabase.html - Connect your browser to the Host On-Demand Clients HTML file,
and then click the link for the Database On-Demand client that you
want to run. The URL of the Clients HTML file is:
where server_name and hod_alias have the same meanings as above. In the name of the file HODMain_xx, the xx is a two-letter mnemonic for the language that you want to use. For example, for English, the file is named HODMain_en.html, and the full URL is (assuming the same server and alias as above):http://server_name/hod_alias/HODMain_xx.htmlhttp://www.myHODServer.com/hod/HODMain_en.html
Database On-Demand predefined clients
The Database On-Demand client is available through any one of three predefined client HTML files. You cannot use the Deployment Wizard to create a Database On-Demand client HTML file. The predefined clients are described below.
- Database On-Demand client (HODDatabase.html)
-
This is the download client. "Download" means that all the client code is downloaded to the client workstation each time the end user starts the Database On-Demand client.
- Database On-Demand client cached (HODDatabaseCached.html)
-
This is the cached client. "Cached" means that most of the client code is downloaded the first time the end user starts the Database On-Demand client and is stored on the client workstation. After the first download, the cached client starts much more quickly than the download client, because most of the client code is already available on the client workstation. The cached Database On-Demand client has many components in common with the cached Host On-Demand client.
For the cached client, if your end user requires more than one code page, you need to add the name of the archive file (.jar file) for each additional code page to the preload list in the predefined HTML file. For a list of code page languages and corresponding file names, see Using multiple code pages with Database On-Demand. - Database On-Demand client cached with problem determination (HODDatabaseCachedDebug.html)
-
This is the cached client with extra problem determination code for logging session events and tracing.
|
Use the problem determination client only if you are working with IBMto resolve a problem with your Host On-Demand installation. |
Configuring Database On-Demand for users
- Use the Administration Utility to define groups and users (see Managing users and groups).
- Specify the database functions that you want groups and users to be able to perform, and specify default values for some of the database parameters in new SQL statements and File Upload statements (see Database On-Demand Group/User Options).
- Run the Database On-Demand client as an end user, and create SQL statements and File Upload statements (see Getting started with Database On-Demand ).
- Launch the Administration Utility and copy the SQL statements and File Upload statements to other users or to groups (see Database On-Demand Group/User Statements).
Obtaining and installing a JDBC driver
To connect to a database server running on a remote host, the end user needs a Java Database Connectivity (JDBC) driver installed on the client workstation.
The Host On-Demand client and the Database On-Demand client already include a JDBC driver from the IBM AS/400 Toolbox for Java. This driver allows a client to access a DB2/400 database on a properly configured IBM System i or AS/400 host system. You do not need to register or deploy this driver.
- Contact the vendor or the administrator of the remote database to obtain the JDBC driver.
- Register the JDBC driver with Host On-Demand or Database On-Demand. See Registering a JDBC driver.
- Deploy the JDBC driver to the workstations of your end users. See Deploying a JDBC driver.
File formats for database access
The end user selects a file type for an SQL statement or a File Upload statement on the Output tab of the SQL Wizard window or on the File tab of the File Upload window.
For information on file formats, see File formats for database.
Using multiple code pages with Database On-Demand
If you wish to use multiple code pages with Database On-Demand, you need to add jar or cab files to your HTML file. Only those code pages that correspond to the language of the HTML file are automatically loaded. For example, if you are running from a French computer, but you want to access a Dutch host, you need to make these modifications.
Edit the CommonJars.js file. If you are using a download client,
look for the line that starts dbaDownloadJars =
and add the
appropriate file names from the table below. Use jar file names, even
if your clients will be using Internet Explorer (the names will be
converted to cab file names later). If you are using a cached client,
look for the line that starts dbaCachedComps =
and add the
appropriate component name from the table below.
Supported Database On-Demand code pages
The following table lists the supported Database On-Demand client code page languages, the corresponding .jar file names, and the cached component names:
| Code page language | .JAR file name | Component name |
| Arabic | hacpar.jar | HACPAR |
| Czech, Hungarian, Polish, Slovenian | hacpce.jar | HACPCE |
| Danish, Finnish, Dutch, Norwegian, Swedish | hacp1b.jar | HACP1B |
| German, Spanish, French, Italian, Portuguese, Brazilian Portuguese | hacp1a.jar | HACP1A |
| Greek | hacpgr.jar | HACPGR |
| Hebrew | hacphe.jar | HACPHE |
| Japanese | hacpja.jar | HACPJA |
| Korean | hacpko.jar | HACPKO |
| Russian | hacpru.jar | HACPRU |
| Simplified Chinese | hacpzh.jar | HACPZH |
| Thai | hacpth.jar | HACPTH |
| Turkish | hacptr.jar | HACPTR |
| Traditional Chinese | hacptw.jar | HACPTW |
Creating and deploying server macro libraries
Server macro libraries are available for the HTML model pages and Config model users. For the HTML page, users can use Deployment wizard to customize the server macro library; for the Config model, users can use the Host On-Demand admin console. GUI based configuration allows the administrator to configure for each session. For the administrator to configure for all the sessions defined, use the HTML parameter SetServerMacroLibraryPath.
The value of SetServerMacroLibraryPath is share path or relative path. You can use the values to create and maintain a central repository of macros for users to access from their Host On-Demand sessions. These macros are downloaded to the user's machine only when it is needed. When you make changes to a server macro, users automatically get your updates the next time when they access the macro.
- They provide a convenient way to store, edit, and administer macros, all from one easy-to-access location.
- They allow easy sharing of macros among multiple users and across any number of sessions.
- They eliminate the need to import macros into the Host On-Demand session, and can therefore reduce the size of the session. The macros are only downloaded to the user's machine if and when the user accesses them.
- You can edit macros and replace the files in the server macro library at any time without regenerating Host On-Demand sessions or modifying the HTML files. Any changes you make are automatically available the next time a user requests that macro.
Server macro libraries can reside on a Web server or on a shared network drive. For both types of libraries, you can control which macros are available to particular Host On-Demand sessions. If you use a Web-based macro library, you need to create a text file that identifies the specific macros that you want to be available for the session that you are configuring. If you use a shared drive-based macro library, then all the files in the specified directory will be available to the session. Users will not be allowed to write to a Web-based macro library, but they may update a shared drive-based macro library if they have write-access.
Deploying a server macro library to a Web server
- Put your macros in a place that users can access through a Web server. This does not need to be the Host On-Demand publish directory.
- For each session that requires a separate set of macros, create
a text file that contains the list of the macro file names. The text
file format can only have one macro file name per line, for example:
Be sure to note the following rules:macro1.mac macro2.mac macro3.mac- The macro name must be the first element on the line, since everything after the first element is ignored.
- If the first element on the line starts with //, the line is considered to be a comment and is ignored.
- Each macro that you list in the text file must have a .mac extension.
- Put this text file in the same location as the macros that it references.
- In the Deployment Wizard, click the Configure menu on the Host Sessions window and select Server macro library... Check the 'Use a server macro library for this session' box and select Web server macro library.
- Specify the fully qualified URL of the macro list that you created in Step 2, for example, http://servername/hod/macrolist.txt. Click OK.
When users open their sessions, they can use the Play Macro or Available Macros windows to see the macros specified in the list that you created for their session. These macros are available when users select Server library as their macro location. The Server library location is only available if you have configured the session to use a server macro library.
Deploying a server macro library to a shared drive
- Put your macros in a shared directory on your network.
- In the Deployment Wizard Host Sessions window, select the session you wish to configure, click the Configure menu, and select Server macro library. Check the 'Use a server macro library for this session' box and select Shared drive macro library.
- Specify the directory path. Examples of valid directory paths
include the following:
- Absolute paths. Mapped network drive letters can also be used in the absolute path. Note that a server macro library should never point to a local drive.
- Remote computer names or IP addresses are allowed as long as the
user's computer is already remotely connected and authenticated to
the computer that is sharing the directory. The following are two
examples of paths to shared drive macro libraries:
\\your_host\macro_library, where your_host is the host name and macro_library is the macro directory.-
\\123.45.67.89\macro_library, where 123.45.67.89 is the IP address of the host and macro_library is the macro directory.
- Click OK.
When users open their sessions, they can use the Play Macro or the Available Macros windows to see a list of the macros in the directory. These macros are available when users select Server library as their macro location. The Server library location is only available if you have configured the session to use a server macro library.
Modifying session properties dynamically
Host On-Demand sessions are defined by the administrator and retrieved by the Host On-Demand client when a user accesses a Host On-Demand HTML file. The session properties a user sees are fixed values and consist of a combination of the administrator's initial configuration and any user updates. However, there may be times when it would be useful with some HTML files, or with certain session properties, to dynamically set a value at the time that the HTML is accessed. This type of control allows you to set particular session property values based on information such as the IP address of the client or the time of day.
In order to dynamically set session properties at the time the HTML is accessed, the administrator must write a program that runs on the Web server and effectively modifies the HTML just before it is sent to the client. Even though the initial session properties are not defined in the HTML, Host On-Demand provides the capability to override many of the session properties in the HTML. These override values are always used by the client and take precedence over both the initial session properties setup by the administrator, as well as any updates for the property made by the user. The HTML override value is never stored, so the client will return to using prior settings for the property whenever the administrator removes the override. Also, the overridden property is locked so a user cannot change it.
There are many ways in which an administrator could write a program to dynamically set one or more session properties using the HTML overrides, such as using Java Server Pages (JSP), servlets, Perl, REXX, or Active Server Pages (ASP). This chapter takes you through a couple of examples that focus on common administrator issues. These examples are meant to demonstrate the syntax and technique of overriding particular properties. These mechanisms apply to whichever programming approach the administrator may choose.
Setting up the initial HTML file
The initial HTML file should be created using the Deployment Wizard, which will allow you to set up the features that are important to you, such as the size of the downloaded code and the functions available to your users. The following sections describe the HTML parameters you will need to include. However, keep in mind that the exact format required for these parameters will vary depending on the format of the HTML. Note that in Host On-Demand 7 and later, some of the HTML is generated using JavaScript, and HTML parameters are specified within a JavaScript array or using JavaScript document.write statements. Also, the format of the HTML varies according to the client (cached or download client) selected.
Setting the Code base
- On the Additional Options window, click Advanced Options and go to the Other branch in the tree view.
- Type the relative path /hod/ in the Code base field.
- Save the HTML file to the default Host On-Demand publish directory your_install_directory\HOD.
Code base refers to the installed Host On-Demand publish directory and not the directory where Deployment Wizard files are published. Although you can enter a fully qualified URL in the Code base field, we strongly recommend that you enter the relative path /hod/ for the default publish directory when modifying session properties dynamically. If you enter a fully qualified URL, any users who specify the host name in a different manner than you specified as the Code base will not be able to access the files, even if the DNS entries resolve to the same IP address.
Add the ConfigBase Parameter
Add a parameter to the HTML file called ConfigBase. Similar to defining /hod/ as the Codebase in Setting the Code base, the ConfigBase parameter is necessary because you will eventually deploy your JSP file to a location that is different than the default publish directory, and the Host On-Demand applet needs to know how to find the session configuration files located in the Host On-Demand/HOD/HODData directory. These files are created at the same time you save your Deployment Wizard HTML file to the publish directory. Unlike Codebase, the ConfigBase parameter requires a fully qualified URL. ConfigBase is a term that is specific to Host On-Demand.
Overriding HTML parameters
- Enable HTML overrides. By default, the client will ignore HTML overrides. To enable overrides, you will need to include an HTML parameter called EnableHTMLOverrides and set it to a value of true.
- List the sessions to be overridden. Because there may be multiple sessions associated with an HTML, you will need to list which ones will be overridden. You will need to include an HTML parameter called TargetedSessionList, having a value of the exact names of the sessions that should accept overrides. The value should be a comma-separated list of session names, such as "Session1Name, Session2Name".
- Specify the override itself. For each session property to be overridden, you will need to include an HTML parameter called the property name, with the value being the desired override. The value you specify will then apply to all sessions listed in your TargetedSessionList parameter. If you wish to only override a subset of the sessions in your TargetedSessionList, you can specify a value in the format of "Session1Name=value1, Session2Name=value2", for example.
Specific session properties that can be overridden
| Parameter name | Description | Valid values |
|---|---|---|
| Host | Host name or IP address of the target server. Appears as "Destination address" on property panels. Applies to all session types. | Host name or IP address. |
| HostBackup1 | Host name or IP address of the backup1 server. Appears as "Destination address" of backup1on property panels. Applies to all session types. | Host name or IP address. |
| HostBackup2 | Host name or IP address of the backup2 server. Appears as "Destination address" of backup2on property panels. Applies to all session types. | Host name or IP address. |
| Port | The port number on which the target server is listening. Appears as "Destination port" on property panels. Applies to all session types. | Any valid TCP/IP port number. |
| PortBackup1 | The port number on which the backup1 server is listening. Appears as "Destination port" of backup1 on property panels. Applies to all session types. | Any valid TCP/IP port number. |
| PortBackup2 | The port number on which the backup2 server is listening. Appears as "Destination port" of backup2 on property panels. Applies to all session types. | Any valid TCP/IP port number. |
| CodePage | The codepage of the server to which the session will connect. Appears as "Host Code-Page" on property panels. Applies to all session types except FTP. | The numeric portion (for example, 037) of the supported host codepage listed in the session property panel. |
| SessionID | The short name you want to assign to this session (appears in the OIA). It must be unique to this configuration. Appears as "Session ID" on property panels. Applies to all session types. | One character: A-Z. |
| LUName | The name of the LU or LU Pool, defined at the target server, to which you want this session to connect. Appears as "LU or Pool Name" on property panels. Applies to 3270 Display and 3270 Printer session types. | The name of an LU or LU Pool. |
| LUNameBackup1 | The name of the LU or LU Pool, defined at the backup1 server, to which you want this session to connect. Appears as "LU or Pool Name" of backup1 on property panels. Applies to 3270 Display and 3270 Printer session types. | The name of an LU or LU Pool. |
| LUNameBackup2 | The name of the LU or LU Pool, defined at the backup2 server, to which you want this session to connect. Appears as "LU or Pool Name" of backup2 on property panels. Applies to 3270 Display and 3270 Printer session types. | The name of an LU or LU Pool. |
| WorkstationID | The name of this workstation. Appears as "Workstation ID" on property panels. Applies to 5250 Display and 5250 Print session types. | A unique name for this workstation. |
| ScreenSize | Defines the number of rows and columns on the screen. Appears as "Screen Size" on property panels. Applies to 3270 Display, 5250 Display, and VT Display session types. |
|
| SLPScope | Service Location Protocol (SLP) Scope. Appears as "Scope" under "SLP Options" on property panels. Applies to 3270 Display, 3270 Printer, 5250 Display, and 5250 Printer session types. | Contact your administrator to get the correct value for this field. |
| SLPAS400Name | Connects a session to a specific IBM System i. Appears as "iSeries Name (SLP)" on property panels. Applies to 5250 Display and 5250 Printer session types. | The fully-qualified SNA CP name (for example, USIBMNM.RAS400B). |
| FTPUser | Specifies the user ID the session uses when connecting to the FTP server. Appears as "User ID" on property panels. Applies to FTP session types. | A valid user ID. |
| FTPPassword | Specifies the password the session uses when connecting to the FTP server. Appears as "Password" on property panels. Applies to FTP session types. | A valid password. |
| UseFTPAnonymousLogon | Enables the session to log in to an FTP server using anonymous as the user ID. Appears as "Anonymous Login" on property panels. Applies to FTP session types. | Yes or No. |
| FTPEmailAddress | Specifies the e-mail address to use when connecting to the FTP server while using Anonymous Login. Appears as "E-mail Address" on property panels. Applies to FTP session types. | A valid e-mail address. |
| PromptForDestinationAddress | Specifies whether to prompt the user for the destination address to use when connecting to the FTP server. Appears as "Destination Address" on property panels. Applies to FTP session types. | yes or no |
| CICSInitialTransEnabled | Enables an initial transaction to be started when a CICS Gateway session is established. | true or false |
| CICSInitialTrans | Specifies the name of the initial transaction to be started upon connection to a CICS host. Applies to CICS Gateway sessions only. The CICSInitialTransEnabled parameter must be set to true for the specified transaction to be started. | Valid transaction identifiers are strings of between 1 and 128 characters. The string identifies the initial transaction and any parameters to be run upon connection to the server. The first four characters, or the characters up to the first blank in the string are taken as the transaction. The remaining data is passed to the transaction on its invocation. |
| Netname | The name of the terminal resource to be installed or reserved. If this field is blank, the selected terminal type is not predictable. Applies to CICS sessions only. | A valid terminal resource name. |
Any errors encountered in processing the HTML parameters are displayed in the Java Console.
Example #1: Overriding the LU name based on the client's IP address
Administrators may want to avoid specifying LU names directly in session definitions. This example shows a simple way of using the IP address of the client to look up an LU name listed in a text file and use it as an override value in a session.
This example is written using JSP. The Deployment Wizard was used to create an HTML file that contains two sessions named 3270 Display and 5250 Display. Note that in Host On-Demand 7 and later, some of the HTML is generated using JavaScript, and HTML parameters are specified within a JavaScript array or using JavaScript document.write statements. Also, the format of the HTML varies according to the client(cached or download client) selected.
- Example1.html
- z_Example1.html
- Example_J2.html
<!doctype html public "-//W3C//DTD HTML 3.2 Final//EN">
<%
// Read the luname.table file into a properties variable.
// The luname.table file contains lines in the following format:
// ipaddress=luname
Properties lunames = new Properties();
lunames.load(new FileInputStream("c:\\luname.table"));
%>
<HTML>
<HEAD>
<META http-equiv="content-type" content="text/html; charset=UTF-8">
<!-- TITLE Begin -->
<TITLE>Example1 page title</TITLE>
<!-- TITLE End -->
<!-- SUMMARY Begin -->
<!--
Configuration Model
What configuration model would you like to use?
-HTML-based model
Host Sessions
-3270 Display
-5250 Display
Additional Options
-Cached = Cached client
-Java Type = java2
Disable Functions
Preload Options
-5250 Sessions = True
-Change Session Properties = True
-3270 Sessions = True
Cached Client/Web Start Options
Basic Options
-Debug = False
-Height (in pixels) = 250
-Width (in pixels) = 550
Upgrade Options
-Percent of users who can upgrade by default = 100
-Prompt user (user decides foreground or background)
Advanced Options
HTML parameters
-None
Code base
- /hod/
HTML templates
-Default
Problem determination
-Debug = False
User updates
-Persist user updates? = True
Appearance
-Standard Host On-Demand Client
Applet size
-Autosize to browser
Session Manager API
-Enable Session Manager JavaScript API = False
Server connection
Language
-Locale = Use the system Locale
Maximum sessions
- 26
-->
<!-- SUMMARY End -->
</HEAD>
<BODY BACKGROUND="/hod/hodbkgnd.gif">
<CENTER>
<IMG src="/hod/hodlogo.gif" ALT="hodlogo.gif">
<P>
<SCRIPT LANGUAGE="JavaScript">
function writeAppletParameters()
{
return "";
}
</SCRIPT>
<SCRIPT LANGUAGE="JavaScript" SRC="/hod/HODVersion.js"></SCRIPT>
<SCRIPT LANGUAGE="JavaScript" SRC="/hod/CommonJars.js"></SCRIPT>
<SCRIPT LANGUAGE="JavaScript" SRC="/hod/CommonParms.js"></SCRIPT>
<SCRIPT LANGUAGE="JavaScript" SRC="/hod/CommonJ2Parms.js"></SCRIPT>
<SCRIPT LANGUAGE="JavaScript">
var db = parent.location;
var hod_Locale = '';
var hod_AppName ='';
var hod_AppHgt = '340';
var hod_AppWid = '550';
var hod_CodeBase = '/hod/';
var hod_Comps = 'HABASE;HODBASE;HODIMG;HACP;HAFNTIB;HAFNTAP;HA3270;HODCFG;HA5250';
var hod_Archs = 'habasen.jar,hodbasen.jar,hodimg.jar,hacp.jar,hafntib.jar,hafntap.jar,
ha3270n.jar,hodcfgn.jar,ha5250n.jar';
var hod_URL = new String(window.location);
var hod_DebugOn = false;
// put cached client installation applet parameters here
var hHod_AppletParams = new Array;
hHod_AppletParams[0] = '<PARAM NAME="DebugCachedClient" VALUE="false">';
hHod_AppletParams[1] = '<PARAM NAME="ShowDocument" VALUE="_parent">';
hHod_AppletParams[2] = '<PARAM NAME="CachedClient" VALUE="true">';
hHod_AppletParams[3] = '<PARAM NAME="ParameterFile" VALUE="HODData\\Example1\\params.txt">';
hHod_AppletParams[4] = '<PARAM NAME="JavaScriptAPI" VALUE="false">';
hHod_AppletParams[5] = '<PARAM NAME="BookmarkPage" VALUE="Example1.html">';
// The next 2 lines are required in order to override session properties.
// The first line turns on the processing for this function and does not
// need to be modified. The second line identifies the sessions that you
// want to change. In this example, there are 2 sessions identified
// named: "3270 Display" and "5250 Display".
hHod_AppletParams[6]='<PARAM NAME="EnableHTMLOverrides" VALUE="true">';
hHod_AppletParams[7]='<PARAM NAME="TargetedSessionList" VALUE="3270 Display,5250 Display">';
// The following line changes the LUName session parameter for the session named
// "3270 Display". In this example, the LUName is being set to the value
// contained in the c:\luname.table for the IP address of the client.
// When you are initially testing your changes, you may want to use a constant
// value to verify that the syntax is correct before you insert your
// calculations.
hHod_AppletParams[8]='<PARAM NAME="Luname" VALUE="3270
Display=<%=lunames.get(request.getRemoteAddr())%>">';
//hHod_AppletParams[x] = '<PARAM NAME="DebugCode" VALUE="65535">';
var pg = buildJ2Page(db);
pg += writeAppletParameters();
pg += '</APPLET>';
if(hod_DebugOn) alert('J2 page complete, result = \n' + pg);
document.write(pg);
</SCRIPT>
</CENTER>
</BODY>
</HTML>Example #2: Allowing the user to specify the host to connect to using an HTML form
Administrators may also want to use HTML forms to specify override values rather than calculating them. The following example displays a simple form for entry of a host name. The form posts to a JSP program which uses the host name specified in the form to override the host name in the 3270 Session.
This example is written using JSP. The Deployment Wizard was used to create an HTML file that contains two sessions named "3270 Display" and "5250 Display." Note that in Host On-Demand 7 and later, some of the HTML is generated using JavaScript, and HTML parameters are specified within a JavaScript array or using JavaScript document.write statements. Also, the format of the HTML varies according to the client (cached or download client) selected.
When using forms, the form data needs to be retained across requests to the program. This is because Host On-Demand HTML files reload themselves for Java detection and for bookmarking support when using configuration server-based model pages. If Java 1 is selected and bookmarking support is disabled if using the configuration server-based model, the page will not need to reload and there is no need to retain the form data. This example uses a JSP session to store the form data across reloads.
Here is a simple HTML form that allows for entry of a host name. The form posts to the JSP program (example2.jsp):
<form method="POST" action="hod/example2.jsp">
Hostname <input name="form.hostname"><br>
<input type="submit">
</form>Here is the modified output from the Deployment Wizard. See the comments in the example for more detail. The lines added to the Deployment Wizard output are displayed in bold.
<HTML>
<%
// Get a session or create if necessary and store the hostname
// entered in the form in the session.
HttpSession session = request.getSession(true);
String hostname = request.getParameter("form.hostname");
if (hostname!=null) {
session.putValue("session.hostname", hostname);
}
%>
<!-- HOD WIZARD HTML -->
<!-- Deployment Wizard Build : 8.0.0-B20030605 -->
<HEAD>
<META http-equiv="content-type" content="text/html; charset=UTF-8">
<TITLE>Example 2 page title</TITLE>
<SCRIPT LANGUAGE="JavaScript" SRC="/hod/CommonJars.js"></SCRIPT>
<SCRIPT LANGUAGE="JavaScript" SRC="/hod/HODJavaDetect.js"></SCRIPT>
<SCRIPT LANGUAGE="JavaScript" SRC="/hod/CommonParms.js"></SCRIPT>
<SCRIPT LANGUAGE="JavaScript">
//---- Start JavaScript variable declarations ----//
var hod_Locale = '';
var hod_jsapi=false;
var hod_AppName ='';
var hod_AppHgt = '80%';
var hod_AppWid = '80%';
var hod_CodeBase = '/hod/';
var hod_FinalFile = 'z_example2.html';
var hod_JavaType = 'java2';
var hod_Obplet = '';
var hod_jars = 'habasen.jar,hodbasen.jar,hodimg.jar,hacp.jar,hodsignn.jar,ha3270n.jar,
hodcfgn.jar,ha5250n.jar';
var hod_URL = new String(window.location);
var hod_DebugOn = false;
var hod_SearchArg = window.location.search.substring(1);
var hod_AppletParams = new Array;
hod_AppletParams[0] = '<PARAM NAME="ParameterFile" VALUE="HODData\\example2\\params.txt">';
hod_AppletParams[1] = '<PARAM NAME="ShowDocument" VALUE="_parent">';
hod_AppletParams[2] = '<PARAM NAME="JavaScriptAPI" VALUE="' + hod_jsapi + '">';
hod_AppletParams[3] = '<PARAM NAME="PreloadComponentList" VALUE="HABASE;HODBASE;HODIMG;
HACP;HAFNTIB;HAFNTAP;
HA3270;HODCFG;HA5250">';
// The next 2 lines are required in order to override session properties.
// The first line turns on the processing for this function and does not
// need to be modified. The second line identifies the sessions that you
// want to change. In this example, there are 2 sessions identified
// named: "3270 Display" and "5250 Display".
// Be careful to increment the array index correctly.
hod_AppletParams[4] = <PARAM NAME="EnableHTMLOverrides" VALUE="true">;
hod_AppletParams[5] = <PARAM NAME="TargetedSessionList" VALUE="3270 Display,5250 Display">;
// The following line changes the Host or Destination Address session parameter
// for the session named "3270 Display". In this example, the Host is being set
// to the value saved in the JSP session from the HTML form.
// When you are initially testing your changes, you may want to use a constant
// value to verify that the syntax is correct before you insert your
// calculations.
// Here we override the host for the 3270 session to the value saved in the
// jsp session from the html form.
hod_AppletParams[6] = <PARAM NAME="Host" VALUE="3270
Display=<%=session.getValue("session.hostname")%>">;
//hod_AppletParams[x] = '<PARAM NAME="DebugCode" VALUE="65535">';
//---- End JavaScript variable declarations ----//
function getHODMsg(msgNum) {
return HODFrame.hodMsgs[msgNum];
}
function getHODFrame() {
return HODFrame;
}
var lang = detectLanguage(hod_Locale);
document.writeln('<FRAMESET cols="*,10" border=0 FRAMEBORDER="0">');
document.writeln('<FRAME src="/hod/hoddetect_' + lang + '.html" name="HODFrame">');
document.writeln('</FRAMESET>');
</SCRIPT>
</HEAD>
</HTML>Configuring Host On-Demand on zSeries
This chapter describes how to set up separate read/write private and publish directories for configuring Host On-Demand on a zSeries system.
The purpose of this configuration scenario is to provide instructions for common zSeries configuration tasks.
Setting up separate read/write private and publish directories
Set up a separate File System for the Host On-Demand private directory
When Host On-Demand is installed, files in the /usr/lpp/HOD/Host On-Demand/private directory are updated in an execution environment, not just by manufacturing refresh releases. Because this directory is now updated during the Host On-Demand software's execution, you are recommended to mount a separate (non-service) File System. You can do this in one of the following ways:
- MOUNT the separate File System on the current private directory location, such as /usr/lpp/HOD/Host On-Demand/private.
- Create a symbolic link to the private directory location as follows:
- Do a TSO MKDIR to create a different mount point, such as /etc/HOD/private.
- Rename, or back up and delete, your original private directory.
- Create a symbolic link from the expected location, /usr/lpp/HOD/Host On-Demand/private,
to point to the real location, /etc/HOD/private.
Use the following link command:
ln -s /etc/HOD/private /usr/lpp/HOD/Host On-Demand/private
If you are using LDAP and native authentication, manually copy the HODrapd and the /keys directory to the system-specific /private directory.
When the system-specific /private directory is mounted, it overlays but does not destroy the master /private directory. When maintenance releases are applied, use the master /private directory. If these files are changed, copy them to the system-specific /private directory.
Set up a separate user publish directory
Files generated from the Deployment Wizard can be placed in a user-defined directory that is separate from the Host On-Demand publish directory. This makes it easier to apply future Host On-Demand upgrades. This solution keeps the Host On-Demand publish directory read only and provides a separate writeable location for deploying Deployment Wizard files.
For instructions on deploying Deployment Wizard files in a separate user publish directory and for information on other user-modified files that can be placed outside the publish directory, refer to migration instruction of deployment wizard.
You can create and mount a separate file system for the user-defined publish directory. The generated Deployment Wizard zip file are to be transferred to this directory and unzipped by the DWUnzip utility. The Web server needs to include an alias statement specific to the user-defined publish directory.
You can access the page through the URL that specifies the alias of the user-defined publish location. For example, if the publish directory is /usr/lpp/HOD/publish, and the alias is userpublish, then the URL to access the client page would be http://<servername>/userpublish/<pagename>.html.
Migration considerations for z/OS
When upgrading from a previous level of Host On-Demand, to Host On-Demand V15.0, you need to consider the previous customization. Unlike previous migrations, from HOD v12.0 onwards, you cannot install HOD on top of a previous level of Host On-Demand because the Installation Manager is used to install the HOD Versions from HOD v12 onwards, and you need to start with an empty file system. After HOD V15.0 is installed, you can copy your previous private directory to the new private directory for any Groups and Users and sessions previously defined. Then use the pax or the tar command to copy your existing private directory into the HOD V15.0 File System. Refer to Backing up the private directory.
As for the previous clients created with the Deployment Wizard, you need to install the Deployment Wizard on a Windows computer. Then edit and redeploy the client to the HOD V15.0 server. Refer to Installing the Development Wizard from the z/OS server.
Backing up the private directory
- From the Host On-Demand V11 File System, change the directory to the private directory: cd /usr/lpp/HOD/Host On-Demand/private.
- Archive the private directory in a /tmp directory. The -z option compresses the file; the -v provides a list of files and subdirectories being archived (optional) : pax -wzvf /tmp/private.pax.Z * .
- Copy the private.tar.Z file to the /tmp directory on the system for Host On-Demand V12, if it is a different system.
- On the Host On-Demand V12.0 HFS, change the directory to the private directory where the file will be extracted: cd /usr/lpp/HOD/Host On-Demand/private.
- Issue the pax command to extract the private.pax.Z file. The -z option specifies a compressed file; the -v provides a list of files and subdirectories being extracted (optional) : pax -rzvf /tmp/private.pax.Z.
Installing the Development Wizard from the z/OS server
The Deployment Wizard normally locates on a Windows machine during the installation of the product. On z/OS, a download is provided for you to install the Deployment Wizard on Windows so you can generate client pages for the z/OS HOD server. Refer to the following steps for installing the Development Wizard from the z/OS server:
- Use FTP in binary to relocate this file of a Windows workstation: /usr/lpp/HOD/Host On-Demand/HOD/depwiz/DW.zip.
- Extract the zip file into a folder.
- To start the install, go to <folder>\DeploymentWizard\disk1 in Explore.
- Double click imLauncherWindows.bat to launch Installation Manager User Interface.
- Follow the instructions to finish the installation.
Once the Development Wizard is installed, you can launch it. Go to Start > All Programs > Host On-Demand Deployment Wizard.
Configuring Host On-Demand on IBM System i
After you install Host On-Demand on the IBM System i platform, configure the software as follows:
- To set up the Service Manager, follow the instructions in Configuring, starting, and stopping the Host On-Demand Service Manager on IBM System i.
- To use the Deployment Wizard with an IBM System i system, follow the instructions in Using the Deployment Wizard with IBM System i.
- To configure security, follow the instructions in Configuring IBM System i servers for secure connection.
- To understand the requirements for Unicode support using Coded Character Set Identifiers see Unicode Support for i/OS and OS/400.
Configuring, starting, and stopping the Host On-Demand Service Manager on IBM System i
The following commands can be used from the IBM iv7r1 or OS/400 command line.
Configure
HOD_install_directory>/lib/samples/NCServiceManager/. - Access the directory /<HOD install directory>/lib/samples/ NCServiceManager/. Here, <HOD install directory> is the location or path where Host On-Demand has been installed. For example, /QIBM/ProdData/Host On-Demand/.
- Open the NCServiceManager-OS400.sh file.
- Verify that the runtime variables are correct and correspond with
your environment. Change the default values of the runtime variables
if they do not correspond with your environment. These include the
following:
- • Location of the JRE: JAVA_ENGINE
Update the value of the JAVA_ENGINE to the complete path or location of the jre installed on the system. It must be Java V6 or higher. It must point to <java_installation>/bin/java in the Java installation directory.
- • Location of the Host On-Demand publish directory on
the server: MY_HOD_DIRECTORY
Verify, and update if necessary, the value of MY_HOD_DIRECTORY to the complete path of the Host On-Demand installation directory. It must be the installation directory of Host On-Demand and the directory contains /bin, /lib and other folders of Host On-Demand. Generally, this value is updated once at the time of installation. For example, /QIBM/ProdData/Host On-Demand.
- • Target paths specified within the command file: MY_PUBLISHED_DIRECTORY
Verify, and update if necessary, the value of MY_PUBLISHED_DIRECTORY to the complete path of the Host On-Demand Publish directory. Generally, it is the <HOD_Installation>/HOD directory, where <HOD_Installation> is the Host On-Demand installation directory.
- • Location of the JRE: JAVA_ENGINE
- Confirm that NCServiceManager-OS400.sh has the necessary execute permissions and authorized to write to directories in the Host On-Demand installation on the server.
Start
To start the Host On-Demand Service Manager, run NCServiceManager-OS400.sh so that it starts and continues to run in the background.
One way to achieve this on IBM i Series is to submit a job by invoking the IBM PASE for System i to run the script. Contact your IBM i Series administrator for the details on best ways to submit a job suitable to your i Series setup and requirements.
sbmjob cmd(call pgm(qp2shell) parm('/QOpenSys/usr/bin/-sh' '/QIBM/ProdData/Host On-Demand/lib/samples/NCServiceManager/NCServiceManager-OS400.sh'))Stop
To stop the service manager, end the job on Iseries. Contact your Iseries administrator for details on a suitable method for stopping the service.
- Type WRKACTJOB to open a list of active jobs.
- In the Work with Active Jobs menu, the Host On-Demand service manager job gets listed with function name JVM-NCServiceM. Scroll down the menu to this job entry and select the Work With.. option, typically option 5.
- Select the End job option. For this, type 41 to end the job, and press the Enter button. This ends the service manager job and stop the service manager.
Work with HOD Server status
To determine whether the Service Manager is running, it needs to be checked whether the Java program NCServiceManager , which is started by the script NCServiceManager-OS400.sh, is running or not. Therefore, the method to check the server status might vary according to the method used to start the service manager.
- Use the WRKACTJOB command to review the status :
- Enter the command:
This provides a list of active jobs.WRKACTJOB - In the Work with Active Jobs menu, the Host On-Demand service manager job gets listed with the function name JVM-NCServiceM. Use the PageDown or PageUp button to scroll down the menu to this job entry and enter the appropriate option number to Work with.. the job, typically option 5.
- Utilize the menu options to review the job status.
- Enter the command:
- Query the process status in the command line.
- On the IBM System i, sign on to a green screen command line.
- b) Enter the PASE shell environment. On the green screen command
line, enter the following command:
.call qp2term - On the PASE shell, type the following command:
.ps –ef | grep NCServNote: NCServiceManager is the name of the Java program that runs the service manager.
$
> ps -ef | grep NCServ
kushald 3146 1 0 15:23:30 - 0:00 /QIBM/ProdData/OS400/Java400/jFr
omPASE java -classpath .:sm.zip:ibmjndi.jar:jndi.jar:jsdk.jar:ods.jar:jt400.j
ar -Djava.net.preferIPv4Stack=true -DFIPS=on com.ibm.eNetwork.HODUtil.service
s.admin.NCServiceManager /QIBM/ProdData/Host On-Demand
$ Certificate Management
Certificate Management functions can be performed using the P12Keyring utility provided by Host On-Demand. This provides an easy way to create and deploy an SSL keyring database. Use this option to work with SSL certificates in one of the Host On-Demand keyrings. Refer to Planning for security for general information on SSL related sessions.
Information on P12Keyring and its usage is available in P12 Keyring utility.
Some sample commands can be viewed at the link How to create, add or convert certificates to CustomizedCAs.p12 file on z/OS for Host On-Demand.
Start Information Bundler
In the event that you need to contact the IBMCenter for assistance, the already available Information Bundler script file can be used to gather information about your Host On-Demand configuration.
Create HOD Printer Definition Table
Create a custom printer definition table for Host On-Demand 3270 printer sessions. In order to use this function, refer to Compiling a PDT in the iSeries server section.
A custom printer definition might be necessary if you have a special paper form or if the printer is not supported. The following options are not available on HOD V15.0:
Using the Deployment Wizard with IBM System i
To use the Deployment Wizard to deploy screens to an IBM System i-based Host On-Demand server, do the following:
- From a Windows workstation, map a network drive to /qibm directory on the IBM System i system that is Host On-Demand server. Refer to the IBM i documentation for more information.
- Download Deployment Wizard installation image from an already installed Host On-Demand v12 server. Access HODMain.html (for example http://hodserver.name.com/hod/HODMain.html, and click on Deployment Wizard Installation Image for Windows.
- Refer to the installation instructions for installing Deployment Wizard. You can run this without having to install the entire Host On-Demand server.
- Design the custom features and selections.
- Save the customized HTML file to the mapped network drive (For example, y:\ProdData\Host On-Demand\hod\myweb).
- Use a browser to test out the file (For example, http://iSeries.name.com/hod/myweb.html).
Configuring IBM System i servers for secure connection
If you are using self-signed certificates or certificates from a signing agency that is not in the well-known list, use the P12Keyring utility to configure the CustomizedCAs keyring. For more details, refer to P12 Keyring utility.
- Ensure that java is installed in the system.
- Open a unix/AIX-based command line. For example, QSHELL or IBM I PASE shell.
- Navigate to the Host On-Demand publish folder in the Host On-Demand installation directory. Generally, it is /QIBM/ProdData/Host On-Demand/HOD/.
- Enter the command
. This command can take a few minutes to complete. If you are asked for a password, type hod and press Enter.java -classpath .:your_install_dir/lib/sm.zip com.ibm.hod5sslight.tools.P12Keyring CustomizedCAs connect myServer.raleigh.ibm.com:702 - Select the certificate number that corresponds to the Certificate Authority (CA) that you want to add to the keyring. Be sure to add the CA certificate and not the site certificate. If the port is not responding, refer to Configuring IBM i 7.1 servers for secure connection.
- Repeat steps 3to 5for each target server.
- Ensure that java is installed in the system.
- Open a linux-based shell, for example, QSHELL or IBM i PASE shell.
- Navigate to the Host On-Demand publish folder in the Host On-Demand installation directory. Generally, it is /QIBM/ProdData/Host On-Demand/HOD/.
- Enter the command
.java -classpath .: your_install_dir/lib/sm.zip com.ibm.hod5sslight.tools.P12Keyring CustomizedCAs list
Installing and configuring Host On-Demand with TLS on i/OS and OS/400
- Verify all software and hardware requirements are met.
- Install all necessary IBM System i software products. Refer to your IBM System i documentation for details.
- Install all required PTFs. The latest PTFs are located on at https://www.ibm.com/support/pages/node/967243.
- Install and configure the IBM HTTP Server or IBM Application Server. Refer to the product documentation for details.
- Create a Certificate Authority (CA) from the Digital Certificate Manager on the IBM Administrative Server or purchase a public CA. Refer to your IBM System i documentation for details.
- Configure TLS on the IBM HTTP Server or IBM Application Server. Refer to the product documentation for details.
- Configure Host On-Demand with TLS. Refer to Configuring TLS for details.
Configuring a Telnet server for secure connection
See IBM System i documentation and search on TLS to learn the steps you need to take to enable TLS. You might need to repeat the steps for each IBM System i7 system that you want to use secure connections with.
Configuring the Host On-Demand CustomizedCAs keyring
If you are using self-signed certificates or certificates from a signing agency that is not in the well-known list, use the P12Keyring utility to configure the CustomizedCAs keyring. For more details, refer to P12 Keyring utility.
- Ensure that java is installed in the system.
- Open a linux-based shell, for example, QSHELL or IBM I PASE shell.
- Navigate to the Host On-Demand publish folder in the Host On-Demand installation directory. Generally, it is /QIBM/ProdData/Host On-Demand/HOD/.
- Enter the command
This command can take a few minutes to complete. If you are prompted for a password, type hod and press Enter.java -classpath .:your_install_dir/lib/sm.zip com.ibm.hod5sslight.tools.P12Keyring CustomizedCAs connect myServer.raleigh.ibm.com:702 - Select the certificate number that corresponds to the Certificate Authority (CA) that you want to add to the keyring. Be sure to add the CA certificate and not the site certificate. If the port is not responding, refer to Configuring IBM System I servers for secure connection.
- Repeat steps 3to 5 for each target server.
To view the contents of the CustomizedCAs keyring, do the following:
- Ensure that java is installed in the system.
- Open a linux-based shell, for example, QSHELL or IBM I PASE shell.
- Navigate to the Host On-Demand publish folder in the Host On-Demand installation directory. Generally, it is /QIBM/ProdData/Host On-Demand/HOD/.
- Enter the command
.java -classpath .: your_install_dir/lib/sm.zip com.ibm.hod5sslight.tools.P12Keyring CustomizedCAs list
|
If you have multiple IBM System i machines and would like to create a single certificate that all the machines can use, consider cross certification. Refer to Managing Security and Cryptographic Services APIs for additional information about cross certification. |
Client authentication
For additional security, consider TLS with client authentication to tightly control who can Telnet to your system over the Internet. For example, you can configure the Telnet server to only allow authentication if the client certificate was issued by your IBM System i (through Digital Certificate Manager).
The client certificates have a limited validity period (for example, 90 days). When the certificate expires, the user must perform the Client Certificate Download process in order to continue. This process requires a valid IBM System i user ID and password.
|
Not all Telnet client software is capable of client authentication. When enabled, all TLS-enabled Telnet connections to the IBM System i require a user certificate. |
Configuring the Host On-Demand OS/400 proxy for secure connections
The OS/400 proxy can be configured to encrypt file transfer and Database On-Demand connections. To do this, the following additional software must be installed on each target IBM System i:
- IBM Cryptographic Access Provider
- IBM Client Encryption
- Host Servers
- Digital Certificate Manager
Set up TLS user authorizations
You need to control authorization of the users to the files. To help you to meet the TLS legal responsibilities, you need to change the authority of the directory that contains the TLS files to control user access to the files. In order to change the authority, do the following:
- Enter the command
wrklnk '/QIBM/ProdData/HTTP/Public/jt400/*' - Select option 9 in the directory .
- Ensure *PUBLIC has *EXCLUDE authority.
- Give users who need access to the TLS files *RX authority to the directory. You can authorize individual users or groups of users. Remember that users with *ALLOBJ special authority cannot be denied access to the TLS files.
Secure Web serving
The Host On-Demand server uses the Web server to download program objects to the browser. This information can be encrypted, but with a considerable performance impact.
The default port for secure web serving is 443. If that port is not enabled, port 80 is used. To enable secure web serving, perform the following steps:
- From a Web browser, enter:
http://<server.name>:2001(where <server.name> is the TCP/IP host name of your IBM System i). If you are unable to connect, start the HTTP server with the following i/OS and OS/400 command:STRTCPSVR SERVER(*HTTP) HTTPSVR(*ADMIN) - Enter the i/OS or OS/400 user profile and password (when prompted). you need to have *ALLOBJ and *SECADM authorities to complete the remaining configuration activities.
- Click IBM HTTP Server for AS/400.
- Click Configuration and Administration.
- Click Configurations.
- Select the CONFIG configuration from the list.
- Click Security Configuration.
- For the Allow HTTP connections and Allow TLS connections selections:
- Port number (443)
- Select TLS Client authentication None.
- Select Apply.
- Click AS/400 Tasks button on the lower left side of the screen.
- Click Digital Certificate Manager.
- Click System Certificates.
- Click Work with Secure Applications.
- Click QIBM_HTTP_SERVER_CONFIG; then click Work with System Certificate.
- Click Assign New Certificate.
- End the administration HTTP server instance with the following
i/OS and OS/400 command:
ENDTCPSVR SERVER(*HTTP) HTTPSVR(DEFAULT) - Wait 10 seconds for the HTTP instance to shut down.
- Start the administration HTTP server instance with the following
i/OS and OS/400 command:
STRTCPSVR SERVER(*HTTP) HTTPSVR(DEFAULT) - From a Web browser, enter
https://server.name/hod/hodmain.html(where server.name is the TCP/IP host name of your IBM System i).
For more information on a wide variety of IBM System i topics, see https://www.ibm.com/docs/en/i/7.1.
Unicode Support for i/OS and OS/400
General information
In a 5250 Display session, Host On-Demand supports the display of Unicode data located in fields tagged with Coded Character Set Identifiers (CCSIDs). For more information see Unicode support for i/OS and OS/400 using Coded Character Set Identifiers.
Host programming information
For host programming information, refer to the IBM i documentation.
Deploying Host On-Demand with WebSphere Portal
As an alternative to accessing Host On-Demand through an HTML file, users can access it through Portal Server, which is a component of WebSphere Portal. Portal Server provides a framework for plugging content extensions known as portlets into a Web site. Portlets are applications that run within Portal Server. They organize content from different sources (such as Web sites, e-mail, and business applications) and display it on a single HTML file in a browser window. The WAR files generated by the Deployment Wizard used to launch Host On-Demand sessions can be deployed as portlets, enabling users to access Host On-Demand through the portal interface. If you are planning to use Host On-Demand and Portal Server in conjunction with a firewall, refer to Using Host On-Demand with a firewall. Also, if you are planning to use security features of WebSphere Portal, such as the user's Portal ID or the Portal Server Credential Vault, refer to the
Both Host On-Demand and Portal Server must be installed to run a Host On-Demand portlet.
How Host On-Demand works with Portal Server
Figure 8 shows how Host On-Demand works with Portal Server.
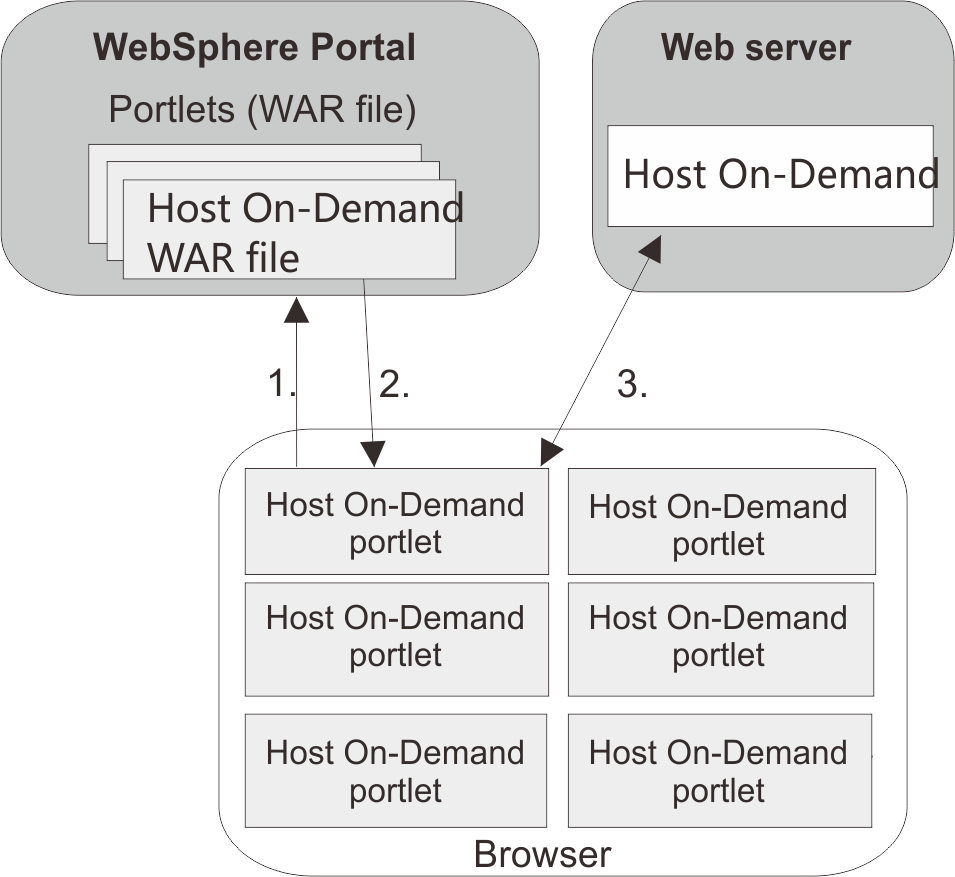
- A user logs into the portal through a browser and is authenticated by a user ID and password.
- The user's customized set of portlets is downloaded to the user's machine and is displayed in the browser.
- If the user has configured a Host On-Demand portlet, Host On-Demand starts. This gives the user full Host On-Demand functionality within the portlet window, including being able to start sessions and perform other Host On-Demand tasks.
Using Host On-Demand clients with Portal Server
To use Host On-Demand with Portal Server, you need a Host On-Demand portlet. You can quickly and easily create your own custom portlets using the Deployment Wizard. See the Deployment Wizard online help for details about creating portlets .
After you create a custom portlet or obtain a sample one, you can import it directly into Portal Server just like any other portlet.
Limitations on accessing Host On-Demand through a portlet
- Although Host On-Demand supports Mac OS client browsers, it is not recommended for Portal environments.
- When running multiple portlets on a single WebSphere Portal page,
note the following:
- Use the HTML-based configuration model.
- Use Java when configuring portlets as cached clients.
- Configure your portlets to be either download or cached clients, not a mixture of the two.
- When using a Java–enabled browser for sessions that are configured to run in a separate window and that have the AssociateEmbeddedMenuBar parameter set to false, the menu for 3270 and 5250 host sessions displays as a pop-up menu. For Host Print and FTP sessions, the pop-up menu does not display by default. In order to display the menu for Host Print or FTP sessions, you need to configure the sessions to start in a separate window.
- In order to embed the menu bar in the Host On-Demand session that
is configured not to run in a separate window,
you need to have a Java–enabled browser and the AssociateEmbeddedMenuBar
parameter set to true (the default). In the following circumstances,
the menu bar for 3270, 5250, VT, and CICS host sessions will display
as a pop-up menu (and not embedded in the session):
- The client browser is enabled with Java and the AssociateEmbeddedMenuBar parameter is set to false
- If the portlet uses caching for Host On-Demand (as configured in the Deployment Wizard), each machine used to access the portlet caches the Host On-Demand client.
- Host On-Demand bookmarking does not work in the portal environment.
- If you do not configure an applet size in the Deployment Wizard, it will default to fixed size, medium.
- When the Host On-Demand portlet is running, you may see warning
messages like
java.io.FileNotFoundExceptionin the Java Console. The messages are caused by a dummy archive file name that the Host On-Demand portlet uses to enable multiple Host On-Demand portlets to run on a single portal page. These messages do not affect the performance of the portlet, so you may ignore them.
Special considerations when using a Host On-Demand portlet
- Host On-Demand sessions when the user logs out of Portal Server. Host On-Demand runs as an applet on the user's machine and therefore does not know when the user logs out of Portal Server. If the session is running in a separate window (default), the Host On-Demand session will continue until the user either closes the session or closes the browser. If the Host On-Demand session is running embedded in the Portal Server window and the user logs out of Portal Server, the session may appear to have ended, although the connection may remain until the browser window is closed. We strongly recommend that users close their browser window at the time they log out of Portal Server. In addition, you may wish to configure a session inactivity timeout for your sessions.
- Session inactivity timeout. By default, Host On-Demand does not force a timeout on session connections. However, when running a portlet, it may be beneficial to timeout inactive sessions to reduce consumption of resources. The inactivity timeout can be set for most emulator types, including 3270 display and printer sessions, 5250 display and printer sessions, and VT. You can enable and set the timeout parameter Session Inactivity Timeout in minutes for every one of these sessions in the Connection window of session Properties.
- Installing WebSphere Portal and Host
On-Demand on different servers. If you install WebSphere Portal
and Host On-Demand on different servers, certain browsers might give
you a security violation when accessing the Host On-Demand portlet.
The problem occurs because some aspects of Host On-Demand functionality
rely heavily on the interaction between Java (from the Host On-Demand
server) and JavaScript (from WebSphere Portal), and some browsers
will not allow the interaction simply because they come from different
servers. One solution is to use proxying to make it appear to the
browser that WebSphere Portal and Host On-Demand are on the same server.
Below is an example of the steps you would need to follow to set
up proxying on the Apache/IBM HTTP server:
- Configure your Host On-Demand portlet's "HOD Server URL" (hodCodeBase) to point to the host on which WebSphere Portal resides, with the context root of /hod/ (for example, http://portal.company.com/hod).
- Uncomment the line (remove the #) in httpd.conf beginning with LoadModule proxy_module.
- Add a ProxyPass rule to httpd.conf to convert the HOD Server URL request into a request for the actual Host On-Demand server (for example, ProxyPass /hod/ http://hod.company.com/hod/).
- Restart the Web server.
-
Now, the client's browser will request Host On-Demand files from the same host as the portal, but these requests will be internally rerouted by the Web server to the actual location of your Host On-Demand install.
- Caching vs. no caching. The default setting in the Deployment Wizard is to cache Host On-Demand on each user's machine. Many customers like this option with Host On-Demand because it effectively installs all necessary code on the user's machine and does not require network loads each time the user accesses the HTML file or portlet. However the caching behavior may not be familiar to many Portal Server users, and you may elect to reject the caching option.
- Choosing the Deployment Wizard model. The
model you choose for your portlet (Configuration server, HTML, or
Combined) reflects where your sessions are configured and determines
how user changes are stored. Although Host On-Demand treats portlets
the same as HTML files, consider the following characteristics as
you decide how to configure your portlet:
- HTML model: This model is the recommended configuration model
for Host On-Demand portlets. It has no dependency on the Host On-Demand
configuration server. If users are allowed to make updates, these
updates are stored as part of the WebSphere Portal configuration and
not on the local machine of the user. This allows users to roam from
machine to machine and still have access to the updates.
User preferences are stored in WebSphere Portal only if you have granted users the appropriate access to the portlet and the Web page that will access the portlet. WebSphere Portal users must have Privileged User, Editor, Manager, or Administrator access. For more information about how to grant access to users, refer to WebSphere Portal documentation. - Configuration server-based model: This model requires users to access the Host On-Demand configuration server. It allows users to roam from one machine to another and still see any session modifications they may have made; however, it requires users to be authenticated through both the Host On-Demand configuration server and WebSphere Portal.
- Combined model: This model requires users to have access to the
Host On-Demand configuration server in order to obtain the initial
session configurations. Because user changes are stored as part of
the WebSphere Portal configuration and not locally, it allows users
to roam from one machine to another and still see any session modifications
they may have made; however, it requires users to be authenticated
through both the Host On-Demand configuration server and WebSphere
Portal.
User preferences are stored in WebSphere Portal only if you have granted users the appropriate access to the portlet and the Web page that will access the portlet. WebSphere Portal V5 users must have Privileged User, Editor, Manager, or Administrator access. For more information about how to grant access to users, refer to WebSphere Portal documentation.
- HTML model: This model is the recommended configuration model
for Host On-Demand portlets. It has no dependency on the Host On-Demand
configuration server. If users are allowed to make updates, these
updates are stored as part of the WebSphere Portal configuration and
not on the local machine of the user. This allows users to roam from
machine to machine and still have access to the updates.
- Configuring additional parameters. When
using Host On-Demand portlets, you may want to configure the following
additional parameters to achieve the desired appearance on the portal
page:
- Start Automatically: Set this option to Yes on the Preferences > Start Options window of session properties to allow the Host On-Demand portlet to start automatically.
- Start in Separate Window: Set this option to No on the Preferences > Start Options window of session properties to allow the Host On-Demand portlet to display as an embedded portlet.
- Hide HOD Desktop at Startup: Select this option on the Advanced Options > Appearance window to hide the Host On-Demand desktop.
- Specifying unique portlet names in Portal Server. Use the Page Title field on the File Name and Output Format page in the Deployment Wizard to specify unique portlet names within Portal Server.
Extending the Host On-Demand portlets
- Portlet template files are located in the portal subdirectory of your Host On-Demand publish directory (or in your Deployment Wizard installation directory, if you installed it separately). Modifying these templates will affect all portlets that are generated subsequently, so be sure to back up these files if you are going to modify them. Template files include those for the JSPs that are used to display the Host On-Demand applet and those for the XML descriptors that are used to deploy the portlets to WebSphere Portal.
- Each portlet is an archive that can easily be extracted and re-archived using a zip utility or the jar utility packaged with a JRE. Extract the portlet to a temporary directory, preserving directory names. You can then modify the appropriate files, and re-archive the portlet from the top level of the temporary directory.
- XML descriptors are located in the top-level directory of your portlet. JSP files are located in the /WEB-INF/hod/html directory for WebSphere Portal 6.
- You may wish to add a custom Help file to your portlet. To do this, you need to indicate in your portlet.xml file that you support the help markup mode. Add a file named WpsHODHelp.jsp (case-sensitive) containing your help information and HTML formatter to your JSP directory in your portlet.
- You may wish to develop a custom portlet that dynamically modifies session properties. Some useful data you may want to access would be the user name of the portal user, or the IP address of the client requesting the page. Consult the portlet APIs on how to access this data. You can use the HTML override syntax described in Modifying session properties dynamically to then insert data derived from this information into your set of applet parameters.
- Consult the WebSphere Portal documentation installed with WebSphere Portal for detailed information regarding portlet development and APIs.
Eclipse-Plugin support
Eclipse-Plugin is the foundation for next-generation, network-centric computing. Built on the Eclipse rich client platform, it provides additional features for managing and deploying applications easily to end users.
On Eclipse-Plugin, all applications are packaged as Eclipse “features”, which consist of “plugins” and “fragments”. Eclipse features are usually installed from an “update site”, which is a directory on a machine that is web-accessible.
To build the Host On-Demand plugin for Eclipse-Plugin, Host On-Demand provides a Java applet called "Update Site Utility". The Update Site Utility converts Host On-Demand jar files into Eclipse plugins and fragments and places them in a new or an existing update site directory.
Procedures to install features from an update site are different depending on Eclipse-Plugin platforms, such as Workplace Managed Client (WMC) or WebSphere Everyplace Deployment (WED). When WMC is used, extra configuration steps are required on its server counterpart, Workplace Collaboration Service (WCS). The Update Site Utility generates an XML file, which eases the configuration steps on WCS.
Creating Host On-Demand plug-ins
To create and deploy these Host On-Demand plugins to run in Eclipse-Plugin, do the following:
- Ensure that you have an HTML-model Deployment Wizard page that
defines the sessions for your plugin. You can use any existing HTML-model
page or create a new one.
Note: Only HTML-model pages are supported for the Eclipse-Plugin feature.Once your page is completed, put the unzipped Deployment Wizard output files into the Host On-Demand publish directory.
- Create a directory, for example c:\update, that will be used as the Eclipse update site for your plugin(s), if you do not already have one defined. Next,
- Define an alias to that directory in the Web server configuration and restart the Web server.
- You are now ready to create the Host On-Demand plugin.
On the Eclipse update site machine, open a browser, running Java JRE
(1.6 or higher) and point it to the Host On-Demand URL: http://<hostname>/<alias>/WCTConfig.html .
Note: On Linux, you need to set the LD_LIBRARY_PATH environment variable when using the IBM 1.4.2 Java plugin Service Release 2 and later.For example, if you want to use the Java plugin that is shipped by Host On-Demand server for Linux, use export command to set the LD_LIBRARY_PATH environment variable as follows:
export LD_LIBRARY_PATH=/opt/ibm/HostOnDemand/hod_jre/jre/bin: $LD_LIBRARY_PATH - This URL will run a special Update Site Utility applet to assist in building the plugin.
- Fill in the Basic Information panel of the Update Site Utility
as follows:
- Update Site Destination Directory (Required) Specify the Eclipse update site directory created in Step 2, for example c:\updates.
- HOD Code Base (Required) This field should already be correctly filled in, if you pointed to WCTConfig.html as described in Step 3. This field needs to specify the location of the Host On-Demand publish directory in the form: http://<hostname>/<alias> The Host On-Demand server name must be fully-qualified. It cannot be a relative URL name or one like “localhost” or “127.0.0.1”.
- Deployment Wizard Output File (Required) Specify the name of the HTML-model Deployment Wizard page created in Step 1.
- Feature Version (Required) Specify the version string used in the generated feature in the format major.minor.service, like 1.0.0.
- User JAR File Path (Optional) Specify the
path of a jar file containing customer code used for solutions that
require custom code to interact with the Host On-Demand sessions.
You can specify multiple files separated by commas (,).
Note: If you need to use the Run Applet feature, you need to package your applets in a jar file and specify the file path here.
- You can reduce the size of the Eclipse plugin to be created by unchecking any unnecessary features or host code pages on the Runtime Codes and the Code Pages panels of the Update Site Utility panel.
- When you have completed all the fields, select Generate and Deploy Plugin. The applet creates the Host On-Demand plugin, and places it in the update site you have specified.
- Following files are created or modified in the directory specified
as Update Site Destination Directory:
- Site map file (site.xml): This file lists the features that are installable from this update site.
- XMLAccess script file: This file is an input of WebSphere Portal XMLAccess utility for installing Host On-Demand feature on WCS. The file names are given in the form: (deployment wizard output file name)_DeployScript.xml.
- features subdirectory: This subdirectory contains the Host On-Demand feature archives.
- plugins subdirectory: This subdirectory
contains:
Host On-Demand plugin Plugin itself. File name is given in the form: com.ibm.eNetwork.HOD.wct_(plugin version).jar Host On-Demand code fragment Host On-Demand runtime code. File name is given in the form: com.ibm.eNetwork.HOD.wct.(function name)_(plugin version).jar Config fragment Fragment that stores configuration information. File name is given in the form: com.ibm.eNetwork.HOD.wct.configs.(deployment wizard output file name)_(feature version).jar - images subdirectory: This subdirectory contains an image file used on WMC/WCS.
For information about installing the plugin on the client, refer to documents that come with your Eclipse-Plugin platforms.
Setting Session Properties Dynamically
- Implement a Java class that implements the com.ibm.eNetwork.HOD.wct.IHODConfigFactory interface,
which is stored in the wct.jar file. The wct.jar file is installed
in the Host On-Demand publish directory. The interface has two public
methods:
public String setHodHtmlFileName() public Properties getHodHtmlParameters()Following is an example of such Java classes:Figure 9. Example of Java classes package com.ibm.eNetwork.HOD.wct.samples; import java.util.Properties; import com.ibm.eNetwork.HOD.wct.IHODConfigFactory; public class ConfigOverride implements IHODConfigFactory { /* (non-Javadoc) * @see com.ibm.eNetwork.HOD.wct.IHODConfigFactory#getHodHtmlFileName() */ public String getHodHtmlFileName() { return "hodwmc"; } /* (non-Javadoc) * @see com.ibm.eNetwork.HOD.wct.IHODConfigFactory#getHodHtmlParameters() */ public Properties getHodHtmlParameters() { Properties p = new Properties(); p.put("EnableHTMLOverrides", "true"); p.put("TargetedSessionList", "3270 Display"); p.put("host", "3270 Display=hostname"); return p; } - Package the Java class in a jar file.
- Edit the Update Site Utility HTML file (WCTConfig.html) in the
Host On-Demand publish directory and set the showUserClass parameter
to true:
var showUserClass=“true”; - Run the Update Site Utility and specify additional parameters as follows: User JAR File Path: The file path of the jar file created on the step 2. User Configuration Factory Class: The name of the Java class implemented on the step 1.
- Generate a Host On-Demand plugin and deploy it to your Eclipse-Plugin platform.
Using a separate user publishing directory
- Edit the Update Site Utility HTML file (WCTConfig.html) in Host
On-Demand publish directory and set the showAlternatePublishDirectory
parameter to true:
var showAlternatePublishDirectory =“true”; - Run the Update Site Utility and specify your separate user publishing directory in the Alternate Publish Directory entry field.
View IDs used in Host On-Demand plugin
| ID | Description |
|---|---|
| com.ibm.eNetwork.HOD.wct.SessionsView | Configured Sessions |
| com.ibm.eNetwork.HOD.wct.SessionLabelsView | Active Sessions |
| com.ibm.eNetwork.HOD.wct.TerminalView | Terminal (Display, Printer, FTP, etc.) |
Limitations on using Host On-Demand in a Eclipse-Plugin environment
- Sometimes a Host On-Demand modal dialog can get behind the Eclipse-Plugin shell window. This will happen if Host On-Demand has a dialog open and the user switches to another application outside of Eclipse-Plugin. User will have to do ALT-TAB to find the HOD dialog that needs to be acknowledged.
- “Confirm On Exit” does not work. The “Confirm On Exit” setting is ignored in the Eclipse-Plugin environment. Since it is not supported, the option has been removed from the session properties.
- If a session is launched and a destination address is not configured, the Host On-Demand applet is able to launch the session properties dialog. In the Eclipse-Plugin environment, users receive a message that a destination address is required but the properties dialog does not open.
- GUI elements like Macro Manager, Keypad, and Toolbar can not be added dynamically to a running session. Instead, these items must be enabled using the existing properties in the Preferences section of the session properties.
- Option to “Start in a Separate Window” has no meaning in this environment since the session is always in an editor pane. This option is removed from the session properties.
- Only a client with debug capabilities is available. Reducing the preload components using the Deployment Wizard Preload Options to make the footprint smaller (with the exception of host codepages and 5250 File Transfer) is not possible.
- Unlike the Host On-Demand cached client, client does not automatically update to the new code level. The Administrator needs to re-configure Update Site so that the Eclipse-Plugin platform can install the new plugin/fragments.
- Run Applet works only when the applet is packaged in a JAR file and installed on client machines.
- IPMON tracing is supported only in the “normal” mode. The “automatic” mode is not supported. On the execution modes of IPMON, refer to the “Overview of IPMON tracing” topic in the online help.
- When multiple Host On-Demand features are installed, the Host On-Demand plugin displays the list of installed Host On-Demand features in the configured sessions view to let the user select one feature among them. After one feature is once selected, the user needs to restart WED to select a different feature.
- Pressing and releasing the Alt-key throws an exception on the Java console. This is a known problem with the IBM 1.4.2 JRE and has been resolved in IBM 1.4.2 Service Release 4.1 and later.
Configuring Host On-Demand Server to use LDAP
The Host On-Demand Server is used to manage configuration data for the configuration server-based and combined models. For the default operational mode of the Host On-Demand Server, this data is saved in a non-shared private data store. Some enterprise customers need to manage their configuration information between multiple Host On-Demand servers. If these customers use the non-shared private data store, then their administrators must manage the data for each Host On-Demand Server separately. A Lightweight Directory Access Protocol (LDAP) server directory provides the ability to share user and group configuration information over different instances of the Host On-Demand configuration server.
Using an LDAP directory server to manage and share your definitions across multiple Host On-Demand servers is an option that must be carefully planned and executed. Migration from the private data store, in particular, has implications on the configuration data. LDAP enables the customer to manage the configuration information by arranging users into a hierarchical tree of groups. If existing users are members of more than one group, then some information will be lost. Note that the configuration data in the private data store is not changed when a migration to LDAP occurs. See implications of migrating to LDAP for more detailed information.
Setting up LDAP support
- Decide which LDAP Directory server you are going to use and, if necessary, install it.
- If you are running a version of LDAP that does not support the schema for Host On-Demand , install the Host On-Demand schema extension files as described in Installing the schema extensions. (The schema extension files are not required for IBM LDAP Version 3.x or later.)
- Ask your LDAP administrator for a suffix which Host On-Demand will use to store configuration information. Make a note of the distinguished name (DN) of this suffix; you will need this information to complete the LDAP setup.
- Ask your LDAP administrator for an administrator DN and password for Host On-Demand; these will be used to authenticate to the LDAP server. The administrator DN must have create, modify and delete privileges for the suffix mentioned in the previous step. Make a note of the DN and password; you will need this information to complete the LDAP setup.
- Enable LDAP on the Directory Service window in the administration
utility. Also, optionally, migrate the private data store configuration
information to the LDAP directory server. For more information, refer
to Configuring Host On-Demand Server to use LDAP.
Users and groups that are already defined in LDAP for other purposes are not used by Host On-Demand. Users and groups for Host On-Demand must be defined separately by either migrating the configuration information from the private data store or by setting up the users and groups in Host On-Demand after enabling LDAP. If you are using the IBM LDAP server on Windows and AIX platforms, and you are creating a large number of users, make sure that DB2 is configured with the proper value for APP_CTL_HEAP_SZ. While the value for this variable is dependent on individual installations, setting APP_CTL_HEAP_SZ to 512 is a good starting value. To configure DB2 heap size in a Windows or AIX environment, issue these commands:- set DB2INSTANCE=ldapdb2
- db2 connect to ldapdb2
- db2 update db cfg for ldapdb2 using APP_CTL_HEAP_SZ 512
- db2 force application all
- db2 terminate
- db2stop
- db2start
Installing the schema extensions
The Host On-Demand extensions to the LDAP directory
schema
are provided in several files that are located in the LDAP subdirectory of the publish
directory (for example, your_install_directory\HOD\ldap, where
your_install_directory is your Host On-Demand installation directory). These files
contain extensions to the LDAP schema and are stored in the standard slapd format. The schema
extensions must be in effect before Host On-Demand can store configuration information in an
LDAP server. Contact your LDAP administrator to have these schema extensions installed.
|
Your LDAP administrator may have already installed these schema extensions for use by another IBM product. If so, skip these steps. If you are using the IBM Directory Server Version 3.1.1 or later, the schema is pre-installed, so you can skip these steps also. |
To install the Host On-Demand schema extensions on a Netscape LDAP Directory server:
- Copy the following slapd files from the <Host On-Demand publish directory>/ldap
directory to the Netscape LDAP config directory on the LDAP server :
Netscape.IBM.at Netscape.IBM.oc - Stop the LDAP server.
- Edit the <Netscape LDAP config directory>/
slapd.conffile and add the following statements:userat "<Netscape LDAP config directory>/Netscape.IBM.at"useroc "<Netscape LDAP config directory>/Netscape.IBM.oc" - Restart the LDAP Server.
To install the Host On-Demand schema extensions on an IBM LDAP Directory server:
- Copy the following slapd files from the Host On-Demand publish directory/ldap directory
to the <installation directory>/etc directory on your LDAP server:
V2.1.IBM.at V2.1.IBM.oc - Stop the LDAP server.
- Edit the <installation directory>/etc/
slapd.at.conffile and add the following statement to the end of the file:include /etc/V2.1.IBM.at - Edit the <installation directory>/etc/
slapd.oc.conffile and add the following statement to the end of the file:include /etc/V2.1.IBM.oc - Restart the LDAP server.
Configuring the Host On-Demand server to use LDAP as a data store
- Open the Administration window and logon to Host On-Demand.
- Click Services > Directory Service
- Click the Use Directory Service (LDAP) box and then enter the
LDAP server information.
- Destination Address
- Type the IP address of the LDAP directory. Use either the host name or dotted decimal format. The default is the host name of the Host On-Demand server.
- Destination Port
- Type the TCP/IP port on which the LDAP server will accept a connection from an LDAP client. The default port is 389.
- Administrator Distinguished Name
- Type the distinguished name (DN) of the directory administrator
that allows Host On-Demand to update information. you need to use
the LDAP string representation for distinguished names (for example,
cn=Chris Smith,o=IBM,c=US). - Administrator Password
- Type the directory administrator's password.
- Distinguished Name Suffix
- Type the distinguished name (DN) of the highest entry in the
directory information tree (DIT) for which information will be saved.
Host On-Demand will store all of its configuration information below
this suffix in the DIT. you need to use the LDAP string representation
for distinguished names (for example,
cn=HOD,o=IBM,c=US). - Migrate Configuration to Directory Service
- To migrate users and groups from the private data store to the LDAP directory, click the check
box. Migrating to LDAP has significant implications for your group and user
configuration information. Refer to LDAP Migration
Implications
for more information. You can check this box either when you switch to the directory
server, or after you have made the switch.
The Redirector configuration is not migrated to the directory server.
If you have a problem connecting to LDAP and migrating, try to connect to LDAP first. Then, after successfully connecting, try to migrate.
- Click Apply.
When you are asked to authenticate with the LDAP directory for the first time, specify a user ID of "admin" and a password of "password". You can change this password after the first log on. Even though you might have changed your password for the private data store, that ID and password continues to be valid for the private data store only. For the LDAP directory, a separate user ID and password are required. To avoid confusion, you can change your LDAP directory password to be the same as your private data store password.
Changes made on this panel are effective immediately. Once you have switched to the LDAP server, subsequent user-related changes will be made only on the LDAP server, including administrative changes to groups, users, or sessions, and changes such as new passwords, macros, keyboard changes, etc., by either the administrator or a user.
Using locally installed clients
The locally installed client installs to a local disk. The client applet is loaded directly into the default system browser, so there is no download from a server. The most common reason to configure a local client is for users who connect remotely over slow telephone lines, where download time can be an issue and connectivity is unpredictable. You can also use the locally installed client to test host access capabilities without installing the full Host On-Demand product.
Operating systems that support the locally installed client
Host On-Demand can be installed as a client on the following operating systems:
- Windows 7
- Windows 8
- Windows 10
- Windows Server 2012
The locally-installed client requires approximately 320 MB of disk space.
Installing the local client
To install the Host On-Demand local client on a Wondows workstation, you need to be a member of the Administrators group.
- Insert the DVD and run
hodinstallwin.exe -lcfrom the\HODINSTdirectory of the DVD. - Click Install.
- Proceed through the rest of the windows.
- If you have not already done so, read the Readme available in the last window.
At the end of installation, the Host On-Demand Service Manager is configured and started automatically. On Windows 7, Windows 8, and Windows 10, the Service Manager is installed as a Service.
Starting the local client
To start Host On-Demand as a client, click Start > Programs> Host On-Demand> Host On-Demand.
Removing the local client
To remove the local client, use Add/Remove Programs from the Control Panel.
Using the IKEYCMD command-line interface
IKEYCMD is a command-line tool, in addition to the Host On-Demand Certificate Management Utility, that can be used to manage keys, certificates, and certificate requests. It is functionally similar to Certificate Management and is meant to be run from the command line without a graphical interface. It can be called from native shell scripts and programs to be used when applications prefer to add custom interfaces to certificate and key management tasks. It can create key database files for all of the types that the Certificate Management utility currently supports. It can create certificate requests, import CA-signed certificates and manage self-signed certificates. It is Java-based and is available only on Windows, AIX, Linux Intel and Linux zSeries platforms.
Use IKEYCMD for configuration tasks related to public-private key creation and management. You cannot use IKEYCMD for configuration options that update the server configuration file, httpd.conf. For options that update the server configuration file, you need to use the IBM Administration Server.
Environment set-up for IKEYCMD command-line interface
Set up the environment variables to use the IKEYCMD command-line interface as follows:
For Windows platforms, do the following:
- Using the user interface or by modifying autoexec.bat on a command
window, set/modify the PATH variable to include the location of the
Java executable files:
set PATH=c:\Program Files\IBM\Host On-Demand\hod_jre\jre\bin;%PATH%; - Using the user interface or by modifying autoexec.bat on a command
window, set/modify the CLASSPATH environment variable as follows:
set CLASSPATH=c:\Program Files\IBM\GSK7\classes\cfwk.zip;C:\Program Files\IBM\GSK7\classes\gsk7cls.jar;%CLASSPATH%;
For AIX platforms:
- on AIX 5.2: fileset xlC.aix50.rte must be at level 6.0.0.3 or later
lslpp -ha "xlC.aix*.rte"- Set your PATH to where your Java or JRE executable resides:
EXPORT PATH=/opt/IBM/Host On-Demand/hod_jre/jre/bin:$PATH - Set the following CLASSPATH environment variable:
EXPORT CLASSPATH=/usr/local/ibm/gsk7/classes/cfwk.zip:/ usr/local/ibm/gsk7/classes/gsk7cls.jar:$CLASSPATH
java com.ibm.gsk.ikeyman.ikeycmd <command>IKEYCMD command-line syntax
java [-Dikeycmd.properties=<properties_file>]com.ibm.gsk.ikeyman.ikeycmd <object> <action> [options]where
- -Dikeycmd.properties specifies the name of an optional properties file to use for this Java invocation. A default properties file, ikminit_hod.properties, is provided as a sample file that contains the default settings for Host On-Demand.
- Object is one of the following:
- -keydb: actions taken on the key database (either a CMS key database file or TLSight class)
- -version: display version information for IKEYCMD
- Action is one of the following:
- -cert: actions taken on a certificate
- -certreq: actions taken on a certificate request
- -help: display help for the IKEYCMD invocations
Action is the specific action to be taken on the object, and options are the options, both required and optional, specified for the object and action pair.
|
The object and action keywords are positional and must be specified in the selected order. However, options are not positional and can be specified in any order, provided that they are specified as an option and operand pair. |
IKEYCMD list of tasks for Host On-Demand
IKEYCMD command-line interface tasks required for Host On-Demand are summarized in the following sections of this appendix:
- Creating a new key database
- Listing CAs
- Showing the default key in a key database
- Storing the encrypted database in a stash file
- Creating a new key pair and certificate request
- Storing the server certificate
- Creating a self-signed certificate
- Making server certificates available to clients
- Exporting keys
- Importing keys
Creating a new key database
A key database is a file that the server uses to store one or more key pairs and certificates. This is required to enable secure connections between the Host On-Demand server and clients. Before configuring TLS communication, you need to create the HODServerKeyDb.kdb key database file in your_install_directory\bin for Windows and your_install_directory/bin for AIX. This file is not shipped with Host On-Demand, so you need to create it after the first install.
java com.ibm.gsk.ikeyman.ikeycmd -keydb -create-db your_install_directory\bin\HODServerKeyDb.kdb-pw <password> -type cms -expire <days> -stashNote the following descriptions:
- <password>: Password is required for each key database operation. Even though a database of the type sslight requires a specified password, the password can be a NULL string (specified as "").
- -type: the
HODServerKeyDb.kdb used by the Host On-Demand server is of the type CMS. - -expire: Days before the password expires.
- If you do not set this parameter, then the password does not expire.
- WARNING: If you set this parameter, and if you are using the key database with the Redirector, be aware that the Redirector fails to run after the password expires. When the Redirector fails, the error message from the Redirector does not state that the password of the key database has expired.
- -stash: Stashes password for key database. Stashing the password
is required for the IBM HTTP Server and the Host On-Demand
server.
When the -stash option is specified during the key database creation, the password is stashed in a file with the filename HODServerKeyDb.sth
Once the HODServerKeyDb.kdb file has been created, it holds all the security information needed by the Host On-Demand server. Any additions or changes are made to the existing HODServerKeyDb.kdb key database file.
|
Whenever you create or make changes to the HODServerKeyDb.kdb file, you need to stop and restart the Host On-Demand Service Manager. |
Setting the database password
When you create a new key database, you specify a key database password. This password protects the private key. The private key is the only key that can sign documents or decrypt messages encrypted with the public key. Changing the key database password frequently is a good practice.
Use the following guidelines when specifying the password:
- The password must be from the U.S. English character set.
- The password should be at least six characters and contain at least two nonconsecutive numbers. Make sure the password does not consist of publicly obtainable information about you, such as the initials and birth date for you, your spouse, or children.
- Stash the password.
|
Keep track of expiration dates for the password. If the password expires, a message is written to the error log. The server will start, but there will not be a secure network connection if the password has expired. |
Changing the database password
To change the database password, do the following:
java com.ibm.gsk.ikeyman.ikeycmd -keydb -changepw-db your_install_directory\bin\HODServerKeyDb.kdb-pw <password> -new_pw <new_password> -expire <days> -stashNote the following descriptions:
- -new_pw: New key database password; this password must be different than the old password, and this password cannot be a NULL string.
- -expire: Days before password expires.
- -stash: Stashes password for key database. Stashing the password is required for the IBM HTTP Server and the Host On-Demand server.
Listing CAs
To display a list of trusted CAs in the HODServerKeyDb.kdb key database, do the following:
java com.ibm.gsk.ikeyman.ikeycmd -cert -list CA -db your_install_directory\bin\HODServerKeyDb.kdb-pw <password> -type cmsBy default, HODServerKeyDb.kdb comes with the CA certificates of the following well-known trusted CAs:
- IBM World Registry CA
- Integrion CA Root (from IBM World Registry)
- VeriSign Class 1 Public Primary CA
- VeriSign Class 2 Public Primary CA
- VeriSign Class 3 Public Primary CA
- VeriSign Class 4 Public Primary CA
- VeriSign Test CA
- RSA Secure Server CA (from VeriSign)
- Thawte Personal Basic CA
- Thawte Personal Freemail CA
- Thawte Personal Premium CA
- Thawte Premium Server CA
- Thawte Server CA
Creating a new key pair and certificate request
To create a public-private key pair and certificate request, do the following:
- For Windows platforms, for example, enter the following command:
java com.ibm.gsk.ikeyman.ikeycmd -certreq -create-db your_install_directory\bin\HODServerKeyDb.kdb-pw <password> -size <1024 | 512> -dn <distinguished_name>
where your_install_directory is your Host On-Demand installation directory.-file <filename> -label <label>Note the following descriptions:
- -size: key size of 512 or 1024
- -label: label attached to certificate or certificate request
- -dn: X.500 distinguished name. This is input as a quoted string
of the following format: (Only CN, O, and C are required; CN=common_name,
O=organization, OU=organization_unit, L=location, ST=state/province,
C=country.)
"CN=weblinux.raleigh.ibm.com,O=ibm,OU=IBM HTTP Server,L=RTP,ST=NC,C=US" - -file: name of file where the certificate request will be stored. By default, Host On-Demand uses the name certreq.arm and it should be stored in your_install_directory\bin (where your_install_directory is your Host On-Demand installation directory), where HODServerKeyDb.kdb is located.
- Verify that the certificate was successfully created.
a. View the contents of the certificate request file you created.
b. Make sure the key database recorded the certificate request:
java com.ibm.gsk.ikeyman.ikeycmd -certreq -list-db <filename> -pw <password>You should see the label listed that you just created.
- Send the newly created file to a certificate authority.
Storing the server certificate
Receiving a CA-signed certificate
Use this procedure to receive an electronically mailed certificate from a certificate authority (CA), designated as a trusted CA on your server. By default, the following CA certificates are stored in the HODServerKeyDb.kdb key database and marked as trusted CA certificates:
- IBM World Registry CA
- Integrion CA Root (from IBM World Registry)
- VeriSign Class 1 Public Primary CA
- VeriSign Class 2 Public Primary CA
- VeriSign Class 3 Public Primary CA
- VeriSign Class 4 Public Primary CA
- VeriSign Test CA
- RSA Secure Server CA (from VeriSign)
- Thawte Personal Basic CA
- Thawte Personal Freemail CA
- Thawte Personal Premium CA
- Thawte Premium Server CA
- Thawte Server CA
The Certificate Authority may send more than one certificate. In addition to the certificate for your server, the CA may also send additional Signing certificates or Intermediate CA Certificates. For example, Verisign includes an Intermediate CA Certificate when sending a Global Server ID certificate. Before receiving the server certificate, receive any additional Intermediate CA certificates. Follow the instructions in Storing a CA certificate to receive Intermediate CA Certificates.
|
If the CA who issues your CA-signed certificate is not a trusted CA in the key database, you need to first store the CA certificate and designate the CA as a trusted CA. Then you can receive your CA-signed certificate into the database. You cannot receive a CA-signed certificate from a CA who is not a trusted CA. For instructions, see Storing a CA certificate |
java com.ibm.gsk.ikeyman.ikeycmd -cert -receive -file <filename>-db your_install_directory\bin\HODServerKeyDb.kdb -pw <password>-format <ascii | binary> -default_cert <yes | no>Note the following descriptions:
- -format: Certificate Authority might provide CA Certificate in either ASCII or binary format
- -label: Label attached to CA certificate.
- -trust: Indicates whether this CA can be trusted. Use enable options when receiving a CA certificate.
- -file: File containing the CA certificate.
Storing a CA certificate
java com.ibm.gsk.ikeyman.ikeycmd -cert -add-db your_install_directory\bin\HODServerKeyDb.kdb-pw <password> -label <label> -format <ascii | binary>-trust <enable |disable> -file <file>Note the following descriptions:
- -label: Label attached to certificate or certificate request
- -format: Certificate Authorities might supply a binary ASCII file
- -trust: Indicate whether this CA can be trusted. This should be Yes.
|
You need to stop and restart the Host On-Demand Service Manager after doing this. |
Creating a self-signed certificate
It usually takes two to three weeks to get a certificate from a well-known CA. While waiting for an issued certificate, use IKEYCMD to create a self-signed server certificate to enable TLS sessions between clients and the server. Use this procedure if you are acting as your own CA for a private Web network.
java com.ibm.gsk.ikeyman.ikeycmd -cert -create-db your_install_directory\bin\HODServerKeyDb.kdb-pw <password> -size <1024 | 512> -dn <distinguished name>-label <label> -default_cert <yes or no>Note the following descriptions:
- -size: Key size 512 or 1024
- -label: Enter a descriptive comment used to identify the key and certificate in the database.
- -dn: Enter an X.500 distinguished name. This is input as a quoted
string of the following format (Only CN, O, and C are required; CN=common_name,
O=organization, OU=organization_unit,L=location, ST=state, province,
C=country).
"CN=weblinux.raleigh.ibm.com,O=ibm,OU=IBM HTTP Server,L=RTP,ST=NC,C=US" - -default_cert: Enter yes, if you want this certificate to be the default certificate in the key database. If not, enter No.
Making server certificates available to clients
All the certificates in the HODServerKeyDb.kdb are available to the Host On-Demand server. However, in some of the configurations, one of these certificates must also be made available to the clients that access the server. In the cases where your server uses a certificate from an unknown CA, the root of that certificate must be made available to the client. If your server uses a self-signed certificate, then a copy of that certificate must be made available to the clients.
For Host On-Demand downloaded and cached clients, this is done by extracting the certificate to a temporary file and creating or updating a file named CustomizedCAs.p12, which should be present in the Host On-Demand publish directory.
java com.ibm.gsk.ikeyman -keydb -create -dbCustomizedCAs.p12 -pw hod -type pkcs12The default password is hod.
Adding the root of an unknown CA to CustomizedCAs.p12
java com.ibm.gsk.ikeyman.ikeycmd -cert -extract-db your_install_directory\bin\HODServerKeyDb.kdb-pw <password> -label <label> -target cert.arm -format asciiNote the following descriptions:
- -label : Label attached to the certificate.
- -pw: password to open HODServerKeyDb.kdb key database file.
- -target : Destination file or database. In this case, it is the name of the Base-64 Armored ASCII format file with a default file name of cert.arm.
- -format: Can be either ASCII or Binary.
java com.ibm.gsk.ikeyman.ikeycmd -cert -add-db CustomizedCAs.p12 -pw hod -label <label>-file cert.arm -format ascii -trust <enable | disable>java com.ibm.gsk.ikeyman.ikeycmd -cert -add-db CustomizedCAs.class -label <label>-file cert.arm -format ascii -trust <enable | disable>Note the following descriptions:
- -label: Label for the certificate being added.
- -file: Name of the file where the certificate has been extracted to. In this case, it is the name of the Base-64 Armored ASCII format file with a default file name of cert.arm.
- -format: Can be ASCII or Binary.
- -trust: Decides whether to set as a trusted root. Enable will set the CA root or self-signed certificate as a trusted root. Disable will not set the CA root or self-signed certificate as a trusted root.
|
Stop and restart the Host On-Demand Service Manager after completing this task. |
..\hod_jre\jre\bin\java -cp ..\lib\sm.zip;
com.ibm.eNetwork.HOD.convert.CVT2SSLIGHT
CustomizedCAs.p12 hod CustomizedCAs.class Exporting keys
java com.ibm.gsk.ikeyman.ikeycmd -cert -export -db <filename>-pw <password> -label <label> -type <cms | jks | jceks | pks12>-target <filename> -target_pw <password>-target_type <cms | jks | jceks | pkcs12> -encryption <strong | weak>Note the following descriptions:
- -label : Label attached to the certificate.
- -target : Destination file or database.
- -target_pw : Password for the target key database.
- -target_type : Type of the database specified by -target operand
- -encryption : Strength of encryption. Default is strong.
Importing keys
java com.ibm.gsk.ikeyman.ikeycmd -cert -import -db <filename>-pw <password> -label <label> -type <cms | jks | jceks | pks12> -target<filename> -target_pw <password> -target_type <cms | jks | jceks | pks12>java com.ibm.gsk.ikeyman.ikeycmd -cert -import -file <filename>-pw <password> -type pkcs12 -target <filename>-target_pw <password> -target_type <cms | jks | jceks | pks12>Note the following descriptions:
- -label: Label attached to the certificate.
- -target: Destination database.
- -target_pw: Password for the key database if -target specifies a key database
- -target_type : Type of the database specified by -target operand.
Showing the default key in a key database
java com.ibm.gsk.ikeyman.ikeycmd -cert -getdefault-db your_install_directory\bin\HODServerKeyDb.kdb-pw <password>Storing the encrypted database in a stash file
java com.ibm.gsk.ikeyman.ikeycmd -keydb -create-db your_install_directory\bin\HODServerKeyDb.kdb-pw <password> -type cms -expire <days> -stashjava com.ibm.gsk.ikeyman.ikeycmd -keydb -stashpw-db your_install_directory\bin\HODServerKeyDb.kdb -pw <password>IKEYCMD command-line parameter overview
The following table describes each action that can be performed on a specified object.
| Object | Action | Description |
| -keydb | -changepw | Change the password for a key database |
| -convert | Convert the key database from one format to another | |
| -create | Create a key database | |
| -delete | Delete the key database | |
| -stashpw | Stash the password of a key database into a file | |
| -cert | -add | Add a CA certificate from a file into a key database |
| -create | Create a self-signed certificate | |
| -delete | Delete a CA certificate | |
| details | List the detailed information for a specific certificate | |
| -export | Export a personal certificate and its associated private key from a key database into a PKCS#12 file, or to another key database | |
| -extract | Extract a certificate from a key database | |
| -getdefault | Get the default personal certificate | |
| -import | Import a certificate from a key database or PKCS#12 file | |
| -list | List all certificates | |
| -modify | Modify a certificate (NOTE: Currently, the only field that can be modified is the Certificate Trust field) | |
| -receive | Receive a certificate from a file into a key database | |
| -setdefault | Set the default personal certificate | |
| -sign | Sign a certificate stored in a file with a certificate stored in a key database and store the resulting signed certificate in a file | |
| -certreg | -create | Create a certificate request |
| -delete | Delete a certificate request from a certificate request database | |
| -details | List the detailed information of a specific certificate request | |
| extract | Extract a certificate request from a certificate request database into a file | |
| -list | List all certificate requests in the certificate request database | |
| -recreate | Recreate a certificate request | |
| -help | Display help information for the IKEYCMD command | |
| -version | Display IKEYCMD version information |
IKEYCMD command-line options overview
The following table shows each option that can be present on the command line. The options are listed as a complete group; however, their use is dependent on the object and action specified on the command line.
| Option | Description |
| -db | Fully qualified path name of a key database |
| -default_cert | Sets a certificate to be used as the default certificate for client authentication (yes or no). The default is no. |
| -dn | X.500 distinguished name. Input as a quoted
string of the following format (only CN, O, and C are required):
"CN=Jane Doe,O=IBM,OU=Java Development,L=Endicott, ST=NY,ZIP=13760,C=country" |
| -encryption | Strength of encryption used in certificate export command (strong or weak). The default is strong. |
| -expire | Expiration time of either a certificate or a database password (in days). Defaults are 365 days for a certificate and 60 days for a database password. |
| -file | File name of a certificate or certificate request (depending on specified object) |
| -format | Format of a certificate (either ascii for Base64_encoded ASCII or binary for Binary DER data). The default is ascii. |
| -label | Label attached to a certificate or certificate request |
| -new_format | New format of key database |
| -new_pw | New database password |
| -old_format | Old format of key database |
| -pw | Password for the key database or PKCS#12 file. See Creating a new key database. |
| -size | Key size (512 or 1024). The default is 1024. |
| -stash | Indicator to stash the key database password to a file. If specified, the password will be stashed in a file. |
| -target | Destination file or database. |
| -target_pw | Password for the key database if -target specifies a key database. See Creating a new key database. |
| -target_type | Type of database specified by -target operand (see -type). |
| -trust | Trust status of a CA certificate (enable or disable). The default is enable. |
| -type | Type of database. Allowable values are cms (indicates a CMS key database), jce (indicates Sun's proprietary Java Cryptography Extension), jceks (indicates Sun's proprietary Java Cryptography Extension Key Store), or pkcs12 (indicates a PKCS#12 file). |
| -x509version | Version of X.509 certificate to create (1, 2 or 3). The default is 3. |
Command-line invocation
The following is a list of each of the command line-invocations, with the optional parameters specified in italics.
-keydb -changepw -db <filename> -pw <password>
-new_pw <new_password> -stash -expire <days>
-keydb -convert -db <filename> -pw <password>
-old_format <cms | webdb> -new_format <cms>-keydb -create -db <filename> -pw <password> -type <cms | jks | jceks | pks12>
-expire <days> -stash-keydb -delete -db <filename> -pw <password>-keydb -stashpw -db <filename> -pw <password>-cert -add -db <filename> -pw <password> -label <label>
-file <filename> -format <ascii | binary> -trust <enable | disable>-cert -create -db <filename> -pw <password> -label <label>
-dn <distinguished_name> -size <1024 | 512> -x509version <3 | 1 | 2>
-default_cert <no | yes>-cert -delete -db <filename> -pw <password> -label <label>-cert -details -db <filename> -pw <password> -label <label>-cert -export -db <filename> -pw <password> -label <label>
-type <cms | jks | jceks | pks12> -target <filename> -target_pw <password>
-target_type <cms | jks | jceks | pkcs12> -encryption <strong | weak>-cert -extract -db <filename> -pw <password> -label <label>
-target <filename> -format <ascii | binary>-cert -getdefault -db <filename> -pw <password>-cert -import -db <filename> -pw <password> -label <label>
-type <cms | jks | jceks | pks12> -target <filename> -target_pw <password>
-target_type <cms | jks | jceks | pks12>-cert -import -file <filename> -type <pkcs12> -target <filename>
-target_pw <password> -target_type <cms | jks | jceks | pks12>-cert -list <all | personal | CA | site> -db <filename>
-pw <password> -type <cms | jks | jceks | pks12>-cert -modify -db <filename> -pw <password> -label <label>
-trust <enable | disable>-cert -receive -file <filename> -db <filename> -pw <password>
-format <ascii | binary> -default _cert <no | yes>-cert -setdefault -db <filename> -pw <password> -label <label>-cert -sign -file <filename> -db <filename> -pw <password>
-label <label> -target <filename> -format <ascii | binary>
-expire <days>-certreq -create -db <filename> -pw <password> -label <label>
-dn <distinguished_name> -size <1024 | 512> -file <filename>-certreq -delete -db <filename> -pw <password> -label <label>-certreq -details -db <filename> -pw <password> -label <label>-certreq -extract -db <filename> -pw <password> -label <label>
-target <filename>-certreq -list -db <filename> -pw <password>-certreq -recreate -db <filename> -pw <password> -label <label>
-target <filename>-help-versionUser properties file
In order to eliminate some of the typing on the Java CLI invocations, user properties can be specified in a properties file. The properties file can be specified on the Java command-line invocation via the -Dikeycmd.properties Java option. For Windows platforms, a sample properties file, ikminit_hod.properties, is supplied in your_install_directory\bin, where your_install_directory is your Host On-Demand installation directory. For AIX platforms, this file is supplied in your_install_directory/bin. These installation directories contain the default setting for Host On-Demand.
P12 Keyring utility
A graphical Certificate Management utility (available on Windows and AIX platforms) is provided to allow you to create certificate requests, receive and store certificates, and create self-signed certificates. The P12 Keyring utility is provided mainly for platforms that do not have the Certificate Management Utility to create a keyring database with root certificates of self-signed and unknown Certificate Authority certificates. However, it can be used on any Host On-Demand platform. This utility provides system administrators with an easy way to create and deploy an TLS keyring database.
The P12 Keyring utility is written in Java. It obtains a server certificate from a Telnet or an FTP server (or a Redirector) that is configured for TLS. An TLS connection is made to the specified server and TLS port. If the port is not provided, the well-known secure Telnet or FTP port is used. The server's certificate will be extracted and added to the specified p12 file.
|
The Host On-Demand TLS support requires the
password to be hod. If you are adding
a private certificate to the keyring database, another password prompt
will be given for the second p12 file. |
Usage
P12Keyring p12FileName connect ipaddr[:port] [ftp]
P12Keyring p12FileName add p12FileName2
P12Keyring p12FileName list
Options
connect - establishes an TLS connection to the specified ipaddr and port. The port number and ftp keyword are optional. If the port number is not specified, the default secure Telnet port 443 or the default secure FTP port 990 will be used.
- Implicit security to port 990
- Explicit security to any other port
AUTH TLS command
first. add - adds a private client certificate to the specified keyring database.
list - displays a list of certificates stored in the specified keyring database.
Examples
C:\your_install_dir\lib\P12Keyring c:\your_install_dir\HOD\CustomizedCAs
connect myServer.raleigh.ibm.com:702

C:\your_install_dir\lib\P12Keyring c:\your_install_dir\HOD\CustomizedCAs
connect myFTPServer.raleigh.ibm.com:5031 ftp cd your_install_directory/HOD
Java –classpath .;your_install_dir/lib/sm.zip \
com.ibm.hod5sslight.tools.P12Keyring CustomizedCAs connect
myServer.raleigh.ibm.com:702 Native platform launcher command line options
When you enter the following command line options with your native platform launcher, the launcher passes them to the Host On-Demand install as installation parameters. Options that suppress the GUI wizard are marked accordingly.
| Option | Purpose | Example usage |
|---|---|---|
-console
(Suppresses the GUI wizard) |
Installs Host On-Demand in console mode. | install.exe |
-log #!filename
where # echoes the display to standard output and !filename is the name of the log file. If you specify ! without a file name, the default log file name is used. |
Generates an installation file log with the name specified. | hodinstallwin.exe -log #!\mydirectory\logfile |
-options filename |
Installs Host On-Demand with command line options that set specified properties for the installation. | hodinstallwin.exe -silent -options c:\mydirectory\responseFile |
-options-record filename |
Generates an options text file recording your responses to the Host On-Demand install wizard, establishing them as default values for installation variables. | hodinstallwin.exe -options-record responses.txt |
-options-template filename |
Generates an options text file containing the default installation values. | hodinstallwin.exe -options-template template.txt |
-silent
(Suppresses the GUI wizard) |
Installs Host On-Demand in silent mode, accepting all default installation values. | hodinstallwin.exe -silent |
The following additional command line options apply only to the process of calling and running the installation program. Enter them at the command line with the native platform launcher.
| Option | Purpose | Example usage |
|---|---|---|
-is:logfilename |
Generates a log file for the native launcher's JVM searches. | hodinstallwin.exe -is:log myLogFile.txt |
-is:silent |
Prevents the display of the launcher user interface
(UI) while JVM searches and other initializations are taking place.
(Commonly used with the command line option silent.) |
hodinstallwin.exe -is:silent |
-is:tempdirdirectory |
Sets the temporary directory used by the Host On-Demand install. | hodinstallwin.exe -is:tempdir "c:\temp" |
Notices
This information was developed for products and services offered in the U.S.A.
IBM may not offer the products, services, or features discussed in this document in other countries. Consult your local IBM representative for information on the products and services currently available in your area. Any reference to an IBM product, program, or service is not intended to state or imply that only that IBM product, program, or service may be used. Any functionally equivalent product, program, or service that does not infringe any IBM intellectual property right may be used instead. However, it is the user's responsibility to evaluate and verify the operation of any non-IBM product, program, or service.
IBM may have patents or pending patent applications covering subject matter described in this document. The furnishing of this document does not give you any license to these patents. You can send license inquiries, in writing, to:
IBM Director of Licensing
IBM Corporation
North Castle Drive
Armonk, NY 10504-1785
U.S.A.
For license inquiries regarding double-byte (DBCS) information, contact the IBM Intellectual Property Department in your country or region or send inquiries, in writing, to:
Intellectual Property Licensing
Legal and Intellectual Property Law
IBM Japan, Ltd.
19-21, Nihonbashi-Hakozakicho, Chuo-ku
Tokyo 103-8510, Japan
The following paragraph does not apply to the United Kingdom or any other country or region where such provisions are inconsistent with local law: INTERNATIONAL BUSINESS MACHINES CORPORATION PROVIDES THIS PUBLICATION "AS IS" WITHOUT WARRANTY OF ANY KIND, EITHER EXPRESS OR IMPLIED, INCLUDING, BUT NOT LIMITED TO, THE IMPLIED WARRANTIES OF NON-INFRINGEMENT, MERCHANTABILITY OR FITNESS FOR A PARTICULAR PURPOSE. Some states do not allow disclaimer of express or implied warranties in certain transactions, therefore, this statement may not apply to you.
This information could include technical inaccuracies or typographical errors. Changes are periodically made to the information herein; these changes will be incorporated in new editions of the publication. IBM may make improvements and/or changes in the product(s) and/or the program(s) described in this publication at any time without notice.
Any references in this information to non-IBM Web sites are provided for convenience only and do not in any manner serve as an endorsement of those Web sites. The materials at those Web sites are not part of the materials for this IBM product and use of those Web sites is at your own risk.
IBM may use or distribute any of the information you supply in any way it believes appropriate without incurring any obligation to you.
Licensees of this program who wish to have information about it for the purpose of enabling: (i) the exchange of information between independently created programs and other programs (including this one) and (ii) the mutual use of the information which has been exchanged, should contact:
Site Counsel
IBM Corporation
2455 South Road
Poughkeepsie, NY 12601-5400
U.S.A.
Such information may be available, subject to appropriate terms and conditions, including in some cases, payment of a fee.
The licensed program described in this document and all licensed material available for it are provided by IBM under terms of the IBM Customer Agreement, IBM International Program License Agreement or any equivalent agreement between us.
Such information may be available, subject to appropriate terms and conditions, including in some cases, payment of a fee. The licensed program described in this document and all licensed material available for it are provided by IBM under terms of the IBM Customer Agreement, IBM International Program License Agreement or any equivalent agreement between us.
Information concerning non-IBM products was obtained from the suppliers of those products, their published announcements or other publicly available sources. IBM has not tested those products and cannot confirm the accuracy of performance, compatibility or any other claims related to non-IBM products. Questions on the capabilities of non-IBM products should be addressed to the suppliers of those products.
If you are viewing this information softcopy, the photographs and color illustrations may not appear.
Trademarks
The following terms are trademarks of International Business Machines Corporation in the United States, other countries, or both: IBM
Java and all Java-based trademarks and logos are trademarks or registered trademarks of Oracle Corporation in the United States and other countries.
Microsoft, Windows, and the Windows logo are registered trademarks of Microsoft Corporation.
Other company, product, and service names may be trademarks or service marks of others.