This edition applies to Version 15.0 of IBM® Host On-Demand and to all subsequent releases and modifications until otherwise indicated in new editions.
Copyright International Business Machines Corporation 2004, 2019, all rights reserved. Copyright HCL Technologies, Ltd. 2019, 2022. US Government Users Restricted Rights -- Use, duplication or disclosure restricted by GSA ADP Schedule Contract with IBM Corp.
Contents
About this book
About this book
This book is written for administrators who are interested
in understanding, planning for, implementing, and troubleshooting
Web Express Logon. It provides step-by-step instructions for configuring Host On-Demand for
Web Express Logon.
This book contains the following parts:
Overview of Web Express Logon
Planning
Implementing macro-based automation
Implementing connection-based automation
API programming guide
Troubleshooting error messages
Appendices
Recording the Web Express Logon macro
Web Express Logon using the Configuration server-based model
Password encryption tool
Glossary of terms
Sources for more information
Notices
Trademarks
Conventions used in this book
The following typographic conventions are used in Host On-Demand Web
Express Logon Reference:
Table 1. Conventions
used in this book
Convention
Meaning
Monospace
Indicates text you must enter at
a command prompt and values you must use literally, such as commands,
functions, and resource definition attributes and their values. Monospace
also indicates screen text and code examples.
Italics
Indicates variable values you must
provide (for example, you supply the name of a file for file_name). Italics also indicates emphasis and
the titles of books.
>
When used to describe a menu, shows
a series of menu selections. For example, “Click File > New”
means “From the File menu, click the New command.”
When used to describe a tree view,
shows a series of folder or object expansions. For example, “Expand
HODConfig Servlet > Sysplexes > Plex1 > J2EE Servers > BBOARS2”
means:
Expand the HODConfig Servlet folder
Expand the Sysplexes folder
Expand the Plex1 folder
Expand the J2EE Servers folder
Expand the BBOARS2 folder
This graphic is used to highlight notes to
the reader.
This graphic is used to highlight tips for
the reader.
This graphic refers to information
that is specific to Certificate-based Web Express Logon.
Overview of Web Express Logon
Introduction
In the age of e-business on demand, finding ways to simplify the
user experience while maintaining company security can be a real challenge.
For example, many companies would like to decrease the number of IDs
and passwords that their users have to manage, but they also realize
that allowing users to access company resources without proper identification
risks company security.
Several products exist in the marketplace that claim to solve the
multiple logon issue and maintain security at the same time. However,
these products generally apply to Web-based applications only and
do not address logon processes for legacy hosts and host-based applications.
In other words, in host-based applications that do not use HTML or
XML, automating the logon process requires being able to intercept
the telnet data stream. Because of its unique position to work with
individual screens and the ability to substitute fields in the data
stream,
Host On-Demand is an ideal candidate to address multiple logon
issues in companies where users access host systems via browser-based
terminal emulation.
Web Express Logon works in conjunction with your company's network
security application to maintain company security while allowing users
to log on to host systems without having to re-enter their user IDs
and passwords. It has several benefits, including the following:
Ease of use: Users can log on to their network
security application and access host applications without having to
re-enter their IDs and passwords.
Reduced password-related support calls:
Users are less likely to call the company support line because of
forgotten or misplaced passwords.
Increased productivity: Users can log on
only once in an environment that has multiple methodologies for defining
user IDs, passwords, and authentications.
What is the difference between Web Express Logon,
Certificate Express Logon and Reuse Active Credentials?
Host On-Demand offers three types of Express Logon:
Web Express Logon
Certificate Express Logon
Reuse Active Credentials
Web Express Logon has been available since Host On-Demand Version
8, Certificate Express Logon, formerly known as Express Logon Feature
(ELF), has been available since Host On-Demand Version 5. Although
the name has changed, Certificate Express Logon functions the same
as ELF did in earlier versions and requires the same configuration.
Reuse Active Credentials is a feature made available starting with Host On-Demand Version
10.0.
Reuse Active Credentials provides automated authentication on all
emulation platforms. It is not as comprehensive as Web Express Logon
but does not require any special network configuration. If a new connection
is made to a host and a user has already authenticated to that host
somehow, those credentials are applied to the new connection. The
credentials are maintained for as long as Host On-Demand is running
in the JVM. The credentials are only stored in Java memory and once
the JVM closes they will have to be re-entered when Host On-Demand is
restarted.
Although all three types of Express Logon allow users to log on
to a host system without having to enter a user ID and password, they
have different requirements for session type, client certificates,
and SSL configuration. Certificate Express Logon works exclusively
with 3270 session types and requires client-side certificates and
an SSL connection to a TN3270 server. Web Express Logon and Reuse
Active Credentials offer a wide variety of styles that function with
all Host On-Demand session types (not just 3270 emulation). Certificate
Express Logon requires a macro to log on to the host application and
then distribute that macro to the clients. Web Express Logon and Reuse
Active Credentials may or may not require a macro, depending on your
environment.
Using client certificates with Web Express Logon
DCAS and z/OS environments that use client certificates for user
authentication are no longer limited to Certificate Express Logon. Starting with Host On-Demand V9, Web Express Logon
offers a type of logon automation that uses client-side certificates
known as Certificate-based Web Express Logon. Although both Certificate
Express Logon and Certificate-based Web Express Logon work exclusively
with 3270 host sessions and require a DCAS server, the client certificates
in the two models are used differently and the automation process
requires different components. With Certificate Express Logon, client
certificates are used to authenticate users to an Express Logon-enabled
TN3270 server, and the Host On-Demand client and a TN3270 server are
configured to automate the login process. With Certificate-based Web
Express Logon, however, client certificates are used to authenticate
users to a secure Web server, and a Host Credential Mapper plug-in
and a macro are used to automate the login process.
Certificate-based Web Express Logon is a more flexible solution
than Certificate Express Logon because it provides more implementation
options. For more information about Certificate-based Web Express
Logon, refer to Configuring macro-based automation in a z/OS and DCAS environment.
Can I migrate from Certificate Express Logon to Certificate-based
Web Express Logon?
Starting from Version 9, Host On-Demand offers
a new DCASELF plug-in that allows users of Certificate Express Logon
to migrate to the more scalable certificate-based Web Express Logon
architecture. This plug-in allows you to move SSL client authentication
from the TN3270 server to a secure Web server.
How does Web Express Logon work?
The overall goal of Web Express Logon is to provide an automated
way for users to log on to hosts and host-based applications without
having to provide an additional ID and password. In order to accommodate
the wide range of supported computing environments, Web Express Logon
offers two styles of logon automation:
macro-based automation
connection-based automation
The style of logon automation that best suits your needs depends
on your environment, including your host type, session type, and your
current method for authenticating users. If the host does not allow
the client to supply the needed credentials at the time the connection
is established, for example, if the client must authenticate to the
host after the host connection is established, macro-based automation
is the appropriate style. In this model, the host must send a login
screen to authenticate the client. The macro automates the login screen,
populates the screen's credential fields with the appropriate user
information, and then transmits this information to the host for authentication.
However, if your host allows the client to supply the needed host
credentials at the time the host connection is established, for example,
using Kerberos authentication or FTP login, connection-based automation
is the appropriate style.
The following sections provide more details about macro- and connection-based
automation, including high-level overviews of some example environments
supported by Web Express Logon. These examples are discussed in more
detail throughout the remainder of this document.
Macro-based automation
As the name implies, macro-based automation requires a macro to
automate the login process. The macro is responsible for obtaining
the user's host credentials and passing that information to the host
for authentication. The host credentials are based on one of the following
user identity types:
local system ID: the user's local operating system ID. Web Express
Logon currently supports Microsoft Active Directory (Windows Domain). Host On-Demand will
use native code to obtain a user's local Windows domain ID when User
Identity Type is set to "Local System ID" in the Express Logon session
properties panel. To use this option, the "WindowsDomain" HTML parameter
must be set to contain the name of the Windows Domain(s) to which
the end users belong. Multiple domains must be separated by commas.
network ID: the user's network security application ID or client
certificate. Web Express Logon currently supports IBM Tivoli Access
Manager and Netegrity Siteminder.
Portal ID: the user's Portal Server ID. Web Express Logon currently
supports Portal Server, a component of IBM WebSphere Portal.
User identity type is a configurable option in session properties.
If you plan for Host On-Demand to acquire the
user's credentials from a different application than the ones supported
by Web Express Logon, you will need to create your own plug-in. For
more information, refer to Customizing Web Express Logon.
Macro-based automation relies on the following four key components
and the interactions that take place among them. Not all environments
that use macro-based automation use all four components:
login macro
Credential Mapper Servlet (CMS)
Network Security plug-in
Host Credential Mapper (HCM) database
The login macro automates the end-to-end process of the client
sending the HTTPS request to the CMS, the CMS responding with the
needed credentials, and the macro inserting the user's credentials
in the proper fields to allow authenticated logon. You must record
the login macro while you are in an active session. It initiates at
the time the user attempts to access the host session, either automatically
or manually (depending on your configuration).
The CMS is supplied with Host On-Demand and must be deployed to
a J2EE-compliant HTTP server. At a high level, the CMS is responsible
for determining the client's identity and returning the host credentials
to the client as an XML document.
The CMS is not required if using the Portal
Credential Vault as your HCM database. This is because the Host On-Demand portlet
is designed to allow the Web Express Logon macro to acquire the user's
credentials directly from Portal Server.
Host On-Demand provides two Network Security plug-ins, one for
each of the two supported network security applications — IBM
Tivoli Access Manager and Netegrity Siteminder. The primary function
of the Network Security plug-in is to acquire the user's network ID,
which may be gleaned from the HTTP header of the incoming HTTP request
object.
The Network Security plug-in does not apply
to Microsoft Active Directory (Windows Domain), Portal Server, or
Certificate-based Web Express Logon. For Microsoft Active Directory,
the Windows login ID is used to identify the user. For Portal Server,
the Portal ID is used to identify the user. For Certificate-based
Web Express Logon, the client certificate is used to identify the
user.
The HCM database is a back-end repository that maps users' network
IDs to their host credentials. This repository can be one of the following:
a JDBC database such as one created with IBM WebSphere DB2
Portal Server Credential Vault
The Digital Certificate Access Server (DCAS) and Vault plug-ins
provided with Web Express Logon and Host On-Demand portlets are designed
to work with these repositories. Another possibility for a repository
is an LDAP directory. However, using LDAP as your HCM database requires
you to write your own plug-in. For more information, refer to Customizing Web Express Logon.
The following examples show you how the key components discussed
above interact together, beginning at the point the user attempts
to open a Host On-Demand session and initiate the login macro. If
the macro is not configured to auto-start, the user will need to start
it manually.
Supported environments
The following three Web Express Logon-supported environments use
macro-based automation:
In a z/OS and DCAS environment, Web Express Logon supports two
different models—one in which users are identified via client
certificates (called Certificate-based Web Express Logon) and one
in which users are identified via a network security application.
Since both of these models have their own requirements for user identification,
the Web Express Logon configuration steps are different for each model.
In a certificate-based environment, you must configure your HTTP server
as well as the browser and Java 2 keystore on each Host On-Demand client.
In a non-certificate-based environment, you must configure your network
security application and create your HCM database. Both models require
you to configure the Digital Certificate Access Server (DCAS).
Figure 1 and Figure 2 along
with the accompanying steps illustrate how Certificate-based and non-Certificate-based
Web Express Logon work in a z/OS and DCAS environment:
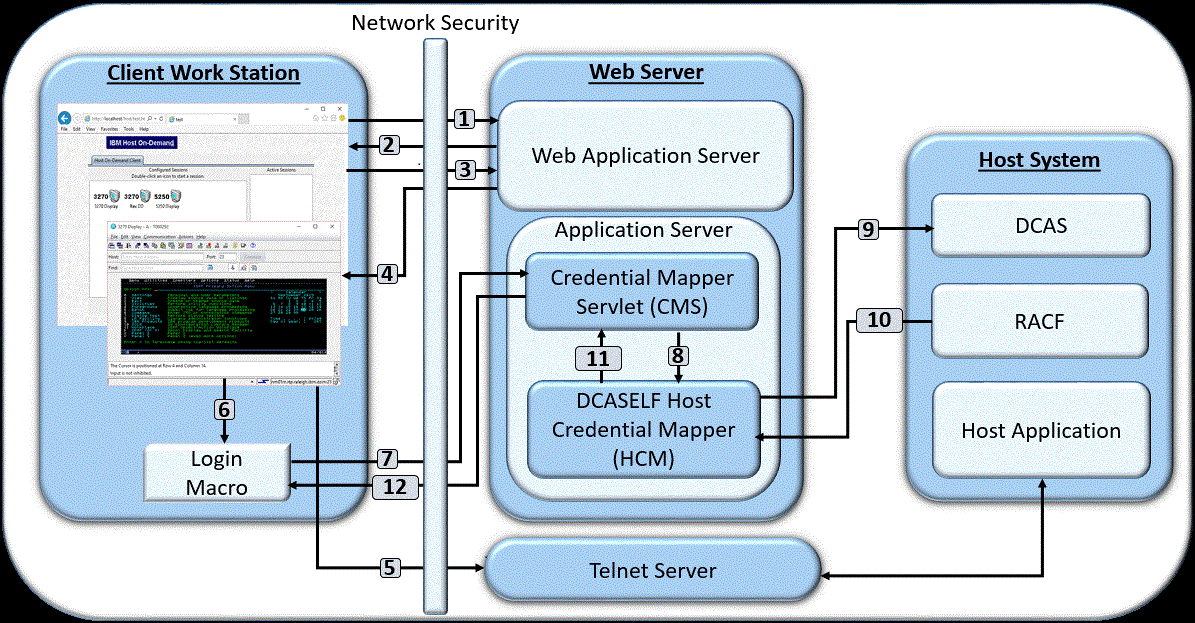
Figure 1. Certificate-based Web Express Logon in a z/OS and DCAS environment
The user clicks a link to launch the Host On-Demand desktop, which
sends an HTTP request to the Web server.
The server requests a client certificate to perform client authentication.
The client certificate must be stored in the browser's keyring.
The user sends the client certificate to the server.
The Web server returns the HTTPS request, and the Host On-Demand desktop
displays.
The user launches a host session.
The login macro executes.
The macro sends an HTTPS request to the CMS to obtain the host
credentials.
The CMS passes the application ID to the DCASELF HCM plug-in.
The DCASELF HCM retrieves the user's certificate from the Web
application server.
The host (RACF) identifies the client, checks the client's authorization,
and returns the passticket to the DCASELF HCM plug-in.
The DCASELF HCM plug-in returns the host ID and passticket to
the CMS.
The CMS returns the host credentials to the client as an XML document.
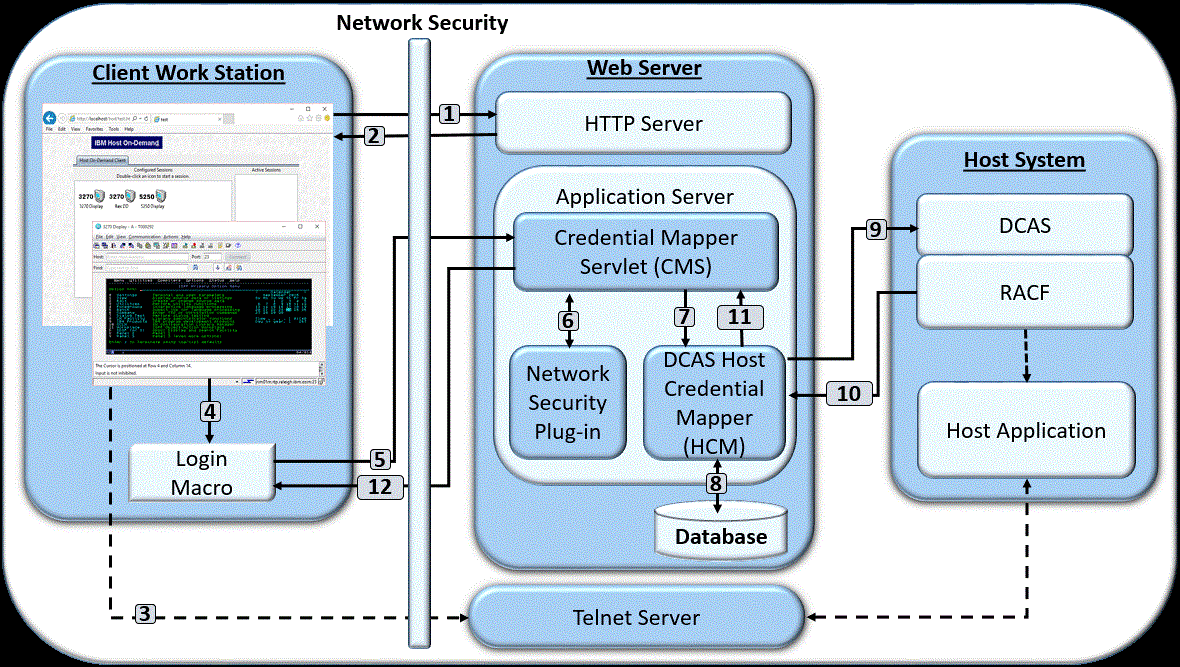
Figure 2. Non-certificate-based
Web Express Logon in a z/OS and DCAS environment
The user clicks a link to launch the Host On-Demand desktop, which
sends an HTTPS request through the network security application to
the HTTP server.
The Web server returns the HTTPS request, and the Host On-Demand desktop
displays.
The user launches a host session.
The login macro executes.
The macro sends an HTTPS request to the CMS to obtain the host
credentials.
The CMS retrieves the user's network ID from the Network Security
plug-in.
The CMS passes the network ID and application ID to the DCAS HCM
plug-in.
Using the network ID and application ID, the DCAS HCM plug-in
calls upon a database, such as IBM DB2, to map the user's host ID.
The DCAS HCM plug-in passes the user's host ID and application
ID to Digital Certificate Access Server (DCAS) and requests a passticket.
The host (RACF) identifies the client, checks the client's authorization,
and returns the passticket to the DCAS HCM plug-in.
The DCAS HCM plug-in returns the host ID and passticket to the
CMS.
The CMS returns the host credentials to the client as an XML document.
The login macro automatically inserts the user's credentials in
the logon screen fields without user intervention. Now the user is
fully authenticated and can proceed with the session.
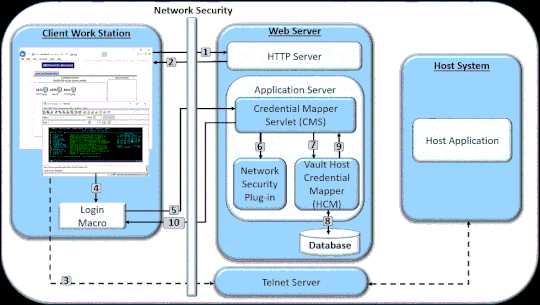
In this model, users are authenticated in a vault-style environment. Figure 3 illustrates this environment:
Figure 3. Web Express
Logon in a vault-style environment
The user clicks a link to launch the Host On-Demand desktop, which
sends an HTTPS request through the network security application to
the Web server.
The Web server returns the HTTPS request and the Host On-Demand desktop
displays.
The user launches a host session.
The login macro executes.
The macro sends an HTTPS request to the CMS to obtain the host
credentials.
The CMS retrieves the user's network ID from the Network Security
plug-in.
The CMS passes the network ID and application ID to the Vault
HCM plug-in.
Using the network ID and application ID, the Vault HCM plug-in
calls upon a database, such as IBM DB2, to map the user's host ID
and password.
The Vault HCM plug-in passes the user's host ID and password
to the CMS.
The CMS returns the host credentials to the client as an XML document.
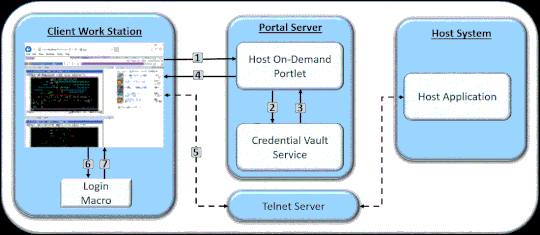
Authentication via Portal Server's Credential Vault Service
In this model, users are authenticated via Portal Server, a component
of IBM WebSphere Portal. Figure 4 illustrates this
environment:
Figure 4. Web Express
Logon in a Portal Server environment
The user logs on to IBM WebSphere Portal and chooses a portal
page that includes the Host On-Demand portlet.
The Host On-Demand portlet initiates the Credential Vault Service.
The Credential Vault Service retrieves all the credentials that
are accessible to the Portal user.
The Host On-Demand portlet sends the credentials to the client
workstation and displays the Host On-Demand applet.
The user launches a host session.
The login macro executes.
The login macro retrieves the credentials from the data received
from the Host On-Demand portlet and performs the logon operation.
Macro-based automation has been successfully tested with the following
applications:
IBM Tivoli Access Manager for e-business Versions
5.1, 6.0 and 6.1
Microsoft Active Directory
Netegrity Siteminder Version 5.5
IBM WebSphere Portal Server Versions 6.0 and 6.1
IBM WebSphere Application Server Versions 6.0, 6.1
and 7.0
IBM DB2 Universal Database Version 7
z/OS V1R4 with APAR PQ74457
The macro-based automation version of Web Express
Logon can function with other applications that are not listed here.
Connection-based automation
Unlike macro-based automation, connection-based automation does
not require a macro because the client and the host are able to connect
without having to provide the user with a login screen.
Supported environments
The following two Web Express Logon-supported environments use
connection-based automation:
IBM i5/OS or OS/400 host with Kerberos passticket authentication
Currently, Web Express Logon supports i5/OS or OS/400
(V5R4 and later) telnet-negotiated environments that have Kerberos
authentication enabled. It does not require the CMS, a login macro,
a Network Security plug-in, nor the HCM database. Instead, it extends
the existing single sign-on capability of the i5/OS and OS/400 operating
systems.
In order for connection-based automation to function in this environment,
you must have the following prerequisites in place:
Windows Domain Controller (Microsoft Active Directory)
key distribution center (KDC)
Kerberos network authentication enabled on each target i5/OS or
OS/400 system
i5/OS or OS/400 V5R4 or later as the host operating
system
Windows as the client operating system
You must configure your i5/OS or OS/400 environment
to use single sign-on capability in order to implement connection-based
logon automation. The i5/OS or OS/400 environment provides single
sign-on capability through a combination of network authentication
service and an IBM technology called Enterprise Identity Mapping (EIM). Host On-Demand uses
this existing methodology for acquiring credentials to allow users
to bypass the 5250 session login screen. Both network authentication
service and EIM technology are available with the i5/OS or OS/400
(V5R4 and later) operating systems.
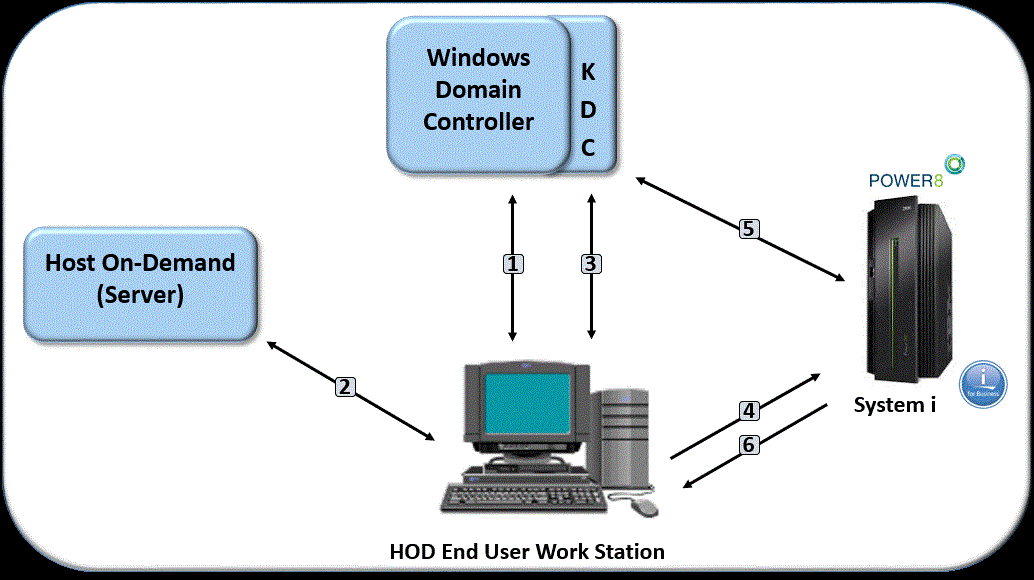
Figure 5 illustrates the overall process
of connection-based automation in an i5/OS or OS/400 environment with
Kerberos authentication enabled:
Figure 5. Web Express
Logon in an i5/OS or OS/400 and Kerberos environment
A user logs on to the Windows domain. The Windows domain gives
users access to the network.
The user requests a Host On-Demand session from the Host On-Demand server.
The Host On-Demand session initializes and requests a Kerberos
ticket from the KDC.
The user attempts to create a connection with the identified session
using the Kerberos ticket as the credential.
The i5/OS or OS/400 host validates the ticket with the KDC.
The user is successfully logged in
FTP login
Web Express Logon provides an automated way for users to log on
to FTP hosts by providing a central repository for storing and retrieving
user's credentials. Although this process is similar to configuring
Web Express Logon in a vault-style environment , this type of automation
is different because the user's credentials are retrieved from the
CMS at the time the connection is established. In other words, it
does not require a macro. Currently, Host On-Demand allows you to
store a user's ID and password statically in the FTP configuration;
however, Web Express Logon extends this approach by automating the
user credential retrieval process.
Figure 6 illustrates the overall process of
connection-based automation in an FTP login environment:
Figure 6. Web Express Logon in an FTP login environment
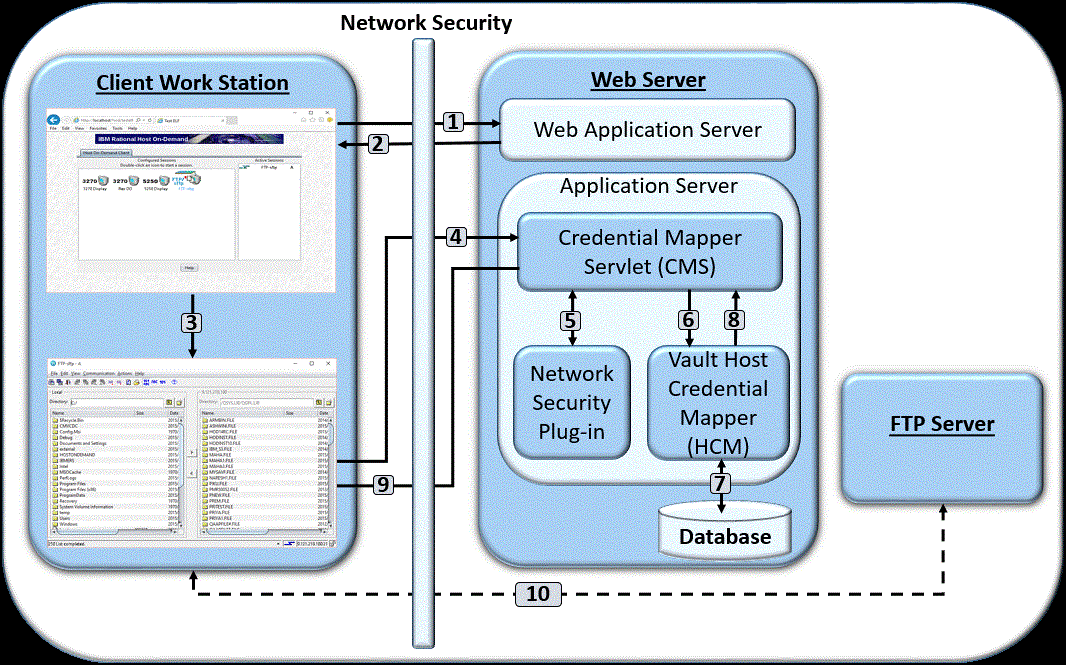
The user clicks a link to launch the Host On-Demand desktop, which
sends an HTTPS request through the network security application to
the Web server.
The Web server returns the HTTPS request, and the Host On-Demand desktop
displays.
The user attempts to launch an FTP session.
The FTP session sends an HTTPS request to the CMS to obtain the
FTP credentials.
The CMS retrieves the user's network ID from the Network Security
plug-in.
The CMS passes the network ID to the Vault HCM plug-in.
Using the network ID, the Vault HCM plug-in calls upon a database,
such as IBM DB2, to map the user's host ID and request the user's
password.
The Vault HCM plug-in returns the FTP user ID and password to
the CMS.
The CMS returns the FTP credentials to the client as an XML document.
The FTP login completes and displays the FTP server's file listings.
Planning
Planning for implementation
Having a clear understanding of your environment and how you plan
to implement Web Express Logon in your environment will save you valuable
time in the implementation phase. Be sure that you take time to develop
your strategy and gather the necessary resources and skills. A firm
plan is key to a successful implementation.
We recommend that you begin planning by taking the following steps:
Step 1: Choose your style of logon automation.
As described in the introduction, Host On-Demand offers two styles
of logon automation:
macro-based automation
connection-based automation
The style of logon automation that best suits your environment
depends on your host and session type. If your host allows the client
to supply the needed host credentials at the time the connection is
established (for example, during the telnet negotiation via a Kerberos
passticket), connection-based automation is the appropriate style
to use. However, if the client does not receive the needed credentials
at time the connection is established, the host must send a login
screen to authenticate the client. Since automating this login screen
requires a macro, macro-based automation is the appropriate style.
The macro populates the screen's credential fields with the appropriate
user information and then transmits this information to the host for
authentication.
Step 2: Identify areas of credential challenges.
Credential challenges are the times at which users are prompted
to provide IDs and passwords. The first step is to evaluate your existing
network infrastructure and identify which credential challenges exist
for your users. Approach this step by simulating a typical day and
identifying all the points at which users are prompted to provide
credentials. For example, in a corporate environment, users may have
to provide credentials when attempting to access any of the following
resources:
operating system
corporate home page
Web-based applications
host-based applications
Step 3: Take an inventory of your environment.
At this point, you should know which style of logon automation
is appropriate for your environment and what components are necessary
to implement Web Express Logon. Before you can successfully plan your
deployment strategy and estimate the scope of implementation, take
a moment to take an inventory of your environment and answer the following
questions according to your style of logon automation:
Macro-based automation
What is your host type?
What application do users go through to access the network? Tivoli
Access Manager? Netegrity Siteminder? Microsoft Active Directory (Windows
Domain)? Portal Server?
Are you planning to customize your own Network Security plug-in?
If so, do you have someone on hand who has some J2EE knowledge and
experience working with J2EE-compliant servlets?
What Web application server are you using? IBM WebSphere Application
Server? BEA WebLogic? Apache Tomcat?
For non-Portal environments, do you have a J2EE-compliant Web
application server to deploy the Credential Mapper Servlet (CMS) to
your Web server?
What will you use as your Host Credential Mapper (HCM) database?
IBM DB2? Portal Server Credential Vault? LDAP?
Do you plan to use DCAS on a z/OS platform?
Are you using client certificates for security?
Connection-based automation
What level of i5/OS or OS/400 are you running on
your IBM eServer i5, iSeries, or AS/400 host or hosts? You must be
running i5/OS (V5R4 or later) in order to use Web Express Logon.
Are your Host On-Demand clients authenticated using Windows Domain?
What are you using as your Key Distribution Center (KDC)?
Are your clients running one or more of the following operating
systems?
Windows 2000 Professional, Server, or Advanced Server
Windows XP Professional
Windows 2003 Server
If not, you will need to upgrade, since other versions of Windows
do not support Kerberos authentication.
Step 4: Develop your deployment strategy.
Now that you have evaluated your need for a Web Express Logon solution,
chosen the style of logon automation that best works in your environment,
and taken an inventory of your company's environment and resources,
you can begin developing your deployment strategy. Consider issues
such as how many/which users will be affected by this implementation,
which skills are required for a successful implementation, and how
many people you will need to participate in the setup process.
Step 5: Establish an HCM database.
This step does not apply to Certificate-based Web Express Logon
or i5/OS or OS/400 environments that support Kerberos authentication.
An HCM database is required for all other environments discussed in
this document.
This document does not provide details
about how to establish an HCM database.
An HCM is a back-end repository that associates users' network
IDs to their host IDs. The CMS queries this repository during the
logon process. Web Express Logon supports the following two types
of HCM databases:
a JDBC database such as one created using IBM DB2
the Portal Server Credential Vault
Another possibility for a repository is an LDAP directory. However,
using LDAP as your HCM database requires you to write your own plug-in.
For more information, refer to Customizing Web Express Logon.
Implementing macro-based automation
The way in which you implement macro-based automation depends on
your environment. In this section, we focus on the following three
environments:
z/OS and DCAS (with or without client certificates)
vault-style
Portal Server
This document does not provide details for
configuring other applications to work with Host On-Demand Web Express
Logon.
Configuring macro-based automation in a z/OS and DCAS environment
The DCAS is a TCP/IP server application that
runs on OS/390 V2R10 and later (z/OS included). It interfaces with
a Security Access Facility (SAF)-compliant server product to assist
with express logon services such as Certificate-based Web Express
Logon. In this example, this SAF-compliant server product is IBM Resource
Access Control Facility (RACF).
Web Express Logon supports two different models for z/OS and DCAS
environments—one in which users are identified via a network
security application and one in which users are identified via client
certificates (called Certificate-based Web Express Logon). The configuration
steps defined in this chapter cover both models with certain information
that is specific to Certificate-based Web highlighted with the following
icon:
Refers to information that is specific to Certificate-based
Web Express Logon.
The following steps show you how to edit and deploy the CMS provided
with Host On-Demand, create an SSL key database so that Host On-Demand can
communicate with the DCAS, and use the Deployment Wizard to create
your HTML file, configure your 3270 host session, and record your
login macro. In a certificate-based environment, you must also configure
your HTTP server as well as the browser and Java 2 keystore on each Host On-Demand client.
In a non-certificate-based environment, you must configure your network
security application and create your HCM database. Both models require
you to configure the Digital Certificate Access Server (DCAS).
For more information about configuring Host On-Demand clients for HTTPS and
client authentication, refer to the Planning, Installing, and Configuring
Host On-Demand guide
located in the Host On-Demand
Information Center at Start > Programs > IBM Rational
Host On-Demand >
Information
Center.
Steps 5–8 are designed for administrators
who are planning to use the Deployment Wizard to create the HTML file,
configure the host session to use Web Express Logon, and record the
Web Express Logon macro all in one sitting. However, you may decide
to create your HTML file first and then configure your session and
create your macro later.
Step 1: Configure the Credential Mapper Servlet (CMS).
We recommend using a J2EE-compliant Web application server such
as IBM WebSphere Application Server to configure and deploy the Credential
Mapper Servlet (CMS). The CMS is supplied with Host On-Demand and
must be deployed to a J2EE-compliant Web application server. At a
high level, the CMS is responsible for determining the client's identity
and returning the host credentials to the client as an XML document.
A. Locate the WAR files on the Host On-Demand DVD
The three WAR files are located in the cdimage\apps\wel subdirectory.
Choose the one that matches your network security application:
IBM Tivoli Access Manager: amcms.war
Netegrity Siteminder: smcms.war
Microsoft Active Directory (Windows Domain): wincms.war
If you have a different network security application,
you will need to customize your own version of the CMS. For more information
about how to do this, refer to Customizing Web Express Logon.
In addition to several other files, the WAR file contains
the following files:
web.xml: the servlet configuration file that you will edit in
a later step
DCAS.xml: for non-Certificate-based Web Express Logon, a sample
file to help you better understand DCAS parameters and their values
DCASELF.xml: for Certificate-based Web Express Logon, a sample
file to help you better understand DCAS parameters and their values
was.policy: for IBM WebSphere Application Server users only, this
file contains the required permissions for the CMS when Java 2 security
is enabled (refer to Troubleshooting Web Express Logon for more information)
B. Become familiar with the INIT parameters in the web.xml
file.
In this step, you will become familiar with the three default INIT
parameters in the web.xml file.
Host Credential Mapper (HCM) plug-in: The
name of the parameter is CMPICredentialMappers, and the parameter
value is a compound value that contains the list of all available
HCM plug-ins, for example, CMPIDCASPlugin CMPIVaultPlugin, and CMPIDCASELFPlugin.
Currently, the value is echo, but you will eventually replace this
with the name of your HCM plug-in.
Network Security plug-in: The name of the
parameter is CMPINetworkSecurity, and the parameter value is the full
path name of the class that handles the CMS interface into the network
security application. This example is taken from the amcms.war file,
which is for Tivoli Access Manager:
The Network Security plug-in does not apply
to Microsoft Active Directory (Windows Domain), Portal Server, or
Certificate-based Web Express Logon. For Microsoft Active Directory,
the Windows login ID is used to identify the user. For Portal Server,
the Portal ID is used to identify the user. For Certificate-based
Web Express Logon, the client certificate is used to identify the
user.
echo plug-in: The name of this INIT parameter
(echo) is the same as the value for the HCM plug-in. In a future step,
you will replace echo with the name of your HCM plug-in.
Host On-Demand provides
this optional echo plug-in in case you want to confirm that you are
able to deploy the CMS correctly before you begin editing the web.xml
file. For example, after you deploy your CMS to a Web server, you
can test it by entering the following syntax in a workstation's browser
address bar: https://web_application_server_name/context_root/CredMapper,
where web_application_server_name is the name
of the Web application server, context_root is
the name of the context root that you specify when deploying the CMS,
and CredMapper is the name of the CMS itself.
Some Web application server products allow
you to deploy the servlet first and then edit the XML file. Other
products, such as WebSphere Application Server Version 5, work best
when you deploy the servlet after you edit the XML code. Refer to
your product's documentation for details.
In this step, you will edit two of the three INIT parameters in
the web.xml file. INIT parameters adapt the servlet to your environment.
You will not edit the CMPINetworkSecurity parameter name or value.
Locate the CMPICredentialMappers parameter and change the name
of its current value (echo) to the name of the DCAS HCM plug-in—CMPIDCASPlugin:
Locate the echo parameter and change the name of its current value
(echo) to the name of the parameter value that you specified for the
HCM plug-in—CMPIDCASPlugin.
Now, replace the parameter value
with a compound value that contains the full class path name of the
implementing class, the authentication type to be used by the DCAS
HCM plug-in, and the host mask. Separate these values with commas.
In this example, com.ibm.eNetwork.security.sso.cms.CMPIDCAS is the
full class path name, AuthType_3270Host is the authentication type,
and * is the host mask.
Full class path name
The
CMS uses the value of the full class path name to create a class object
of the specified type. That object is then used to handle CMS or HCM
plug-in requests. The specified class file must be in the ...\WEB-INF\classes subdirectory
in a loose file (not as a JAR file). From this location, the CMS will
be able to access and use it whenever the need arises.
Authentication type
This value is used to
identify the type of authentication that the requestor needs. Once
you specify the desired authentication type, the CMS can better identify
which credential mapper to select to handle the request. You can pair
multiple authentication types together to give HCM plug-ins the freedom
to support multiple authentication types. Use the vertical bar character
to join multiple authentication types.
The five identified
authentication types are listed in the Table 2:
Authentication used in Secure Shell (SSH) on
VT emulation or sftp sessions are not supported by the HCM plug-in.
Table 2. Authentication types
and descriptions
Authentication type
Description
AuthType_3270Host
Identifies the credentials to be used with a
3270 emulation
AuthType_5250Host
Identifies the credentials to be used with 5250
emulation
AuthType_VTHost
Identifies the credentials to be used with VT
emulation
AuthType_FTPPassword
Credentials used to access an FTP host
AuthType_ConfigServer
Credentials identified by the token used to
identify the user to the Host On-Demand configuration server (if you
are using the Configuration server-based model
AuthType_All
Identifies the credentials to be used for all
authentication types
Host mask
The host mask
is a secondary selection criteria used by the CMS to identify the
most appropriate credential mapper. This value can contain one or
more host addresses. Use the vertical bar character to join multiple
addresses. Use the asterisks character to wildcard a host address.
The wildcard character may start, end, or start and end a host address.
Add the following two optional debugging parameters to help you
troubleshoot:
CMPI_TRACE_LOG_FILE
This parameter specifies the name of the log file. The value
should be the full path to the log file, for example C:\Program Files\IBM\Host On-Demand\HODWEL.log
on a Windows platform.
This parameter specifies the trace level for the CMS. The trace
messages are logged to the log file specified by CMPI_TRACE_LOG_FILE
parameter. Depending on your Web application server, they may or may
not be logged to the console. Trace level values include the following:
0 = None: No tracing. This is the default.
1 = Minimum: Trace APIs and parameters,
return values, and errors.
2 = Normal: Trace Minimum plus internal
APIs and parameters and informational messages.
E. Add the required DCAS client parameters for the CMPIDCASPlugin.
Add the required DCAS client parameters to allow the HCM database to map the user ID to the host
ID and get a passticket from the DCAS application running on the host. A passticket is a
credential that is similar to a password, however a passticket expires after a certain
amount of time and is used only one time. DCAS requires a Security Access Facility
(SAF)-compliant server product, such as an IBM Resource Access Control Facility (RACF)
security server, that supports passticket generation.
Starting with Host On-Demand V9.03, the
CMPI_DCAS_KEYRING_FILE and CMPI_DCAS_KEYRING_PASSWORD are deprecated and
should not be used. Instead, CMPI_DCAS_TRUSTSTORE,
CMPI_DCAS_TRUSTSTORE_PASSWORD, and CMPI_DCAS_TRUSTSTORE_TYPE should be used.
However, CMPI_DCAS_KEYRING_FILE and CMPI_DCAS_KEYRING_PASSWORD will continue
to work in lieu of CMPI_DCAS_TRUSTSTORE and CMPI_DCAS_TRUSTSTORE_PASSWORD,
and the type pkcs12 will be assumed when these deprecated parameters
are used.
For
non-Certificate-based Web Express Logon, use DCAS.xml located in the WAR
file as a reference for adding parameters when editing the web.xml file. For
Certificate-based Web Express Logon, use DCASELF.xml as a reference.
Add the following HCM database parameters to allow the client to connect to the
DCAS securely:
CMPI_DCAS_KEYRING_FILE
This parameter references an SSL keyring database file that provides access
to the DCAS client certificate as well as the DCAS server's certificate. The
certificates establish a client-authenticated, secure connection with the
DCAS server. The DCAS plug-in serves as the DCAS client. You will create a
keyring database file called HODDCAS.p12 in Step 3: Create the SSL key database..
This parameter specifies the password for the keyring database.
This
parameter should be encrypted using the password encryption
tool. It is decrypted by the HCM before using it. For more
information about the password encryption tool, refer to
Password encryption tool.
This parameter is required unless CMPI_DCAS_USE_DEFAULT_TRUSTSTORE or
CMPI_DCAS_USE_WELLKNOWN_KEYS is true. This parameter contains the name of
the truststore to be used by JSSE to lookup the DCAS certificates.
CMPI_DCAS_TRUSTSTORE_TYPE
This parameter is required unless CMPI_DCAS_USE_DEFAULT_TRUSTSTORE or
CMPI_DCAS_USE_WELLKNOWN_KEYS is true. This parameter contains the type of
the truststore specified by CMPI_DCAS_TRUSTSTORE. Valid values are pkcs12,
jceks, and jks.
CMPI_DCAS_TRUSTSTORE_PASSWORD
This parameter is required unless CMPI_DCAS_USE_DEFAULT_TRUSTSTORE or
CMPI_DCAS_USE_WELLKNOWN_KEYS is true. This parameter contains the password
of the truststore specified by CMPI_DCAS_TRUSTSTORE.
The following parameters contain all the relevant information needed to connect to
your HCM database, which in this example is a JDBC database table. You can either
configure access to an existing database or point to a newly created database. The
level of security for the database varies according to database vendor. Refer to
the database application's documentation for details.
The following parameters are not used for
Certificate-based Web Express Logon:
CMPI_DCAS_DB_ADDRESS
CMPI_DCAS_DB_NET_DRIVER
CMPI_DCAS_DB_USERID
CMPI_DCAS_DB_TABLE
CMPI_DCAS_DB_PASSWORD
CMPI_DCAS_DB_ADDRESS
This is a URL string that provides the address of the database. An example
of this string is jdbc:db2://dtagw:6789/HODSSO.
This string contains the name of the class that acts as the network
database driver. An example of this string is
COM.ibm.db2.jdbc.net.DB2Driver. The location of this class is assumed to be
in the existing class path.
This is the password of the user account to use when accessing the
database.
This
parameter should be encrypted using the encrypt password
tool. It is decrypted by the HCM plug-in before using it. For
more information about the password encryption tool, refer to
Password encryption tool.
The following parameters should correspond directly to the column headings in your
HCM database and should clearly indicate the contents of the columns. With some
databases, such as IBM DB2, the column headings must be in all upper-case letters,
for example, NETWORKID, HOSTADDRESS, APPLICATIONID, and HOSTID.
Based on the
information provided by the first three of these parameters (network ID, host
address, and the host application ID), you can make a SQL query of the database to
get the host ID. The result of the query is entered in the host ID (HOSTID)
column. Assuming that the query is successful, a call is made to the DCAS to
request the passticket.
The following parameters are not used for
Certificate-based Web Express Logon:
CMPI_DCAS_DB_NETID_COL_NAME
CMPI_DCAS_DB_HOSTADDR_COL_NAME
CMPI_DCAS_DB_HOSTAPP_COL_NAME
CMPI_DCAS_DB_HOSTID_COL_NAME
CMPI_DCAS_DB_NETID_COL_NAME
This entry identifies the name of the column that contains the network ID
value (NETWORKID).
F. Add the optional DCAS client parameters (if desired).
Unlike the previous set of DCAS parameters, the following
parameters are optional. Which of these parameters you add to the
web.xml file depends on your environment and your objectives as an
administrator:
CMPI_DCAS_TRACE_LEVEL
This parameter specifies the trace level for the DCAS plug-in.
The trace messages are logged to the log file specified by CMPI_TRACE_LOG_FILE
parameter. Depending on your Web application server, they may or may
not be logged to the console. Trace level values include the following:
0 = None: No tracing. This is the default.
1 = Minimum: Trace APIs and parameters,
return values, and errors.
2 = Normal: Trace Minimum plus internal
APIs and parameters and informational messages.
The DCAS host address is determined based on the destination
host specified in the request. The default port address of 8990 is
used, but you may override it using this parameter.
Prior to Host On-Demand 9.03, the parameter
CMPI_DCAS_USE_WELLKNOWN_KEYS defaulted to true and indicated that
the WellKnownTrustedCAs.p12 file should be used along with the CMPI_DCAS_KEYRING_FILE
to look up the DCAS server certificate. Starting with Host On-Demand 9.03, This
parameter defaults to false, and when it is true, it indicates that
WellKnownTrustedCAs.p12 is the ONLY truststore that JSSE will use
to look up the DCAS client and server certificates.
If you choose to replace the provided WellKnownTrustedCAs.p12
with your own, you will need to specify the password here. Place your
WellKnownTrustedCAs.p12 file in the same directory where the provided
version was located.
This password
should be encrypted using the encrypt password tool. For more information
about the password encryption tool, refer to Password encryption tool.
This parameter specifies the passticket request timeout in milliseconds.
It should be less than the Host On-Demand macro time-out value. The
default is 50000.
The CMPI_DCAS_DB_PRESERVE_WHITESPACE and CMPI_DCAS_DB_CASE_SENSITIVE
parameters are not used for Certificate-based Web Express Logon.
CMPI_DCAS_DB_PRESERVE_WHITESPACE
This parameter indicates whether to trim white spaces from the
credential request parameters or not. If true, the white spaces are
not trimmed. The default is false.
This parameter specifies whether or not the DCAS plug-in converts
the application ID and network ID of the user to lowercase characters
and then uses the lcase() method to make SQL queries to the HCM database.
This parameter should be set to true when using SQL applications that
do not support the lcase() method.
This parameter indicates that JSSE should use the default truststore
to lookup the DCAS certificates. This parameter is overridden by the
CMPI_DCAS_USE_WELLKNOWN_KEYS parameter when CMPI_DCAS_USE_WELLKNOWN_KEYS
is set to true. The default is false.
CMPI_DCAS_NO_FIPS
This parameter indicates that the FIPS security provider should
not be used. The default security provider will be used instead. The
default is false.
Step 2: Save the WAR file and deploy the CMS.
Once you save the WAR file with your edits, you are ready to deploy
the servlet to the Web server. Refer to your Web server application's
documentation for details of how to deploy the servlet.
Step 3: Create the SSL key database.
In order to communicate with a DCAS server, an SSL connection must
be established using client authentication. This requires you to create
a key database file, for example, HODDCAS.p12. To create the file,
use the Host On-Demand Certificate Management GUI on Windows and AIX
platforms, or use a P12 keyring tool for other platforms. This key
database file must contain the DCAS client's personal certificate
and the DCAS server's certificate (public key) information. Also,
the DCAS client certificate must be added/imported to the DCAS server's
keyring for SSL client authentication.
For more information about
creating this key database file, refer to the Planning, Installing, and
Configuring Host On-Demand
guide, which is located in the Host On-Demand Information Center at
Start > Programs > IBM Rational Host On-Demand > Information
Center.
To create a keyring database called HODDCAS.p12 file that will
be specified in the CMPI_DCAS_KEYRING_FILE parameter in your web.xml
file, take the following steps on a Windows machine:
Click Key Database File > New. For the Key database type, select PKCS12.
For File Name, type HODDCAS.p12. For Location,
type C:\Program Files\IBM\Host On-Demand.
You may
choose a different name and location, if you prefer.
Click OK.
Type the password and make a note of it.
Click OK.
Add the DCAS's certificate to the key database. Be sure that the
key database content is for the signer certificate. If it is not,
select the pull-down menu and change it. Then select Add.
Select Binary DER data for
the data type. If the server certificate is in ASCII format, select Base64-encoded ASCII data.
Type the file name in the For Certificate File Name field.
Type the path name in the Location field.
Click OK.
Enter a label for the certificate and click OK.
Add the DCAS client's certificate to
the key database.
Change the Key database content to Personal Certificates
and click Export/Import.
Select Import Key as the Action
Type.
Select PKCS12 for the Key file
type.
Type the client certificate's p12 file name in the File Name
field and the path name in the Location field.
Click OK and enter the client
certificate PIN.
Click OK.
Exit the Certificate Management GUI.
Step 4: Add the Web server's certificate to the Java keyring
(Java 2 clients only).
This step only applies
to Certificate-based Web Express Logon. If you are not using client
certificates to authenticate users to a secure Web server, skip to
the next step.
For Java 2 clients, if the Web Server's certificate
is self-signed or has not been issued by a trusted Certificate Authority
(CA), you must add the Web server's certificate to the Java keyring
in order to for clients to make secure HTTPS connections to the Web
server.
To add the certificate to the keyring for Java 2 clients, take
the following steps:
Open a Windows command prompt and input the following command.
Note that the syntax of the command remains the same, regardless of
the location of the library, which may vary depending on the vendor
and version of the JRE:
If you input your command successfully, the output should look
similar to the following:
Owner: CN=hodnotnet.raleigh.ibm.com, OU=Test, O=HACP, L=Chapel Hill, ST=NC,
POST ALCODE=27514, C=US
Issuer: CN=hodnotnet.raleigh.ibm.com, OU=Test, O=HACP, L=Chapel Hill, ST=NC,
POS TALCODE=27514, C=US
Serial number: 40a27eaf Valid from: Tue May 11 15:44:47 EDT 2004
		until: Thu May 12 15:44:47 EDT 2005
Certificate fingerprints:
	MD5:  97:A9:31:88:4E:DC:77:08:C2:1D:1E:22:79:E8:4C:E8
	SHA1: 16:26:88:91:67:4D:71:FD:2A:D4:9B:47:0C:96:07:C3:8D:3F:CC:37
Trust this certificate? [no]:  yes
Certificate was added to keystore
Certificate-based Web Express Logon also requires a client certificate.
This client certificate must be available to both the Web browser
(usually stored in the browser keystore) as well as to Java 2. To
make the certificate available, take these steps:
Start the Java Control Panel for the JRE.
On the Java Control Panel, go to the 'Advanced' tab and enter
the following line for 'Java Runtime Parameters':
The Host On-Demand Deployment Wizard allows you to create an HTML
file that is used to launch Host On-Demand sessions. Within the Deployment
Wizard, you can add, delete, configure, and start sessions. It guides
you configuration choices and provides comprehensive help for the
features. When you have finished selecting features, it creates the
HTML and supporting files for you.
To begin creating your HTML file on a Windows machine, take the
following steps:
Open the Deployment Wizard:
If you automatically installed the Deployment Wizard
as part of the Windows Host On-Demand server, click Start > Programs > IBM Rational Host On-Demand > Administration > Deployment Wizard.
If you installed the Deployment Wizard from the Host On-Demand DVD
separately, click Start > Programs > IBM Rational Host On-Demand Deployment Wizard > Deployment Wizard.
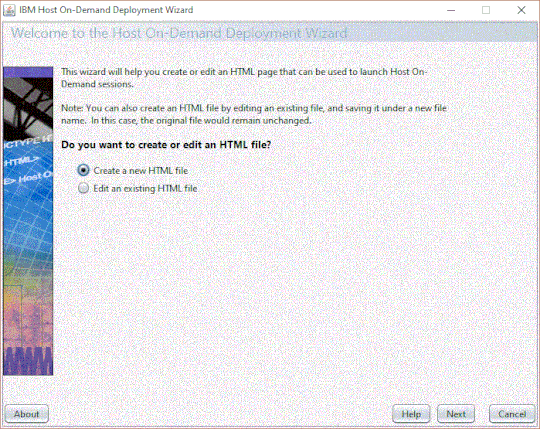
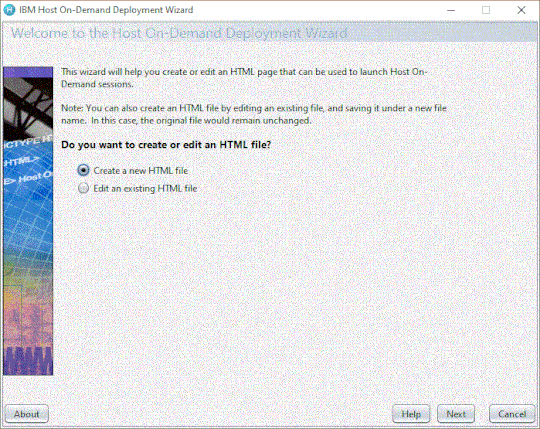
On the Welcome to the Deployment Wizard window (Figure 7), select either to create a new HTML
file or edit an existing file. Click Next.
Figure 7. Welcome to
the Host On-Demand Deployment Wizard window
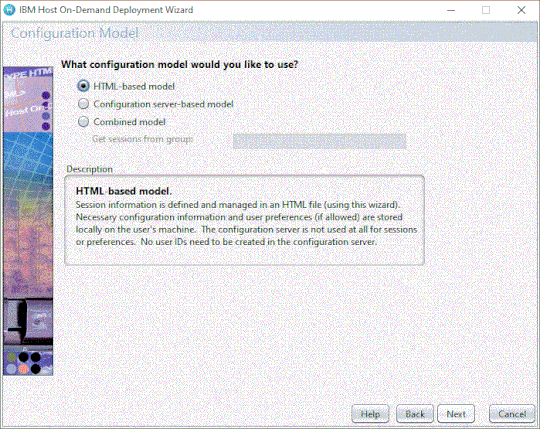
If you are creating a new HTML file, select one of the following
three configuration models on the Configuration Model window (Figure 8) and click Next:
HTML-based model
Configuration server-based model
Combined model
If you
are using the HTML-based or Combined models, you can create your HTML
file as normal. However, if you are using the Configuration server-based
model, you must configure the HTML file with additional steps. Refer
to Web Express Logon using the Configuration server-based model for more information.
Figure 8. Configuration
Model window
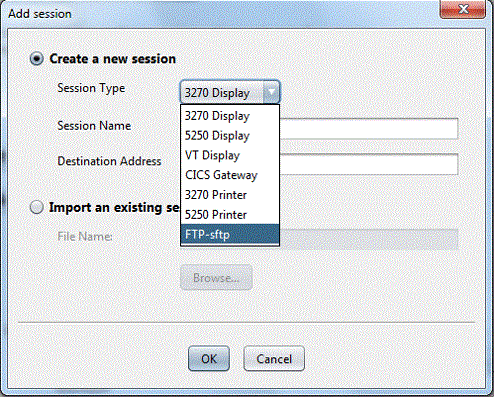
On the Host Sessions window, click New/Import to open the Add
session window (Figure 9). This window allows
you to either create a new session (default) or import an existing
session. To create a new session, select a host type, enter a session
name, and a destination address. Click OK to return to the Host Sessions
window.
Figure 9. Add session
window
Step 6: Configure the Host On-Demand session to use Web Express
Logon.
Take the following steps to configure your Host On-Demand session
to use Web Express Logon.
Using the Host Sessions window, highlight your session and select
Properties under the Configure drop-down menu. On the left side of
the window, select Express Logon under Connection.
You may
also open session properties by right-clicking a session icon and
selecting Properties.
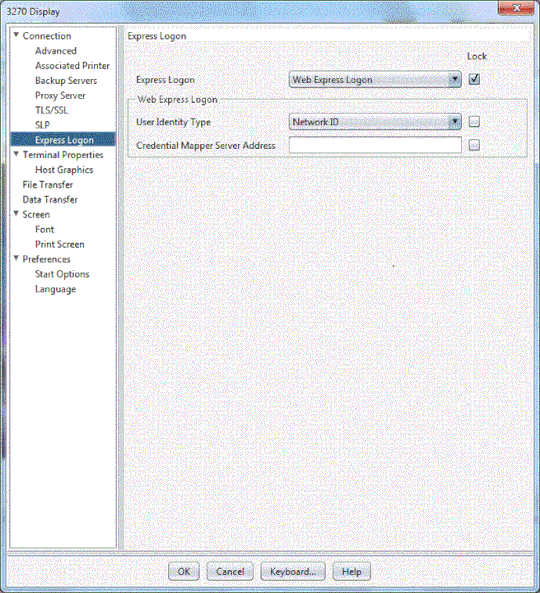
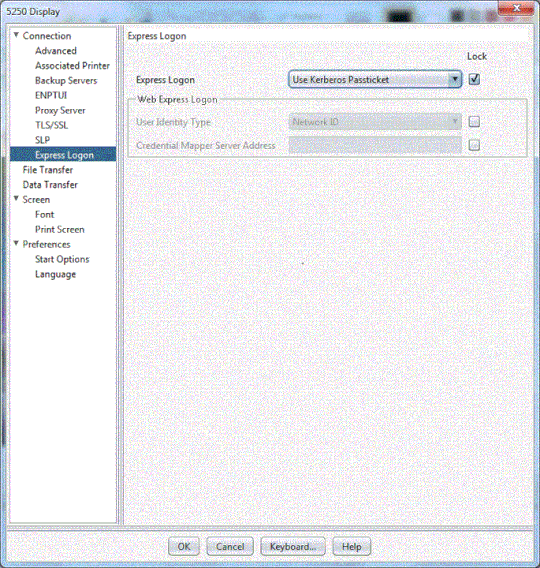
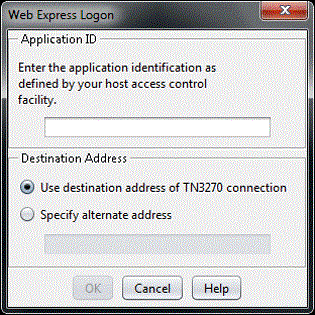
On the Express Logon window (see Figure 10),
select Web Express Logon as the Express Logon type.
Figure 10. 3270 Express
Logon
Select the User Identity Type:
Local System ID: the user's local operating system ID. Web Express
Logon currently supports Microsoft Active Directory (Windows Domain).
Network ID: the user's network security application ID. Web Express
Logon currently supports IBM Tivoli Access Manager and Netegrity Siteminder.
Portal ID: the user's Portal Server ID. Web Express Logon currently
supports Portal Server, a component of IBM WebSphere Portal.
Type the full URL of the credential mapper server, for example,
https://server_name/junction/cm/CredMapper, where
server_name is the name of the authentication
server
junction is the name of the junction (optional)
cm is the credential mapper servlet space
CredMapper is the servlet name
Be sure that the servlet name matches the name in your XML file.
For example, if you specify the servlet name in your host session
as CredMapper, the code in your XML should look like the following:
The
servlet that resides at this URL processes the HTTPS request from
the user, performs a lookup, and returns the user's credentials. The Host On-Demand client
uses the obtained credentials to automate the login process.
Click OK.
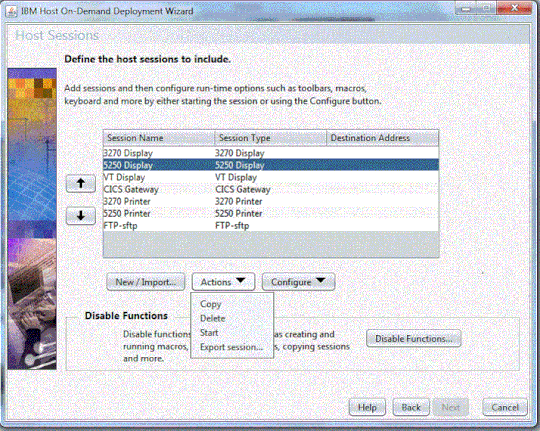
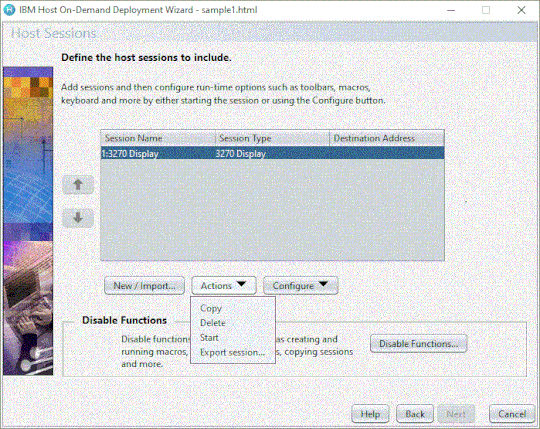
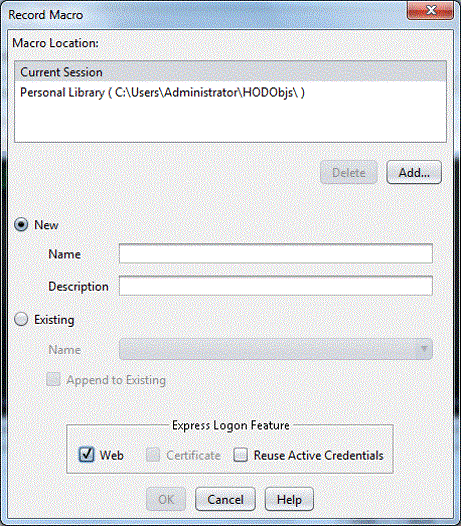
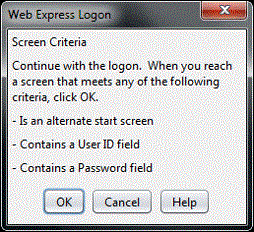
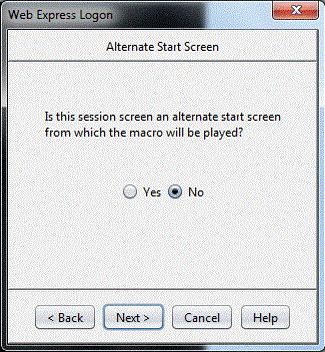
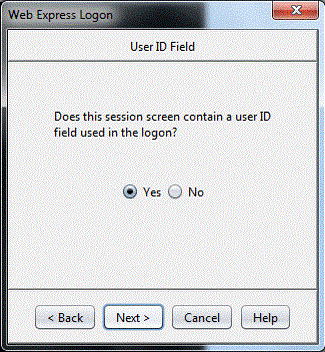
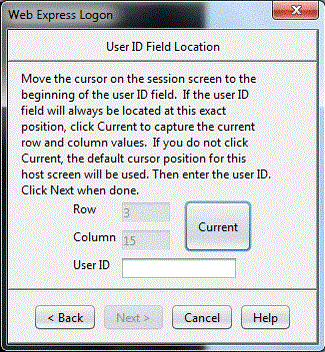
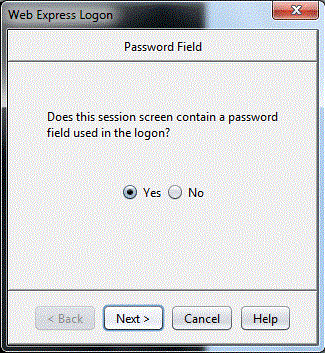
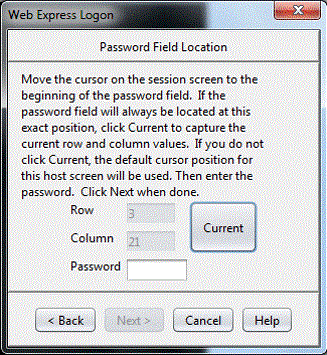
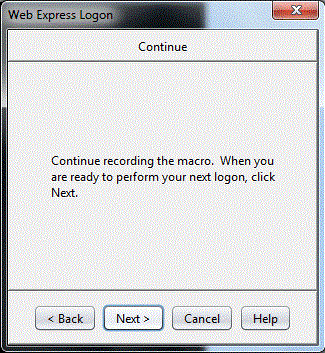
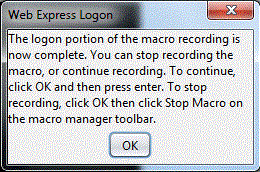
Step 7: Record the Web Express Logon macro.
To record a macro, you must first start a host session. To start
a session from within the Deployment Wizard, highlight your session
on the Host Sessions window (Figure 11)
and click Actions > Start.
Figure 11. Host Sessions
window
Now that you have configured your Host On-Demand session to use
Web Express Logon and have recorded your login macro, you are ready
to finish creating your HTML file using the Deployment Wizard. To
finish creating the file, take the following steps:
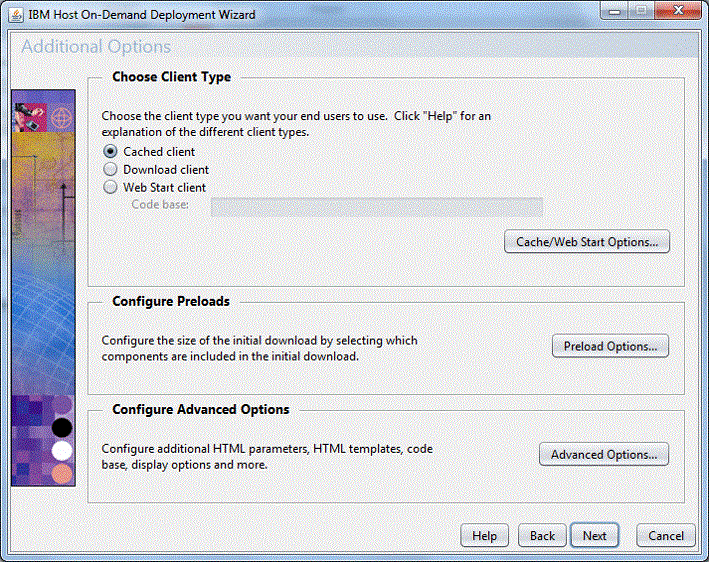
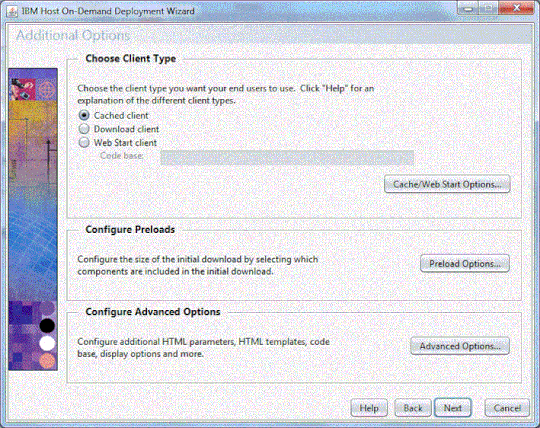
On the Host Sessions window, click Next to open the Additional
Options window (Figure 12). Make any changes
that you desire and click Next.
Figure 12. Additional
Options window
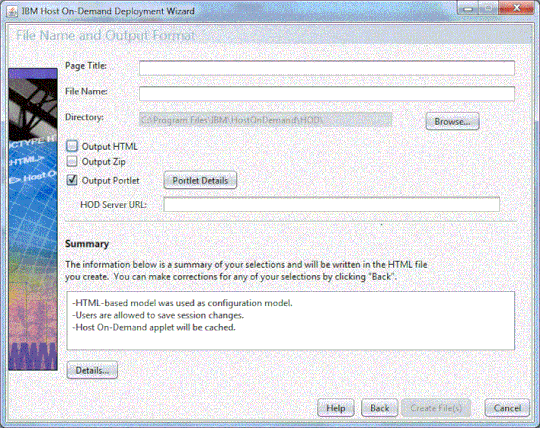
On the File Name and Output Format window (Figure 13), enter the page title, the file name,
choose the directory where you want to save your file, and check the
Output HTML box. You should save your file to the Host On-Demand server
in a directory known to your Web server; usually, this directory is
your Host On-Demand server's publish directory. Click Create File(s)
to finish creating your HTML file.
Figure 13. File Name and Output Format window
Congratulations! You have taken all the necessary steps to implement
Web Express Logon in a z/OS and DCAS environment. Your next step is
to test the logon automation. If logon automation is not successful,
that is, you are still being prompted with the host logon screen,
refer to Troubleshooting Web Express Logon.
Configuring macro-based automation in a vault-style environment
In order to implement macro-based automation in a vault-style
environment, you must configure your network security application
and create your HCM database.
The following steps show you how to edit and deploy the CMS provided
with Host On-Demand and use the Deployment Wizard to create your HTML
file, configure your 3270 host session, and record your login macro.
Steps 3–6 are designed for administrators
who are planning to use the Deployment Wizard to create the HTML file,
configure the host session to use Web Express Logon, and record the
Web Express Logon macro all in one sitting. However, you may decide
to create your HTML file first and then configure your session and
create your macro later.
Step 1: Configure the Credential Mapper Servlet (CMS).
We recommend using a J2EE-compliant Web application server such
as IBM WebSphere Application Server to configure and deploy the Credential
Mapper Servlet (CMS). The CMS is supplied with Host On-Demand and
must be deployed to a J2EE-compliant Web application server. At a
high level, the CMS is responsible for the following tasks: (1) determine
the client's identity by means of the local system ID, network ID,
or Portal ID, (2) map the user's ID to the host ID, and (3) return
the host credentials to the client as an XML document.
A. Locate the WAR files on the Host On-Demand DVD
The three WAR files are located in the cdimage\apps\wel subdirectory.
Choose the one that matches your network security application:
IBM Tivoli Access Manager: amcms.war
Netegrity Siteminder: smcms.war
Microsoft Active Directory (Windows Domain): wincms.war
If you have a different network security application,
you will need to customize your own version of the CMS. For more information
about how to do this, refer to Customizing Web Express Logon.
In addition to several other files, the WAR file contains
the following files:
web.xml: the servlet configuration file that you will edit in
a later step
Vault.xml: a sample file to help you better understand Vault parameters
and their values
was.policy: for IBM WebSphere Application Server users only, this
file contains the required permissions for the CMS when Java 2 security
is enabled (refer to Troubleshooting Web Express Logon for more information)
B. Become familiar with the INIT parameters in the web.xml
file.
In this step, you will become familiar with the three default INIT
parameters in the web.xml file.
Host Credential Mapper (HCM) plug-in: The
name of the parameter is CMPICredentialMappers, and the parameter
value is a compound value that contains the list of all available
HCM plug-ins, for example, CMPIDCASPlugin CMPIVaultPlugin, and CMPIDCASELFPlugin.
Currently, the value is echo, but you will eventually replace this
with the name of your HCM plug-in.
Network Security plug-in: The name of the
parameter is CMPINetworkSecurity, and the parameter value is the full
path name of the class that handles the CMS interface into the network
security application. This example is taken from the amcms.war file,
which is based on the Tivoli Access Manager network security application:
The Network Security plug-in does not apply
to Microsoft Active Directory (Windows Domain), Portal Server, or
Certificate-based Web Express Logon. For Microsoft Active Directory,
the Windows login ID is used to identify the user. For Portal Server,
the Portal ID is used to identify the user. For Certificate-based
Web Express Logon, the client certificate is used to identify the
user.
echo plug-in: The name of this INIT parameter
(echo) is the same as the value for the HCM plug-in. In a future step,
you will replace echo with the name of your HCM plug-in.
Host On-Demand provides
this optional echo plug-in in case you want to confirm that you are
able to deploy the CMS correctly before you begin editing the web.xml
file. For example, after you deploy your CMS to a Web server, you
can test it by entering the following syntax in a workstation's browser
address bar: https://web_application_server_name/context_root/CredMapper,
where web_application_server_name is the name
of the Web application server, context_root is
the name of the context root that you specify when deploying the CMS,
and CredMapper is the name of the CMS itself.
Some Web application server products allow
you to deploy the servlet first and then edit the XML file. Other
products, such as WebSphere Application Server Version 5, work best
when you deploy the servlet after you edit the XML code. Refer to
your product's documentation for details.
In this step, you will edit two of the three INIT parameters in
the web.xml file. INIT parameters adapt the servlet to your environment.
You will not edit the CMPINetworkSecurity parameter name or value.
Locate the CMPICredentialMappers parameter and change the name
of its current value (echo) to the name of your HCM plug-in. In this
example, the HCM plug-in is CMPIVaultPlugin:
Locate the echo parameter and change the name of its current value
(echo) with the name of the parameter value that you specified for
the HCM plug-in (CMPIVaultPlugin).
Now, replace the parameter value
with a compound value that contains the full class path name of the
implementing class, the authentication type to be used by the HCM
plug-in, and the host mask. Separate these values with commas. In
this example, com.ibm.eNetwork.security.sso.cms.CMPIVault is the full
class path name, AuthType_All is the authentication type, and * is
the host mask.
Full class path name
The
CMS uses the value of the full class path name to create a class object
of the specified type. That object is then used to handle CMS or HCM
requests. The specified class file must be in the ...\WEB-INF\classes subdirectory
in a loose file (not as a JAR file). From this location, the CMS will
be able to access and use it whenever the need arises.
Authentication type
This value is used to
identify the type of authentication that the requestor needs. Once
you specify the desired authentication type, the CMS can better identify
which credential mapper to select to handle the request. You can pair
multiple authentication types together to give HCM plug-ins the freedom
to support multiple authentication types. Use the vertical bar character
to join multiple authentication types.
The five identified
authentication types are listed in Table 4:
Authentication used in Secure Shell (SSH) on
VT emulation or sftp sessions are not supported by the HCM plug-in.
Table 4. Authentication types
and descriptions
Authentication type
Description
AuthType_3270Host
Identifies the credentials to be used with a
3270 emulation
AuthType_5250Host
Identifies the credentials to be used with 5250
emulation
AuthType_VTHost
Identifies the credentials to be used with VT
emulation
AuthType_FTPPassword
Credentials used to access an FTP host
AuthType_ConfigServer
Credentials identified by the token used to
identify the user to the Host On-Demand configuration server (if you
are using the Configuration server-based model
AuthType_All
Identifies the credentials to be used for all
authentication types
Host mask
The host mask
is a secondary selection criteria used by the CMS to identify the
most appropriate credential mapper. This value can contain one or
more host addresses. Use the vertical bar character to join multiple
addresses. Use the asterisks character to wildcard a host address.
The wildcard character may start, end, or start and end a host address.
Add the following two optional debugging parameters to help you
troubleshoot:
CMPI_TRACE_LOG_FILE
This parameter specifies the name of the log file. The value
should be the full path to the log file, for example C:\Program Files\IBM\Host On-Demand\HODWEL.log
on a Windows platform.
This parameter specifies the trace level for the CMS. The trace
messages are logged to the log file specified by CMPI_TRACE_LOG_FILE
parameter. Depending on your Web application server, they may or may
not be logged to the console. Trace level values include the following:
0 = None: No tracing. This is the default.
1 = Minimum: Trace APIs and parameters,
return values, and errors.
2 = Normal: Trace Minimum plus internal
APIs and parameters and informational messages.
E. Add the required Vault parameters for the CMPIVaultPlugin.
Add the required Vault parameters to allow the HCM database to
map the user ID to the host ID.
Use the
Vault.xml file located in the WAR file as a reference for adding parameters
when editing the web.xml file.
The following parameters contain all the relevant information
needed to connect to your HCM database, which in this example is a
JDBC database table. You can either configure access to an existing
database or point to a newly created database. The level of security
for the database varies according to database vendor. Refer to the
database application's documentation for details.
CMPI_VAULT_DB_ADDRESS
This is a URL string that provides the address of the database.
An example of this string is jdbc:db2://dtagw:6789/HODSSO.
This string contains the name of the class that acts as the
network database driver. An example of this string is COM.ibm.db2.jdbc.net.DB2Driver.
The location of this class is assumed to be in the existing class
path.
This is the password of the user account to use when accessing
the database.
This parameter
should be encrypted using the encrypt password tool. It is decrypted
by the HCM plug-in before using it. For more information about the
password encryption tool, refer to Password encryption tool.
The following parameters should correspond directly to the column
headings in your HCM database and should clearly indicate the contents
of the columns. With some databases, such as IBM DB2, the column headings
must be in all upper-case letters, for example, NETWORKID, HOSTADDRESS,
APPLICATIONID, HOSTID, and PASSWORD.
Based on the information
provided by the first three of these parameters (network ID, host
address, and the host application ID), you can make a SQL query of
the database to get the host ID. The result of the query is entered
in the host ID (HOSTID) column. Assuming that the query is successful,
a call is made to the DCAS to request the passticket.
CMPI_VAULT_DB_NETID_COL_NAME
This entry identifies the name of the column that contains the
network ID value (NETWORKID).
F. Add the optional Vault parameters (if desired).
Unlike the previous set of Vault parameters, the following
parameters are optional. Which of these parameters you add to the
web.xml file depends on your environment and your objectives as an
administrator:
CMPI_VAULT_TRACE_LEVEL
This parameter specifies the trace level for the Vault plug-in.
The trace messages are logged to the log file specified by CMPI_TRACE_LOG_FILE
parameter. Depending on your Web application server, they may or may
not be logged to the console. Trace level values include the following:
0 = None: No tracing. This is the default.
1 = Minimum: Trace APIs and parameters,
return values, and errors.
2 = Normal: Trace Minimum plus internal
APIs and parameters and informational messages.
This parameter indicates whether to trim white spaces from the
credential request parameters or not. If true, the white spaces are
not trimmed. The default is false.
This parameter specifies whether or not the Vault plug-in converts
the application ID and network ID of the user to lowercase characters
and then uses the lcase() method to make SQL queries to the HCM database.
This parameter should be set to true when using SQL applications that
do not support the lcase() method.
Once you save the WAR file with your edits, you are ready to deploy
the servlet to the Web server. Refer to your Web server application's
documentation for details of how to deploy the servlet.
Step 3: Begin creating your HTML file.
The Host On-Demand Deployment Wizard allows you to create an HTML
file that is used to launch Host On-Demand sessions. Within the Deployment
Wizard, you can add, delete, configure, and start sessions. It guides
you configuration choices and provides comprehensive help for the
features. When you have finished selecting features, it creates the
HTML and supporting files for you.
To begin creating your HTML file on a Windows machine, take the
following steps:
Open the Deployment Wizard:
If you automatically installed the Deployment Wizard
as part of the Windows Host On-Demand server, click Start > Programs > IBM Rational Host On-Demand > Administration > Deployment Wizard.
If you installed the Deployment Wizard from the Host On-Demand DVD
separately, click Start > Programs > IBM Rational Host On-Demand Deployment Wizard > Deployment Wizard.
On the Welcome to the Deployment Wizard window (Figure 14), select either to create a new HTML
file or edit an existing file. Click Next.
Figure 14. Welcome to
the Host On-Demand Deployment Wizard window
If you are creating a new HTML file, select one of the following
three configuration models on the Configuration Model window (Figure 15) and click Next:
HTML-based model
Configuration server-based model
Combined model
If you
are using the HTML-based or Combined models, you can create your HTML
file as normal. However, if you are using the Configuration server-based
model, you must configure the HTML file with additional steps. Refer
to Web Express Logon using the Configuration server-based model for more information.
Figure 15. Configuration
Model window
On the Host Sessions window, click New/Import to open the Add
session window (Figure 16). This window allows
you to either create a new session (default) or import an existing
session. To create a new session, select a host type, enter a session
name, and a destination address. Click OK to return to the Host Sessions
window.
Figure 16. Add session
window
Step 4: Configure the Host On-Demand session to use Web Express
Logon.
Take the following steps to configure your Host On-Demand session
to use Web Express Logon.
Using the Host Sessions window, highlight your session and select
Properties under the Configure drop-down menu. On the left side of
the window, select Express Logon under Connection.
You may
also open session properties by right-clicking a session icon and
selecting Properties.
On the Express Logon window (see Figure 17), select Web Express Logon as the
Express Logon type.
Figure 17. 3270 Express
Logon
Select the User Identity Type:
Local System ID: the user's local operating system ID. Web Express
Logon currently supports Microsoft Active Directory (Windows Domain).
Network ID: the user's network security application ID. Web Express
Logon currently supports IBM Tivoli Access Manager and Netegrity Siteminder.
Portal ID: the user's Portal Server ID. Web Express Logon currently
supports Portal Server, a component of IBM WebSphere Portal.
Type the full URL of the credential mapper server, for example,
https://server_name/junction/cm/CredMapper, where
server_name is the name of the authentication
server
junction is the name of the junction (optional)
cm is the credential mapper servlet space
CredMapper is the servlet name
Be sure that the servlet name matches the name in your XML file.
For example, if you specify the servlet name in your host session
as CredMapper, the code in your XML should look like the following:
The
servlet that resides at this URL processes the HTTPS request from
the user, performs a lookup, and returns the user's credentials. The Host On-Demand client
uses the obtained credentials to automate the login process.
Click OK.
Step 5: Record the Web Express Logon macro.
To record a macro, you must first start a host session. To start
a session from within the Deployment Wizard, highlight your session
on the Host Sessions window (Figure 18)
and click Actions > Start.
Figure 18. Host Sessions
window
Now that you have configured your Host On-Demand session to use
Web Express Logon and have recorded your login macro, you are ready
to finish creating your HTML file using the Deployment Wizard. To
finish creating the file, take the following steps:
On the Host Sessions window, click Next to open the Additional
Options window (Figure 19). Make any
changes that you desire and click Next.
Figure 19. Additional
Options window
On the File Name and Output Format window (Figure 20), enter the page title, the file name,
choose the directory where you want to save your file, and check the
Output HTML box. You should save your file to the Host On-Demand server
in a directory known to your Web server; usually, this directory is
your Host On-Demand server's publish directory. Click Create File(s)
to finish creating your HTML file.
Figure 20. File Name
and Output Format window
Congratulations! You have taken all the necessary steps to implement
Web Express Logon in a vault-style environment. Your next step is
to test the logon automation. If logon automation is not successful,
that is, you are still being prompted with the host logon screen,
refer to Troubleshooting Web Express Logon.
Configuring macro-based automation in a Portal Server environment
In order to implement macro-based automation in a Portal Server
environment, you must configure your Host On-Demand session to run
as a portlet in the IBM WebSphere Portal Server space. You must also
configure the Portal Server's Credential Vault Service with the appropriate
host credential information, including the user's password, application
ID, and host address. In this environment, the Portal Server's Credential
Vault is similar to Host Credential Mapper (HCM) Vault database. For
details about how to configure Portal Server's Credential Vault, refer
to the Web Express Logon for Host On-Demand white paper, located at
.
The Portal Credential Vault cannot be used
as the HCM database for RACF passticket generation.
The following steps show you how to use the Deployment Wizard to
create your Host On-Demand portlet, configure your host session, and
record your login macro.
Steps 1–5 are designed for administrators
who are planning to use the Deployment Wizard to create the portlet,
configure the host session to use Web Express Logon, and record the
Web Express Logon macro all in one sitting. However, you may decide
to create your portlet first and then configure your session and create
your macro later.
Step 1: Begin creating your Host On-Demand portlet.
The Host On-Demand Deployment Wizard allows you to create a portlet
to be launched within a Portal Server page. Host On-Demand portlets
are saved as Web Archive (WAR) files.
To begin creating your portlet on a Windows machine, take the following
steps:
Open the Deployment Wizard:
If you automatically installed the Deployment Wizard
as part of the Windows Host On-Demand server, click Start > Programs > IBM Rational Host On-Demand > Administration > Deployment Wizard.
If you installed the Deployment Wizard from the Host On-Demand DVD
separately, click Start > Programs > IBM Rational Host On-Demand Deployment Wizard > Deployment Wizard.
On the Welcome to the Deployment Wizard window (Figure 21), select either to create a new
file or edit an existing file. Click Next.
Figure 21. Welcome to
the Host On-Demand Deployment Wizard window
If you are creating a new HTML file, select one of the following
three configuration models on the Configuration Model window (Figure 22) and click Next:
HTML-based model
Configuration server-based model
Combined model
If you
are using the HTML-based or Combined models, you can create your HTML
file as normal. However, if you are using the Configuration server-based
model, you must configure the HTML file with additional steps. Refer
to Web Express Logon using the Configuration server-based model for more information.
Figure 22. Configuration
Model window
On the Host Sessions window, click New/Import to open the Add
session window (Figure 23). This window
allows you either to create a new session (default) or import an existing
session. To create a new session, select a host type, enter a session
name, and a destination address. Click OK to return to the Host Sessions
window.
Figure 23. Add session
window
Step 2: Configure the Host On-Demand session to use Web Express
Logon.
Take the following steps to configure your Host On-Demand session
to use Web Express Logon.
Open session properties. There are two ways to do this:
Right-click a session icon and select Properties. On the left
side of the window, select Express Logon under Connection, and select
Enable.
In the Deployment Wizard on the Host Sessions window, highlight
your session and select Properties under the Configure drop-down menu.
On the left side of the window, select Express Logon under Connection
and then select Enable.
On the Express Logon window (see Figure 24), select Web Express Logon as the
Express Logon type.
Figure 24. 3270 Express
Logon
Select the User Identity Type:
The User Identity Type field is not used when
using the Portal Server Credential Vault Service.
Local System ID: the user's local operating system ID. Web Express
Logon currently supports Microsoft Active Directory (Windows Domain).
Network ID: the user's network security application ID. Web Express
Logon currently supports IBM Tivoli Access Manager and Netegrity Siteminder.
Portal ID: the user's Portal Server ID. Web Express Logon currently
supports Portal Server, a component of IBM WebSphere Portal.
Leave the Credential Mapper Server Address field blank. This field
is not required when using the Portal Server Credential Vault Service.
Click OK.
Step 3: Record the Web Express Logon macro.
To record a macro, you must first start a host session. To start
a session from within the Deployment Wizard, highlight your session
on the Host Sessions window (Figure 25)
and click Actions > Start.
Figure 25. Host Sessions
window
Step 4: Finish creating your Host On-Demand portlet.
Now that you have configured your Host On-Demand session to use
Web Express Logon and have recorded your login macro, you are ready
to finish creating your portlet file using the Deployment Wizard.
To finish creating the file, take the following steps:
On the Host Sessions window, click Next to open the Additional
Options window (Figure 26). Make any
changes that you desire and click Next.
Do not
select Web Start client as your client type when creating a Host On-Demand portlet.
Figure 26. Additional
Options window
On the File Name and Output Format window (Figure 27), enter the page title and file name,
choose the directory where you want to save your portlet file, and
check the Output Portlet box. You should save your portlet to the Host On-Demand server
in a directory known to your Web server; usually, this directory is
your Host On-Demand server's publish directory. Click the Portlet
Details button when you are finished.
Figure 27. File Name
and Output Format window
On the Portlet Details window (Figure 28),
select Credential Vault in the left tree view to configure your portlet
and allow Host On-Demand to retrieve the user credentials from the
Portal Credential Vault. Once you enable Host On-Demand to use the
Portal Server's Credential Vault, enter information for the following
two fields:
Portal Vault Slot ID: Specifies a string
that is prepended to the Portal Credential Vault Slot name retrieved
by the Host On-Demand portlet. The Portal Vault Slot name is made
up of the slot ID, the host name, and the application name, which
you specify when you record the Web Express Logon macro. The default
value is HATS.
Portal Vault Slot Type: Identifies the Portal
Credential Vault Slot Type retrieved by the Host On-Demand portlet.
The default is , which is recommended.
Any information
that you provide about the Portal Server Credential Vault is only
used if you have left the Credential Mapper Server Address field in
the Express Logon window of session properties blank.
Click OK.
Host On-Demand provides
a separate portlet for manipulating user IDs and passwords stored
in administrative slots. The WAR file (PasswordEditor.war) is stored
in the portal sub-directory of Host On-Demand published directory. Step 5: Using a custom portlet to manage user credentials describes the usage of the utility. Host On-Demand does
not provide any tools for manipulating other types of valut slots
(system and shared).
Figure 28. Portlet Details
On the File Name and Output Format window (Figure 27), enter the HOD Server URL
so the Portal Server will be able to locate the Host On-Demand Server.
The URL that you specify here must identify the Host On-Demand publish
directory. An example HOD Server URL is http://server_name.mycompany.com/hod,
where server_name is the name of the server where Host On-Demand is
installed. You are not required to enter a value for this field since
it can be modified by a Portal Server administrator once the portlet
has been installed. This field is a configuration parameter of the
generated portlet and is named hodCodeBase.
Click Create File(s) to finish creating your portlet file.
Step 5: Using a custom portlet to manage user credentials
Host On-Demand provides a customized portlet that can be placed
on a user page and allows them to update their own credentials in
administrative slots. This is particularly useful when a user is
required to change their password because it has expired and they
no longer remember the current password which is needed to create
new credentials.
With this custom portlet, users can update their own credentials
in the vault. After the password is reset the user can select the modify Slot radio button. Their credentials are
retrieved from the credential vault and presented through the portlet
edit mode. The host user ID and two password fields are populated
with the current values. The user can now change the credentials
by entering the new credentials into the respective fields and clicking Save.
Congratulations! You have taken all the necessary steps to implement
Web Express Logon in a Portal Server environment. Your next step is
to test the logon automation. If logon automation is not successful,
that is, you are still being prompted with the host logon screen,
refer to Troubleshooting Web Express Logon.
Implementing connection-based automation
The way in which you implement connection-based automation depends
on your environment. In this section, we focus on the following two
environments:
i5/OS or OS/400 and Kerberos
FTP
This document does not provide details
for configuring other applications to work with Host On-Demand Web
Express Logon.
Configuring connection-based automation in an i5/OS or OS/400
and Kerberos environment
Unlike macro-based automation, connection-based automation does
not require the use of a Credential Mapper Servlet (CMS), a login
macro, the Network Security plug-in, nor the Host Credential Mapper
(HCM). Instead, it extends the existing single sign-on capability
of iSeries environments that meet the following criteria:
operate within a Windows Domain
have Kerberos-based network authentication enabled on each target
iSeries system
run i5/OS V5R4 or later (these versions support Kerberos-based
network authentication)
run one or more of the following client operating systems:
Windows 2000 (Professional, Server, and Advanced Server)
Windows XP Professional
Windows Server 2003
You must configure your iSeries environment to use single sign-on
capability in order to implement connection-based logon automation.
The iSeries environment provides single sign-on capability by working
in conjunction with Kerberos-based network authentication and an IBM
technology called Enterprise Identity Mapping (EIM). Host On-Demand uses
this existing methodology for acquiring credentials to allow users
to bypass the host session login screen.
Both EIM technology and Kerberos are available with
i5/OS V5R4 or later operating systems. EIM is an IBM infrastructure
technology that allows you to manage multiple user identities and
user registries easily and inexpensively while maintaining secure
authentication and authorization. This architecture describes the
relationships between individuals or entities in an enterprise and
the many identities that represent them within the enterprise. Kerberos,
on the other hand, is a network authentication protocol that identifies
and authenticates users who request to log on to a network. Together,
EIM and Kerberos provide single sign-on capability.
Although this document does not instruct you how to configure your
iSeries environment for single sign-on capability, the following resources
are available to help you:
Once you have configured your iSeries environment to use single
sign-on capability, you are ready to configure Host On-Demand to extend
this single sign-on capability. To accomplish this, take the following
two steps:
Step 1: Use the Deployment Wizard to create your HTML file.
The Host On-Demand Deployment Wizard allows you to specify how
sessions are defined and managed. You can choose from three different
configuration models:
HTML-based model
Configuration server-based model
Combined model
When using the Configuration server-based model and a network
security application such as Tivoli Access Manager, you may be accessing
your Host On-Demand pages via a URL such as https://server_name/junction_name/HOD/myhodpage.html,
where server_name is the name of the machine
running Tivoli Access Manager and junction_name is
the junction that you create to point to your Host On-Demand server
machine and your HTTP server's port number. If this is the case, Host On-Demand will
try to contact the Host On-Demand Service Manager to get your user,
group, and session information at the server_name rather
than at the junction_name. To remedy this
situation, edit the config.properties file found in the HOD directory
of your Host On-Demand install directory (\Program Files\IBM\Host On-Demand\HOD\config.properties)
by adding this line at the end of the file content:
ConfigServer=myhodserver.ibm.com
where myhodserver is the machine you are pointing to
with the junction_name.
Step 2: Configure your Host On-Demand session to use Web Express
Logon.
Configure your 5250 session properties to use a Kerberos passticket
by taking the following steps:
Open session properties. There are two ways to do this:
Right-click a session icon and select Properties.
In the Deployment Wizard on the Host Sessions window, highlight
your session and select Properties under the Configure drop-down menu.
On the Connection > Express Logon window (see Figure 29),
Select Use a Kerberos Passticket as the Express Logon type. This allows Host On-Demand to
be able to retrieve a passticket from a Windows server. This passticket
is used to connect to the host system that you identify in the session
properties.
If Use Kerberos Passticket is selected, the
User Identity Type and Credential Mapper Server fields become disabled.
This is because they are not required for connection-based automation.
Figure 29. 5250 Express
Logon
Once you have taken the above steps and configured your iSeries
host for Kerberos authentication, you will have taken all the necessary
steps to implement Web Express Logon in an i5/OS or OS/400 and Kerberos
environment. Your next step is to test the logon automation. If logon
automation is not successful, that is, you are still being prompted
with the host logon screen, refer to Troubleshooting Web Express Logon.
Configuring connection-based automation in an FTP environment
Web Express Logon is also designed
to work in FTP environments that use Portal Server. To configure this
environment, follow steps 1 and 2 in this chapter and then steps 1,
2 and 4 in the Configuring macro-based automation in a Portal Server environment chapter. Because FTP logon
is based on connection-based automation, you will not need to create
a Web Express Logon macro; however, you must configure the Portal
Server Credential Vault as you would with macro-based automation in
a Portal Server environment.
In order to implement connection-based automation in
an FTP login environment, you must configure your network security
application and create your HCM database.
In this document, we show you how to edit and deploy the CMS provided
with Host On-Demand and use the Deployment Wizard to create your HTML
file and configure your host session.
Steps 3–5 are designed for administrators
who are planning to use the Deployment Wizard to create the HTML file
and configure the FTP session to use Web Express Logon all in one
sitting. However, you may decide to create your HTML file first and
then configure your session later.
Step 1: Configure the Credential Mapper Servlet (CMS).
We recommend using a J2EE-compliant Web application server such
as IBM WebSphere Application Server to configure and deploy the Credential
Mapper Servlet (CMS). The CMS is supplied with Host On-Demand and
must be deployed to a J2EE-compliant Web application server. At a
high level, the CMS is responsible for determining the client's identity
and returning the host credentials to the client as an XML document.
A. Locate the WAR files on the Host On-Demand DVD
The three WAR files are located in the cdimage\apps\wel subdirectory.
Choose the one that matches your network security application:
IBM Tivoli Access Manager: amcms.war
Netegrity Siteminder: smcms.war
Microsoft Active Directory (Windows Domain): wincms.war
If you have a different network security application,
you will need to customize your own version of the CMS. For more information
about how to do this, refer to Customizing Web Express Logon.
In addition to several other files, the WAR file contains
the following files:
web.xml: the servlet configuration file that you will edit in
a later step
Vault.xml: a sample file to help you better understand Vault parameters
and their values
was.policy: for IBM WebSphere Application Server users only, this
file contains the required permissions for the CMS when Java 2 security
is enabled (refer to Troubleshooting Web Express Logon for more information)
B. Become familiar with the INIT parameters in the web.xml
file.
In this step, you will become familiar with the three default INIT
parameters in the web.xml file.
Host Credential Mapper (HCM) plug-in: The
name of the parameter is CMPICredentialMappers, and the parameter
value is a compound value that contains the list of all available
HCM plug-ins, for example, CMPIDCASPlugin and CMPIVaultPlugin. Currently,
the value is echo, but you will eventually replace this with the name
of your HCM plug-in.
Network Security plug-in: The name of the
parameter is CMPINetworkSecurity, and the parameter value is the full
path name of the class that handles the CMS interface into the network
security application. This example is taken from the amcms.war file,
which is based on the Tivoli Access Manager network security application:
The Network Security plug-in does not apply
to Microsoft Active Directory (Windows Domain), Portal Server, or
Certificate-based Web Express Logon. For Microsoft Active Directory,
the Windows login ID is used to identify the user. For Portal Server,
the Portal ID is used to identify the user. For Certificate-based
Web Express Logon, the client certificate is used to identify the
user.
echo plug-in: The name of this INIT parameter
(echo) is the same as the value for the HCM plug-in. In a future step,
you will replace echo with the name of your HCM plug-in.
Host On-Demand provides
this optional echo plug-in in case you want to confirm that you are
able to deploy the CMS correctly before you begin editing the web.xml
file. For example, after you deploy your CMS to a Web server, you
can test it by entering the following syntax in a workstation's browser
address bar: https://web_application_server_name/context_root/CredMapper,
where web_application_server_name is the name
of the Web application server, context_root is
the name of the context root that you specify when deploying the CMS,
and CredMapper is the name of the CMS itself.
Some Web application server products allow
you to deploy the servlet first and then edit the XML file. Other
products, such as WebSphere Application Server Version 5, work best
when you deploy the servlet after you edit the XML code. Refer to
your product's documentation for details.
In this step, you will edit two of the three INIT parameters in
the web.xml file. INIT parameters adapt the servlet to your environment.
You will not edit the CMPINetworkSecurity parameter name or value.
Locate the CMPICredentialMappers parameter and change the name
of its current value (echo) to the name of your HCM plug-in. In this
example, the HCM plug-in is CMPIVaultPlugin:
Locate the echo parameter and change the name of its current value
(echo) with the name of the parameter value that you specified for
the HCM plug-in (CMPIVaultPlugin).
Now, replace the parameter value
with a compound value that contains the full class path name of the
implementing class, the authentication type to be used by the HCM
plug-in, and the host mask. Separate these values with commas. In
this example, com.ibm.eNetwork.security.sso.cms.CMPIVault is the full
class path name, AuthType_All is the authentication type, and * is
the host mask.
Full class path name
The
CMS uses the value of the full class path name to create a class object
of the specified type. That object is then used to handle CMS or HCM
requests. The specified class file must be in the ...\WEB-INF\classes subdirectory
in a loose file (not as a JAR file). From this location, the CMS will
be able to access and use it whenever the need arises.
Authentication type
This value is used to
identify the type of authentication that the requestor needs. Once
you specify the desired authentication type, the CMS can better identify
which credential mapper to select to handle the request. You can pair
multiple authentication types together to give HCMs the freedom to
support multiple authentication types. Use the vertical bar character
to join multiple authentication types.
The five identified
authentication types are listed in Table 6:
Authentication used in Secure Shell (SSH) on
VT emulation or sftp sessions are not supported by the HCM plug-in.
Table 6. Authentication types and descriptions
Authentication type
Description
AuthType_3270Host
Identifies the credentials to be used with a
3270 emulation
AuthType_5250Host
Identifies the credentials to be used with 5250
emulation
AuthType_VTHost
Identifies the credentials to be used with VT
emulation
AuthType_FTPPassword
Credentials used to access an FTP host
AuthType_ConfigServer
Credentials identified by the token used to
identify the user to the Host On-Demand configuration server (if you
are using the Configuration server-based model
AuthType_All
Identifies the credentials to be used for all
authentication types
Host mask
The host mask
is a secondary selection criteria used by the CMS to identify the
most appropriate credential mapper. This value can contain one or
more host addresses. Use the vertical bar character to join multiple
addresses. Use the asterisks character to wildcard a host address.
The wildcard character may start, end, or start and end a host address.
Add the following two optional debugging parameters to help you
troubleshoot:
CMPI_TRACE_LOG_FILE
This parameter specifies the name of the log file. The value
should be the full path to the log file, for example C:\Program Files\IBM\Host On-Demand\HODWEL.log
on a Windows platform.
This parameter specifies the trace level for the CMS. The trace
messages are logged to the log file specified by CMPI_TRACE_LOG_FILE
parameter. Depending on your Web application server, they may or may
not be logged to the console. Trace level values include the following:
0 = None: No tracing. This is the default.
1 = Minimum: Trace APIs and parameters,
return values, and errors.
2 = Normal: Trace Minimum plus internal
APIs and parameters and informational messages.
E. Add the required Vault parameters for the CMPIVaultPlugin.
Add the required Vault parameters to allow the HCM database to
map the user ID to the host ID.
Use the
Vault.xml file located in the WAR file as a reference for adding parameters
when editing the web.xml file.
The following parameters contain all the relevant information
needed to connect to your HCM database, which in this example is a
JDBC database table. You can either configure access to an existing
database or point to a newly created database. The level of security
for the database varies according to database vendor. Refer to the
database application's documentation for details.
CMPI_VAULT_DB_ADDRESS
This is a URL string that provides the address of the database.
An example of this string is jdbc:db2://dtagw:6789/HODSSO.
This string contains the name of the class that acts as the
network database driver. An example of this string is COM.ibm.db2.jdbc.net.DB2Driver.
The location of this class is assumed to be in the existing class
path.
This is the password of the user account to use when accessing
the database.
This parameter
should be encrypted using the encrypt password tool. It is decrypted
by the HCM plug-in before using it. For more information about the
password encryption tool, refer to Password encryption tool.
The following parameters should correspond directly to the column
headings in your HCM database and should clearly indicate the contents
of the columns. With some databases, such as IBM DB2, the column headings
must be in all upper-case letters, for example, NETWORKID, HOSTADDRESS,
HOSTID, and PASSWORD.
Based on the information provided by the
first two of these parameters (network ID and host address), you can
make a SQL query of the database to get the host ID. The result of
the query is entered in the host ID (HOSTID) column. Assuming that
the query is successful, a call is made to the vault-style database
to request the password.
CMPI_VAULT_DB_NETID_COL_NAME
This entry identifies the name of the column that contains the
network ID value (NETWORKID).
F. Add the optional Vault parameters (if desired).
Unlike the previous set of Vault parameters, the following parameters
are optional. Which of these parameters you add to the web.ml file
depends on your environment and your objectives as an administrator:
CMPI_VAULT_TRACE_LEVEL
This parameter specifies the trace level for the Vault plug-in.
The trace messages are logged to the log file specified by CMPI_TRACE_LOG_FILE
parameter. Depending on your Web application server, they may or may
not be logged to the console. Trace level values include the following:
0 = None: No tracing. This is the default.
1 = Minimum: Trace APIs and parameters,
return values, and errors.
2 = Normal: Trace Minimum plus internal
APIs and parameters and informational messages.
This parameter indicates whether to trim white spaces from the
credential request parameters or not. If true, the white spaces are
not trimmed. The default is false.
This parameter specifies whether or not the Vault plug-in converts
the application ID and network ID of the user to lowercase characters
and then uses the lcase() method to make SQL queries to the HCM database.
This parameter should be set to true when using SQL applications that
do not support the lcase() method.
Once you save the WAR file with your edits, you are ready to deploy
the servlet to the Web server. Refer to your Web server application's
documentation for details of how to deploy the servlet.
Step 3: Begin creating your HTML file.
The Host On-Demand Deployment Wizard allows you to create an HTML
file that is used to launch Host On-Demand sessions. Within the Deployment
Wizard, you can add, delete, configure, and start sessions. It guides
you configuration choices and provides comprehensive help for the
features. When you have finished selecting features, it creates the
HTML and supporting files for you.
To begin creating your HTML file on a Windows machine, take the
following steps:
Open the Deployment Wizard:
If you automatically installed the Deployment Wizard
as part of the Windows Host On-Demand server, click Start > Programs > IBM Rational Host On-Demand > Administration > Deployment Wizard.
If you installed the Deployment Wizard from the Host On-Demand DVD
separately, click Start > Programs > IBM Rational Host On-Demand Deployment Wizard > Deployment Wizard.
On the Welcome to the Deployment Wizard window (Figure 30), select either to create a new
HTML file or edit an existing file. Click Next.
Figure 30. Welcome to
the Host On-Demand Deployment Wizard window
If you are creating a new HTML file, select one of the following
three configuration models on the Configuration Model window (Figure 31) and click Next:
HTML-based model
Configuration server-based model
Combined model
If you
are using the HTML-based or Combined models, you can create your HTML
file as normal. However, if you are using the Configuration server-based
model, you must configure the HTML file with additional steps. Refer
to Web Express Logon using the Configuration server-based model for more information.
Figure 31. Configuration
Model window
On the Host Sessions window, click New/Import to open the Add
session window (Figure 32). This window allows you
to either create a new session (default) or import an existing session.
To create a new session, select FTP as the host type, enter a session
name, and a destination address. Click OK to return to the Host Sessions
window.
Figure 32. Add session
window
Step 4: Configure the Host On-Demand session to use Web Express
Logon.
Take the following steps to configure your Host On-Demand session
to use Web Express Logon.
Using the Host Sessions window, highlight your FTP session and
select Properties under the Configure drop-down menu. On the left
side of the window, select Express Logon under Connection.
You may
also open session properties by right-clicking a session icon and
selecting Properties.
On the Express Logon window (see Figure 33), select Web Express Logon as
the Express Logon type.
Figure 33. FTP Express
Logon
Select the User Identity Type:
local system ID: the user's local operating system ID. Web Express
Logon currently supports Microsoft Active Directory (Windows Domain).
network ID: the user's network security application ID. Web Express
Logon currently supports IBM Tivoli Access Manager and Netegrity Siteminder.
Portal ID: the user's Portal Server ID. Web Express Logon currently
supports Portal Server, a component of IBM WebSphere Portal.
Type the full URL of the credential mapper server, for example,
https://server_name/junction/cm/CredMapper, where
server_name is the name of the authentication
server
junction is the name of the junction (optional)
cm is the credential mapper servlet space
CredMapper is the servlet name
Be sure that the servlet name matches the name in your XML file.
For example, if you specify the servlet name in your host session
as CredMapper, the code in your XML should look like the following:
The
servlet that resides at this URL processes the HTTPS request from
the user, performs a lookup, and returns the user's credentials. The Host On-Demand client
uses the obtained credentials to automate the login process.
Click OK.
Notice
the Logon option in the left pane of the FTP Host Sessions window.
On this window, be sure to leave the User ID and Password fields blank.
If you enter a User ID and Password, Host On-Demand will ignore the
settings on the Express Logon window.
Step 5: Finish creating your HTML file.
Now that you have configured your Host On-Demand session to use
Web Express Logon and have recorded your login macro, you are ready
to finish creating your HTML file using the Deployment Wizard. To
finish creating the file, take the following steps:
On the Host Sessions window, click Next to open the Additional
Options window (Figure 34). Make any
changes that you desire and click Next.
Figure 34. Additional
Options window
On the File Name and Output Format window (Figure 35), enter the page title, the file name, choose
the directory where you want to save your file, and check the Output
HTML box. You should save your file to the Host On-Demand server in
a directory known to your Web server; usually, this directory is your Host On-Demand server's
publish directory. Click Create File(s) to finish creating your HTML
file.
Figure 35. File Name
and Output Format window
Congratulations! You have taken all the necessary steps to implement
Web Express Logon in an FTP login environment. Your next step is to
test the logon automation. If logon automation is not successful,
that is, you are still being prompted with the host logon screen,
refer to Troubleshooting Web Express Logon.
API programming guide
Customizing Web Express Logon
If you decide to customize Web Express Logon, you may take either
of the following two approaches — (1) customize the existing
CMS or (2) replace the entire CMS with your own custom version. Although
the first approach requires some J2EE knowledge, it is easier to implement
than the second approach and does not require experience creating
servlets.
The CMS is the core of the credential-mapping framework. It is
supplied with Host On-Demand and must be deployed to a J2EE-compliant
Web application server. At a high level, the CMS is responsible for
determining the client's identity and returning the host credentials
to the client as an XML document. It accomplishes these tasks through
credential mapper Java classes called plug-ins. Web Express Logon
provides two Network Security plug-ins (one for Tivoli Access Manager
and one for Siteminder) to perform the request part of the process
and three Host Credential plug-ins (two for DCAS and one for Vault)
to perform the response part.
The Network Security plug-in retrieves the user's credentials from
the network security application after the user has made an HTTPS
request to the CMS. It identifies the user by way of the network user
ID and then passes it on to the appropriate Host Credential plug-in.
The Host Credential plug-in then determines the host user ID and acquires
the host access credentials.
If you take the first approach, you can create a Network Security
plug-ins and/or a HCM plug-in. For example, if your network security
application is not one of three applications supported by Web Express
Logon, you can create a Network Security plug-in to meet the requirements
of your application. Also, if you want to use an LDAP directory as
your HCM database instead of a JDBC database such as IBM DB2, for
example, you can create your own HCM plug-in.
Approach 1: Replace the entire CMS with your own custom version
of the servlet
This document does not describe how to create a servlet, resources on the web might help you.
If you decide to replace the entire CMS provided with Host On-Demand, you will need to use an HTTP
parameter for requests and XML-formatted data for responses. Parameters are supplied to the
CMS servlet via an HTTP request, and the response information is encapsulated into an
XML-formatted object and returned to the caller.
HTTP request parameters
When Host On-Demand makes a request of the CMS, it applies the
appropriate HTTP parameters to this request. This helps determine
the needs of the request. Since it must be an HTTP request, the CMS
request interface is built around a standard HTTP-style query. Following
the HTTPS protocol and server address is the query character, a question
mark, and then a list of keys and values. These keys and values are
separated by the ampersand symbol. Within each key and value pair,
the key and value are separated by the symbol for equality. A sample
query may look like the following example:
This is the destination for which the credentials
are being requested.
appid
This is the host application ID for which the
credentials are being requested.
authtype
This is the type of authentication credentials
being requested (available authentication types are defined in Table 2).
localid
This optional value will supply the user's identification,
based on the local operating system or the Portal user ID. For now,
the local ID solution is supported only on the Windows operating system.
XML data response object
The CMS returns its response to the client in XML format in an
effort to make the response information structured and extensible.
This XML format provides a good base for allowing structured access
to the return data today and flexibility for expansion and improvement
in the future. The following XML schema defines the format of the
XML document:
In the above code, the user ID and password elements return garbage
characters because they are encrypted. Host On-Demand includes an
object called com.ibm.eNetwork.security.sso.PasswordCipher to
accomplish this. It contains the following two methods:
public static String encrypt (String plainText)
This method returns an encrypted string passed as a parameter.
public static String decrypt (String cipherText)
This method reverses the encryption process by returning a decrypted
string. If the cipherText was not encrypted using the encrypt method,
it returns the original input string
The status element provides the status of the return
value. If the credential mapper query fails for any reason, this field
reports that failure to the client. Failure codes are defined in the
SSOConstants class, which serves as a static repository of related
SSO static information. The following table contains the status code
definitions:
Table 9. Status code definitions
Status code
Description
0
Success
1
Unknown status code
2
Suitable HCM plug-in not found
3
Invalid network user ID
4
Invalid application ID
5
Invalid server address
6
Database connection error
7
User ID not found in database
8
Exception
9
Invalid user ID
10
Passticket error
11
Timeout
12
Unexpected DCAS return code
13
API not supported
14
Bad URL
15
Unable to parse response
16
Local user ID not available
17
Duplicate XML tags
18
An exception occurred while processing the credential
request
19
Network Security plug-in is not defined to the
CMS
20
Portal ID not available
21
A matching user ID not found in Portal Vault
Approach 2: Customize the existing CMS provided with Host On-Demand
You can create custom Network Security and HCM plug-ins to customize
the existing CMS. The CMS relies on these plug-ins to provide the
user's network ID and host credentials. The CMS interacts with these
plug-ins via the following three Java interfaces:
com.ibm.eNetwork.security.SSO.CMS.CMInterface
com.ibm.eNetwork.security.sso.CMRequest
com.ibm.eNetwork.security.sso.CMResponse
com.ibm.eNetwork.security.SSO.CMS.CMInterface
The CMInterface interface contains the following methods:
public int Init(Properties p, String id)
This method is used to initialize the plug-in. Any configuration
parameters needed to intialize the plug-in will be passed in with
the properties object parameter. The parameters are specified in the
servlet's web.xml file. The id parameter is the symbolic name of the
plug-in specified in the CMS configuration portion of the web.xml
file. This value may be used to qualify the instance of the plug-in
in the event multiple instances of the plug-in are running.
public void Destroy()
This method is called when CMS is shutting down.
public CMResponse CMSGetUserCredentials(CMRequest
req)
This method is called by the CMS when it has selected the plug-in
to respond to a request. If the plug-in is a network security type,
it is expected that the plug-in will return the user's network user
id. If the plug-in is a host user credential type, then this method
will need to return the user's host credentials.
The following methods are needed for plug-in identification and
selection.
public String getName();
This method returns a string that identifes the plug-in.
public String getDescription();
This method returns a string that contains information that
describes the purpose and function of the plug-in.
public String getAuthor();
This method is needed to identify the originating company or
person of the plug-in.
public String[] getParameters();
This method returns a string array containing the parameter
tokens that may be used to configure this plug-in. These tokens are
the keys specified in the initialization (INIT) parameters section
of the web.xml file used to define the CMS servlet. If no tokens
are needed for configuration, the method may return null.
public Properties getParameterInfo(String strParm);
Given a parameter token, this method returns a properties object
with the list of properties for the given parameter. The current
list of possible properties are as follows:
cmiDefaultValue: This property contains
the default value for the specified parameter.
cmiEncrypted: This property determines
if the parameter must be encrypted (true or false).
cmiRequired: This property identifies
whether or not a parameter is required for initialization of the plug-in.
com.ibm.eNetwork.security.sso.CMRequest
The CMRequest object is used by CMS to encapsulate all necessary
parameters for a plug-in request. The CMRequest interface contains
the following members and methods:
Members:
ID (Host ID or Network ID)
Host Application ID
Host Destination Address
Authentication Type
HTTP Servlet request object
Methods
public CMRequest()
public CMRequest(String id, String applID, String
hostAddr, int authType, HttpServletRequest httpRequest)
public String getID()
public void setID(String id)
public String getHostApplID()
public void setHostApplID(String applID)
public String getHostDestination()
public void setHostDestination(String hostAddr)
public int getAuthType()
public void setAuthType(int authType)
public HttpServletRequest getHttpRequestObject()
public void setHttpRequestObject(HttpServletRequest
httpRequest)
public String toString()
com.ibm.eNetwork.security.sso.CMResponse
The CMResponse object encapulates all relevant information needed
by the CMS for the request made of a plug-in. The CMResponse interface
contains the following members and methods:
Members:
Status Code
ID (Host ID or Network ID)
User Credentials (Password or Passticket)
Methods:
public CMResponse()
public CMResponse(Object id, Object password,
int status)
public int getStatus()
public void setStatus(int status)
public Object getID()
public String getIDasString()
public void setID(Object id)
public Object getPassword()
public String getPasswordasString()
public void setPassword(Object password)
public String toString()
Writing your own plug-ins
The Network Security and HCM plug-ins are Java classes that implement
the CMInterface interface. The CMS makes calls to your plug-ins via
the APIs described earlier.
Network Security plug-in: Host On-Demand provides
two Network Security plug-ins, one for Tivoli Access Manager and one
for Netegrity Siteminder. If you decide not to use either of these,
you may create your own plug-in.
The primary function of the Network Security plug-in is to acquire
the user's network ID, which may be gleaned from the HTTP header of
the incoming HTTP request object. The details of how to acquire the
network ID is specific to your network security application. Refer
to your network security documentation for more information.
HCM plug-in: Host On-Demand provides three
HCM plug-ins, two for DCAS and one for Vault. If you decide not to
use either of these, you may create your own plug-in. For sample HCM
plug-in code, refer to Sample HCM plug-in.
The primary function of the HCM plug-in is to take the user's network
ID or user's certificate (and perhaps the application ID) and obtain
the appropriate host credentials. In Web Express Logon's implementation,
users' network IDs are mapped to their host IDs by way of a JDBC-accessible
database. However, you may wish to do this by another means, such
as LDAP. For this reason, you may want to write your own HCM plug-in.
In our DCAS/JDBC plug-in, we automate 3270 application logins by associating
users' network IDs to their host IDs. Then, the host IDs and application
IDs are used to obtain a RACF-generated passticket. This passticket
is then used to sign the user on to the host. In your environment,
you may not want to use the JDBC association aspect of our plug-in.
For this reason, we have provided a DCAS API that you can use to develop
your own custom plug-ins. This API provides access to RACF-generated
passtickets.
The DCAS API object (DCASClient) encapsulates the Passticket requests:
The DCAS API client contains the following members:
Members:
Port Number
Keyring File Name
Keyring Password
Use WellKnownTrustedCAs
Server Authentication
Trace Level
Trace Log File Name
The DCAS API client contains the following methods:
Methods:
Public DCASClient()
This constructor should be used if you want to use the default
trace level and log file name when the object is created.
Public DCASClient(int traceLevel, String logFile)
traceLevel - Trace level (0=None, 1=Minimum, 2=Normal and 3=Maximum)
logFile - Trace log file name. It should include the full path
name.
This constructor should be used if you want to specify a trace
level and log file name when the object is created.
Public int Init (String hostAddress, int hostPort,
String trustStoreName, String trustStorePassword, String trustStoreType)
hostAddress - DCAS server's IP address
hostPort - DCAS server's port number. If not specified, the default
port number of 8990 will be used.
trustStoreName - The name of the truststore to be used by JSSE
to connect to DCAS. It should include the full path name. Set to
null if using default truststore or WellKnownTrustedCAs.p12.
trustStorePassword -The password of the above truststore. Set
to null if using default truststore or WellKnownTrustedCAs.p12.
trustStoreType -- The type of the above truststore. Valid values
are DCASClient.TRUSTSTORE_TYPE_PKCS12 (pkcs12), DCASClient.TRUSTSTORE_TYPE_JCEKS
(jceks), and DCASClient.TRUSTSTORE_TYPE_JKS (jks). Set to null if
using default truststore or WellKnownTrustedCAs.p12.
This method should be called after creating the DCASClient object.
The parameters are stored in the object, and they do not change for
the life of the object. The truststore name should include the full
path name. The truststore must contain the DCAS client certificate
and DCAS server certificate, unless the default truststore or WellKnownTrustedCAs.p12
will be used. The truststore password should have been encrypted using
the encrypt password tool. It will be decrypted before being stored
in the object. The valid return codes are described in the SSOConstants
object. Return 0 on success, non-zero otherwise.
public void setUseDefaultTrustStore(boolean def)
public void setNoFIPS(boolean nof)
Public int Init(String dcasAddr, int dcasPort,
String keyringFileName, String keyringPassword)
dcasAddr - DCAS server's IP address
dcasPort - DCAS server's port number. If not specified, the default
port number of 8990 will be used.
keyringFileName - The name of the SSL keyring database file. It
should include the full path name.
keyringPassword - The password of the above keyring database.
This method should be called after creating the DCASClient object.
The parameters are stored in the object, and they do not change for
the life of the object.The p12 file name should include the full path
name. It must contain the DCAS client certificate and the DCAS server
certificate. If WellKnownTrustedCAs.p12 or the default truststore
is being used for these certificates, set p12FileName and p12Password
to null. The p12 password should have been encrypted using the encrypt
password tool. It will be decrypted before being stored in the object.
The valid return codes are described in the SSOConstants object.
If a truststore of a type other than p12 is being used, use the Init(hostAddress,
hostPort, trustStoreName, trustStorePassword, trustStoreType method
instead.
Public void setWellKnownTrustedCAs(boolean wellKnownCAs)
public void setWellKnownTrustedCAsPassword(String
password)
This method is used for setting the value specified by the above
parameter.
Public void setServerAuthentication(boolean serverAuth)
Public void setTraceLevel(int level)
Public void setLogFile(string fileName)
Public CMResponse getPassticket(String hostUserID,
String hostApplID, String hostAddr, long timeout)
hostUserID - User ID for which the passticket is being requested.
hostApplID - Application ID for which the passticket is being
requested.
hostAddr - The DCAS server's address.
timeout - The time available for the DCAS protocol to return a
passticket. It is specified in milliseconds.
This method should be called after creating and initializing
the DCASClient object to obtain a passticket from the DCAS server.
The passticket and the user ID are returned in a CMResponse object.
The caller should check the status field of the CMResponse object
to see if the call was successful or not. If the call was successful,
the status field will be set to SSO_CMR_SUCCESS (0). The valid values
for the status field are specified in Table 9.
An SSL client authenticated connection is established with the DCAS
server, and it is reused for all subsequent passticket requests.
Public CMResponse getPassticket(byte certificate[],
String hostApplID, String hostAddr, long timeout)
certificate - User Certificate for which the passticket is being
requested.
hostApplID - Application ID for which the passticket is being
requested.
hostAddr - The DCAS server's address.
timeout - The time available for the DCAS protocol to return a
passticket. It is specified in milliseconds.
This method should be called after creating and initializing
the DCASClient object to obtain a passticket from the DCAS server.
The passticket and the user ID are returned in a CMResponse object.
The caller should check the status field of the CMResponse object
to see if the call was successful or not. If the call was successful,
the status field will be set to SSO_CMR_SUCCESS (0). The valid values
for the status field are specified in Table 9.
An SSL client authenticated connection is established with the DCAS
server, and it is reused for all subsequent passticket requests.
Public void Destroy()
This method closes the DCAS connection.
Troubleshooting error messages
Troubleshooting Web Express Logon
Web Express Logon depends on a number of independent processes
working together to function properly. Some of these processes run
on the Host On-Demand client while others run on other host systems.
When one or more of these processes break down, you must be able to
determine which process is causing the problem in order to resolve
it appropriately. This portion of the document is devoted to that
purpose.
If you have problems with Web Express Logon, analyze the type of
results you receive and any accompanying informational messages. Some
of these informational messages are included as part of the Host On-Demand client
by way of an interactive panel, and/or they may be part of a server-based
log.
Assuming that Web Express Logon is not functioning properly (that
is, you are not logged in a host emulation session), ask yourself
the following questions:
Did the Host On-Demand client display an error message panel?
If no, verify the following on your session configuration panel:
Have you enabled Express Logon for the session that you are currently
running? To do this, highlight your session and select Properties
under the Configure drop-down menu in the Deployment Wizard. On the
left side of the window, select Express Logon under Connection and
click Yes to enable Express Logon.
Is this a 5250 session and you are using a Kerberos passticket
for authentication? If so, you will need to make sure you select Yes
for the Use Kerberos Passticket option on the Express logon window
of session properties.
Are you using macro-based automation? If so, verify the following
items:
When creating the macro, verify that you selected Web Express
Logon (not Certificate Express Logon) on the Record macro window.
If you are expecting the macro to run when the session is started,
verify that you have selected Auto-Start macro in your session configuration.
Did your automation macro run but not provide the appropriate
credentials to log in the user? This means that you have properly
accessed the Credential Mapper Web application, but something is not
functioning properly within that environment. You should enable server-side
logging and attempt another credential automation event. Then look
in the log that is created and refer to Web Express Logon server-side messages.
Are you using IBM WebSphere Application Server and have Java 2
security enabled? If so, please check to make sure that the following
permissions are granted in the was.policy file, which is located in
the META-INF directory.
This applies to the JDBC database Host Credential Mapper (HCM).
Are users being prompted for their network IDs twice? When using
JVM V1.4 and later, users may be prompted for their network credentials
two times. Although this is a known issue, currently no workaround
exists. This double authentication issue does not occur when using
JVM V1.3.x.
Web Express Logon client-side messages
When an unexpected problem occurs during the Web Express Logon
process, the Host On-Demand client provides information about the
problem to the user by displaying a panel with an informational message.
Each of these messages contain an error code that you can use as a
unique identifier for the problem that is occurring. The following
is a list of all Web Express Logon messages for the Host On-Demand client.
WELM001: Message key not found: status
= value
This message should only be seen in the event of an error found
in a custom plug-in. If you have customized the Web Express Logon
credential mapper framework, you can create user defined error codes.
If the Web Express Logon credential mapper returns such a code, this
message will be displayed.
WELM002: No suitable Host credential plug-in found
This message is displayed when there is no appropriate credential
plug-in found to handle the Host On-Demand client's credential request.
Verify that your Web Express Logon credential mapper application is
properly configured to handle the Host On-Demand client's session
type.
WELM003: Invalid network user ID
The Web Express Logon credential mapper cannot acquire the user's
network ID. This can be caused by improper settings in the network
security plug-in section of the CMS configuration. If the local operating
system identification is being used to identify the user, make sure
this option is selected in the Express Logon section of the Session
Configuration panel.
WELM004: Invalid Application ID
This message indicates the lack of a valid Application ID. You
specify the Application ID when you create the Web Express Logon macro.
When you create the macro, be sure that you enter the proper value
for the Application ID.
WELM005: Invalid server address
This message indicates the lack of a valid server address. The
server address is specified as the Destination Address on the Session
Configuration panel. For some credential plug-ins, this is a required
parameter.
WELM006: Could not connect to database
This problem can be generated by an improperly configured database
link. Please verify that the database is properly configured in your
CMS configuration. If the configuration information looks correct,
you should independently verify the database's availability and running
status. The database's configuration and management tools are a good
place to perform this test.
WELM007: A matching user ID not found in database
The credential plug-in is not able to find a match for the user's
host ID, given the search criteria. Verify that the user's host ID
is specified in the database or other storage medium used by the credential
plug-in. In addition, you may want to enable server-side logging and
verify that the parameters being sent to the CMS are correct.
WELM008: The Credential Mapper Servlet reported an
exception while processing a credential request. Please see the server
log for details.
This generalized message is a result of an exception occurring
on the CMS. Please follow the instructions for enabling server-side
logging for more information about the cause of this problem.
WELM009: Invalid User ID
A credential plug-in does not have a valid user's host ID. For
some plug-ins, the host ID is used to obtain a temporary passticket
credential to access the host. If the value used is not appropriate,
this message is generated. You may want to verify the user's host
ID is specified in the database or other storage medium used by the
credential plug-in. In addition, you may want to enable server-side
logging and verify that the parameters being sent to the CMS are correct.
WELM010: Passticket could not be obtained
This message is displayed when a credential plug-in receives
an error during the passticket creation process. Typically, the actual
creation of the passticket occurs in a process outside of the credential
plug-in. If that external process returns an error, this message displays.
You should enable server-side logging and perform the credential request
again. Using the information in the log along with the messages found
in this section of the document should provide a better understanding
of the problem.
WELM011: Credential/Passticket request timed out
This message is the result of a pending request timing out before
it could be resolved. This could happen when the Host On-Demand client
is making a request of the Credential Mapper Server, or it could be
the credential plug-in making a request of an external entity. In
either case, if the default time elapses before the request is fulfilled,
this message is generated. To rectify the problem, verify that the
addresses being used are correct. For the Host On-Demand client, the
Credential Mapper server is specified as the Credential Mapper Server
address in the Express Logon properties window of the Session Configuration
panel. If the credential plug-in is generating this problem, verify
that the credential plug-in is properly configured in your CMS configuration.
WELM012: Unexpected return code received from DCAS
This error is created when a credential plug-in receives an
unexpected return value of an external application. You should enable
server-side logging and perform the credential request again. Using
the information in the log along with the messages found in this section
of the document should provide a better understanding of the problem.
WELM013: API not supported. Contact the system administrator
for server log.
This message informs the user that an unsupported request has
been made of the credential plug-in selected by the credential mapping
application. You should enable server-side logging and perform the
credential request again. Using the information in the log along with
the messages found in this section of the document should provide
a better understanding of the problem.
WELM014: A malformed URL was specified for the Credential
Mapper Server Address
The address used for the Credential Mapper server is not a valid
URL address. The Credential Mapper server is specified as the Credential
Mapper server address in the Express Logon properties of the Session
Configuration panel.
WELM015: Unable to parse Credential Mapper response
The response generated by the Credential Mapper server application
contains a response that is improperly formatted. This may happen
when a custom Credential Mapper server application is used in place
of the default Host On-Demand Credential Mapper server application.
Refer to Customizing Web Express Logon for more information about the CMS
response format.
WELM016: Local user ID not available
This message is generated when the operating system on which
the Host On-Demand client is running does not support the Use Local
Operating System ID option for network security identification. Refer
to the Introduction for more information about which operating
systems and versions are supported by this option.
WELM017: Credential Mapper response contained a duplicate
userid, password, or status tag
This problem is caused when the response generated by the Credential
Mapper server application contains duplicate response values. This
may happen when a custom Credential Mapper server application is used
in place of the default Host On-Demand Credential Mapper server application.
Refer to Customizing Web Express Logon for more information about the CMS
response format.
WELM018: An exception occurred while processing the
credential request: some exception
This message is displayed when an exception occurs in the Host On-Demand client
during the Web Express Logon process. If the exception is an IOException,
the problem may be the Credential Mapper server address specified
in the Express Logon properties panel in the session configuration.
If the address seems correct, validate that the CMS server is available.
Typing the Credential Mapper address specified in the session configuration
into the address entry field of your browser allows you to test access
to the CMS server easily. The results should be an XML document similar
to the one described earlier in this document.
WELM020: Portal user ID not available
This message is generated when the Portal ID cannot be retrieved.
The HTML page may not be configured as a Host On-Demand portlet.
WELM021: A matching user ID not found in Portal Vault
The matching user's host credentials are not found in the Portal
Vault. Be sure that the Portal Vault parameters are configured when
the HTML page is generated.
WELM050: Web Express Logon Credential Mapper Server
Address not specified
Web Express Logon is used to automate the Host On-Demand configuration
server login process, but the Credential Mapper server address is
not specified. Verify that you have specified the proper value for
the Credential Mapper server address in the Deployment Wizard.
WELM051: User name returned from Web Express Logon
is not a known Host On-Demand user
Web Express Logon is used to automate the Host On-Demand configuration
server login process and the user name provided by Web Express Logon
is not a valid Host On-Demand user. Verify that the user is listed
in the Host On-Demand configuration by accessing the Host On-Demand Administrative
Console. In addition, view the server-side log to verify that the
user name is being retrieved properly.
WELM052: Invalid password returned from Web Express
Logon
Web Express Logon is used to automate the Host On-Demand configuration
server login process, and the password provided by Web Express Logon
is not a valid. Verify that the user is listed in the Host On-Demand configuration
by accessing the Host On-Demand Administrative Console. In addition,
view the server-side log to verify that the user name is being retrieved
properly.
WELM053: This session is not enabled for Web Express
Logon
A Web Express Logon macro is executed, and the session on which
it is running has not been configured to use Web Express Logon. Web
Express Logon can be configured via the Host On-Demand session configuration
panel.
Web Express Logon server-side messages
The following are the primary server-side messages:
This error occurs when the Credential Mapper plug-in corresponding
to YourCredentialMapperName fails to initialize
successfully. Possible causes of this error include the following:
Your web.xml specifies an invalid or missing value for a parameter
that is required by the specified plug-in.
To determine which parameter(s) is causing the problem, turn on
tracing for the plug-in and look in the log for error CMPIE008.
You are using the DCAS or Vault plug-ins, and an error occurs
when attempting to connect to the credentials database. Turn on tracing
for the plug-in to obtain more diagnostic information (database driver
missing, SQL exception, etc).
You are using a custom plug-in, and your Init() method is returning
a value other than 0 on success. Refer to the Customizing Web Express Logon for
more information about writing your own credential mapper plug-in.
You are using DCAS, and the SSL key database file or password
is not specified in web.xml.
CMPIE003: No CM configuration can be found for the
CM identified by the CredentialMapperName name.
This error occurs as a result of a missing element in your web.xml
file. If you provide a value for the CMPICredentialMappers parameter
that is not also a parameter itself elsewhere in the web.xml, you
will get this error. For example, is you have the following definition
in your web.xml,
CMPIE005: No Credential Mapper found for Auth type:
AuthTypeValue
When you define a Credential Mapper in your web.xml, you specify
the type of Authentication to which the plug-in applies. For example,
if you had an entry such as the following,
this would show that the vault Credential
Mapper is only intended to be used with 3270 host sessions. If this
were the only Credential Mapper defined in your web.xml and you tried
to perform a logon to a 5250 session, you would receive this error
with AuthTypeValue equal to AuthType_5250Host. Be sure that your
web.xml has a Credential Mapper defined that is appropriate for your
authentication type.
CMPIE007: No authentication type specified for CM object:
YourCredentialMapperName
When you define a Credential Mapper in your web.xml, you must
specify the full class path name, the authentication type, and the
host mask. If you do not specify an authentication type, or if you
specify an invalid authentication type (such as AuthType_Fred), you
will get this error. For a list of valid authentication types, refer
to Table 6.
CMPIE008: Invalid value for parameter: ParameterName
This error occurs when a parameter that is required by the plug-in
has an invalid value or has not been specified. Provide an appropriate
value in the web.xml for the parameter ParameterName.
CMPIE010: Exception and Host User ID not found for
Network ID: NetIDValue.
An exception occurred before the host user ID corresponding
to NetIDValue could be found. A possible cause of the exception is
a mismatch between the column names in the data source and the column
names specified in the web.xml. Another possibility is an error in
the formatting of the table name ([tableName$] for Excel, simply tableName
for DB2). Double check your web.xml for errors and refer to the exception
trace in the server log for debugging information.
CMPIE011: Host User ID not found for Network ID: NetIDValue.
This error occurs when there is no entry found in the database
for NetIDValue. Check your database and verify that there is an entry
for NetIDValue. Make sure that the host address and application ID
found in the server log for this query match the host address and
application ID specified for this NetID in the database.
CMPIE012: SQLException: Value.
This error occurs when attempting to open or close a connection
to the database. Make sure that the database is available and correctly
specified in the web.xml file.
CMPIE013: Exception: Value.
An exception occurred in the plug-in code.
DCAS error messages
The following are the primary DCAS error messages:
DCASE001: Cannot import the CA certificates contained
in Keyring Database.
An SSL runtime exception occurred while loading the CA certificates
from the KeyringDatabase. The file may be corrupted. Please see the
additional logged messages for details. You may have to set the CMPI_DCAS_TRACE_LEVEL
parameter in web.xml to 3 to see the additional messages.
DCASE002: Cannot read the keyring file: KeyringFileName
The specified KeyringFileName cannot be loaded. Make sure that
the file exists and the path name and file name are correctly specified
in the web.xml file. See the exception trace for additional information.
DCASE003: The DCAS server address is either blank or
null.
The Host On-Demand client's credential request contains an invalid
server address. See the WELM005 message for details.
DCASE004: The Keyring file name is either blank or
null.
The CMPI_DCAS_KEYRING_FILE parameter must be specified in the
web,xml file. Check the web.xml file.
DCASE005: The Keyring password is either blank or null.
The CMPI_DCAS_KEYRING_PASSWORD parameter must be specified in
the web.xml file. Check the web.xml file.
DCASE006: The host user id is either blank or null.
The host user ID retrieved from the vault database is either
blank or null. Check the vault database for host user ID.
DCASE007: The host application id is either blank or
null.
The Host On-Demand client's credential request contains an invalid
application ID. See the WELM004 message for details.
DCASE008: Passticket could not be obtained for user
ID: Userid
The DCAS client could not obtain a passticket for the specified
User ID. Make sure that the host user ID is valid and it is defined
to the host credential system such as RACF. Also, see the additional
logged message for a specific failure.
DCASE009: DCAS timer expired - no response from server:
Host
The DCAS connection timer expired before a passticket request
could be completed. If this problem persists, you may want to increase
the value of the CMPI_DCAS_REQUEST_TIMEOUT parameter in the web.xml
file. This value should be less than the timeout value for the macro.
DCASE010: Unexpected DCAS return code: ReturnCode
This error suggests an internal coding error. Please make a
note of the ReturnCode and report this problem.
DCASE013: DCAS Exception: Exception
Exception occurred while processing a passticket request. See
the additional logged messages for details.
DCASE021: Cannot send passticket request to server
Host
The DCAS server connection is not active. Check the DCAS server
log and retry the operation.
DCASE022: An unexpected error occurred while processing
a passticket request.
An unexpected exception occurred while processing a passticket
request. See the exception details to determine the cause of the problem.
DCASE023: An error occurred while receiving data from
the passticket server Host. The connection is closing.
Input/Output error occurred while receiving data from the passticket/DCAS
server. Retry the operation. If the problem persists, check the DCAS
server log for details.
DCASE050: Cannot create socket to the passticket server
at IpAddr. See other messages for details.
An SSL exception occurred while creating a secure connection.
See the additional logged messages for details. You may have to set
the CMPI_DCAS_TRACE_LEVEL parameter in web.xml to 3 to see the additional
messages. This message typically indicates an SSL handshake failure.
DCASE051: The DCAS server at Ipaddr is an unknown host.
The Destination Address specified in the Session Connection
panel is an unknown host. Check the Ipaddr to make sure it is valid.
See the WELM005 message.
DCASE052: Cannot create socket to the passticket server
at IpAddr because of an I/O error.
An I/O exception occurred while creating a secure connection
to IpAddr. See the additional logged messages for details. You may
have to set the CMPI_DCAS_TRACE_LEVEL parameter in web.xml to 3 to
see the additional messages. The server at IpAddr may be down.
DCASE060: The common name in the certificate received
from Host is empty. SSL connection is terminated.
The SSL server authentication failed. The Host presented a
certificate that does not contain the common name. Please update
the server certificate's common name, or turn the server authentication
off.
DCASE061: The common name in the certificate received
from Host has no address. SSL connection is terminated.
The SSL server authentication failed. The host presented a
certificate whose common name does not have an address. Update the
server certificate's common name to the server's IP address, or turn
the server authentication off.
DCASE062: The passticket server's name Host has no
address. SSL connection is terminated.
The SSL server authentication failed. The host presented a certificate
whose host name does not have an IP address. Make sure that an IP
address is associated with the host name, or turn the server authentication
off.
DCASE063: The common name in the certificate received
from Host does not match the partner's common name. SSL connection
is terminated.
The SSL server authentication failed. The socket or discovered
address does not match the common name specified in the Host certificate.
The server certificate could not be authenticated. Update the server
certificate's common name to match its IP address, or turn the server
authentication off.
DCASE064: No certificate chain received from Host.
SSL connection is terminated.
The host did not present its certificate when a connection was
established. The server certificate could not be authenticated. The
host must be configured to send its certificate to do the server authentication.
Recording the Web Express Logon macro
Take the following steps to record the logon automation macro:
In an open session, click the Record Macro button on the toolbar.
On the Record Macro window (Figure 36), under
Express Logon Feature, select Web.
Figure 36. Record macro
window
Enter the application ID (3270 sessions only) in the Application
ID window (Figure 37) and then click OK. This
name must match the RACF PTKTDATA (Passticket Data Profile) application
name that is configured on the z/OS host. This name could be the same
as the application name that the user is logging on to (for example,
the name on USSMSG10). When creating PTKTDATA profiles for applications
such as TSO (time sharing option), the application name portion of
the profile will most likely not be the same. For example, RACF requires
that the application ID portion of the profile name be TSO+SID. Refer
to the Security Server (RACF) Security Administrator's
Guide, publication number SC28-1915, to determine the correct
profile naming. You can obtain this ID from the host administrator.
Figure 37. Application
ID
The Screen Criteria window (Figure 38)
shows you what is needed by the macro to complete the logon. Once
you reach a screen that meets any of the criteria, click OK..
Figure 38. Screen Criteria
On the Alternate Start Screen window (Figure 39), specify whether this screen is an alternate
start screen and then click Next. The macro can start playing when
a start screen is recognized or when an alternate screen is recognized.
You can have only one alternate start screen per logon. If you have
multiple logons, you will pass through this screen again.
The alternate
start screen is a screen from which the user might want to play the
macro to log on to the application. If the application has more than
one possible start screen, you should identify it during the recording
process so that the macro can be played from that screen. For example,
the logon process might begin from the USSMSG10 screen or the application
logon screen. You may start the logon macro from either the start
screen or the alternate start screen. You can designate only one screen
as an alternate start screen. There is no alternate start screen
after the screen that contains the user ID.
Figure 39. Alternate
Start Screen
On the User ID Field window (Figure 40),
select Yes to specify that the session screen contains a user ID field.
Click Next.
Figure 40. User ID Field
On the User ID Field Location window (Figure 41), type the user ID in the User ID field,
not on the session screen. You must enter a user ID to continue recording
the macro. The macro enters the actual user ID text in the user ID
field on the session screen. Row/column determines the cursor position
on the screen for the user ID field. Click Current to use the cursor's
current position on the session screen if you know it is correct.
If the current cursor position is not correct, move the cursor to
the beginning of the user ID field on the session screen to identify
where the user will enter the user ID and click Current. The field
values change to match the new cursor position on the screen. If
the initial cursor position is correct, then there is no need to move
the cursor on the session screen. When you are finished, click Next.
Click Current only if you will not be using
this screen for multiple applications and the location of the user
ID field never changes.
Figure 41. User ID Field
Location
On the Password Field window (Figure 42),
select Yes to specify that the session screen contains a password
field. Click Next.
Figure 42. Password Field
On the Password Field Location window (Figure 43), type the password in the Password field
on this window, not on the screen. You must enter a password to continue
recording the macro. The macro enters the actual password text in
the password field on the session screen. Row/Column determines the
cursor position on the screen for the password field. Click Current
to use the cursor's current position on the session screen if it is
correct. If not, move the cursor to the beginning of the Password
field on the session screen to specify where the user will enter the
password and click Current. The field values change to match the new
cursor position on the screen. If the initial cursor position is correct,
then there is no need to move the cursor on the session screen. When
you are finished, click Next.
Click Current only if you will not be using
this screen for multiple applications and the location of the password
field never changes.
Figure 43. Password Field
Location
On the Multiple Logons window (Figure 44),
click either Yes or No.
Figure 44. Multiple Logons Click Yes if you want to define another logon sequence for an
additional application. If you click Yes, you will advance to the
Continue window (Figure 45). Once you reach
a point in the macro that requires another User ID and password logon,
click Next.
Figure 45. Continue Click No to finish recording the logon portion of the macro
(see Figure 46). Click OK to finish.
Figure 46. Finish
Finish recording your macro using the Macro Manager, and click
Stop on the toolbar.
If you are planning to save the macro to your current session
(and not to a file), another window appears that asks you if you would
like the macro to start automatically when the user opens the session.
Click Yes if you would like the macro to auto-start. If you select
No, the user will have to start the macro manually.
Web Express Logon using the Configuration server-based model
When creating an HTML file using the Configuration server-based
model in the Deployment Wizard, the next window after the Configuration
Model window is the Logon Type window. On this window, you are presented
with the following three options:
Prompt users to enter Host On-Demand user ID:
Select this option only if you want users to be challenged for their
credentials. This is the default option.
Use Web Express Logon: Select this option
to map the user's network ID to the Host On-Demand ID, which will
log users on to the Host On-Demand server.
Note that
you must have your user profiles already set
up on your Host On-Demand configuration server. If you do not have
your user profiles set up and you attempt to launch the HTML file,
you will get the following error message:
WELM051 User name returned from Web Express Logon
is not a known Host On-Demand user
Selecting this option also requires that you add an additional
Vault credential mapper and all of its parameters to your web.xml
file. For example, take the following steps:
In the web.xml file, update the following INIT parameter with
the new Vault credential mapper name, for example, CMPIConfigServer_:
In your Vault credential mapper database, create a new table with
three columns, for example:
NETWORKID
HODID
PASSWORD
Be sure that the NETWORKID contains the network IDs, the HODID
column contains the Host On-Demand user IDs, and the PASSWORD column
contains the Host On-Demand passwords. Since you did not add parameters
in your XML file for HOSTADDRESS and APPLICATIONID, you do not need
to add the columns for these in your Vault credential database.
Automatically log users on to Host On-Demand using
their Windows username: Select this option to allow Host On-Demand to
use the local system's ID for macro-based automation. You can either
allow Host On-Demand to use the network ID supplied to the network
security application or the Windows system ID to retrieve the host
credentials. If you use this option, be sure that you select the appropriate
User Identity Type in session properties and that you are using the
WAR file that is intended to be used with Windows Domain (wincms.war).
When using the Configuration server-based model and a network security
application such as Tivoli Access Manager, you may be accessing your Host On-Demand pages
via a URL such as https://server_name/junction_name/HOD/myhodpage.html,
where server_name is the name of the machine
running Tivoli Access Manager and junction_name is
the junction that you create to point to your Host On-Demand server
machine and your HTTP server's port number. If this is the case, Host On-Demand will
try to contact the Host On-Demand Service Manager to get your user,
group, and session information at the server_name rather
than at the junction_name. To remedy this
situation, edit the config.properties file found in the HOD directory
of your Host On-Demand install directory (\Program Files\IBM\Host On-Demand\HOD\config.properties)
by adding this line at the end of the file content:
ConfigServer=myhodserver.ibm.com
where myhodserver is the machine you are pointing to
with the junction_name.
Password encryption tool
Host On-Demand provides a password encryption tool so you can encrypt
your passwords for added security. The tool is a command-line tool
that allows you to generate a file that stores the encrypted password,
which you must then copy to the appropriate place in the web.xml file.
The Host Credential plug-in decrypts the password before using it.
If you create a custom Host Credential plug-in, the plug-in should
use the com.ibm.eNetwork.security.PasswordCipher object
to decrypt the password. The CLASS file for this object is included
in WAR file. Refer to XML data response object for a description of
the encrypt and decrypt methods.
Windows platforms
Using a DOS prompt, change the current directory to the Host On-Demand's
bin directory and type the following command:
encrypt <password> [filename]
where password is the password to be encrypted
and filename is the name of the file that
you want to store the encrypted password. The default filename is
password.txt.
Unix platforms
Issue the following command:
cd your_install_dir
Java -classpath .;your_install_dir\lib\sm.zip \
     com.ibm.eNetwork.security.sso.cms.tools.Encrypt <password> [filename]
where your_install_directory is your Host On-Demand installation
directory, password is the password to be
encrypted, and filename is the name of the
file that you want to store the encrypted password. The default filename
is password.txt.
Sample HCM plug-in
You can create your own Host Credential Mapper (HCM) plug-in if
those provided with Web Express Logon do not suit your needs. To use
your own custom plug-in, you must write the plug-in code and update
the web.xml file so the servlet can function with your plug-in.
The following two sections provide more details about writing your
own plug-in and updating the web.xml file.
Write the HCM plug-in.
Here, we provide pseudocode from a sample HCM plug-in called CMPISample.
The purpose of this sample is to demonstrate the implementation of
CMInterface and some of the functions your plug-in will need to provide.
CMPISample is designed to read the host credentials from a database
that you specify.
We recommend that you use the provided CMPIVault
class for this function whenever possible. You should only create
a custom plug-in like CMPISample if one of the plug-ins provided with Host On-Demand does
not suit your needs.
package com.mycompany;

import java.util.Properties;
import java.util.Enumeration;
import com.ibm.eNetwork.security.sso.*;
import com.ibm.eNetwork.security.sso.cms.CMInterface;


public class CMPISample implements CMInterface {

    private static final String className
		= "com.mycompany.CMPISample";


    //The following strings match the parameters contained in the
	web.xml file (see Sample.xml)
    private static final String DB_ADDRESS             = "CMPI_SAMPLE_DB_ADDRESS";
    private static final String DB_TABLE               = "CMPI_SAMPLE_DB_TABLE";
    private static final String TRACE_LEVEL            = "CMPI_SAMPLE_TRACE_LEVEL";
    private static final int    DEFAULT_TRACE_LEVEL    = Ras.TRACE_NONE;
    //TODO:  Add all other parameters needed, such as the database
		driver, column names, ID and PW, etc

    private String dbAddress;         //url string that provides the
		address of the database
    private String dbTable;           //database table to use for the query
    private int    traceLevel;        //trace level
    private String logFile;           //trace log file
    //TODO:  Add fields for all other parameters


    private Properties pInit = null;
    private String cmID = null;
    //TODO:  Add any other needed fields, such as the database connection


    private boolean initOK = true;

    /*************************************************************************
     * Called to initialize the Sample Plug-in
     *
     * @param pInit  All of the CredMapper servlet parameters.
     *               These parameters are specified in the web.xml file.
     * @param id     The plug-in being initialized.
     * @return       An int value which indicates the status of the initialization.
     *************************************************************************/
    public int Init(Properties pInit, String id)
    {
         final String methodName = "Init";

         initOK = true;
         this.pInit = pInit;
         this.cmID = id;

         // For debug purposes, add a RAS implementor which logs to stdout and file.
         String traceStr = getProperty(TRACE_LEVEL, false);                  // Optional
         if (traceStr != null)  traceLevel = Integer.parseInt(traceStr);
         else                   traceLevel = DEFAULT_TRACE_LEVEL;
         String logFile  = getProperty(SSOConstants.TRACE_LOG_FILE, false);  // Optional
         if (logFile == null)   logFile    = SSOConstants.DEFAULT_TRACE_LOG_FILE;

         SampleRas sampleRas = new SampleRas(logFile);  //SampleRas classs not provided.
			This class implements RasInterface
                                                      //and writes to logFile and stdout

         if ((traceLevel > Ras.TRACE_NONE) &&
             (Ras.hasNoImplementations())) {
           Ras.addRasImplementation(sampleRas);
         }

         if (traceLevel >= Ras.TRACE_MINIMUM) {
           //Trace all parameters and their values
           String parameters = "";
           //TODO:  Loop through pInit and build parameters string

           Ras.traceEntry(className, methodName, new String [] {
                          "pInit = {\n\t" + parameters + "\n\t}",
                          "id = " + id
                          } );
         }

        /*************************************************************************
         * Get Sample parameters from the properties object
         * Try to retrieve the value of all parameters and return an error
         * if one or more than one parameter is bad.
         *************************************************************************/
         dbAddress         = getProperty(DB_ADDRESS, true);           //Required
         dbTable           = getProperty(DB_TABLE, true);             //Required
         //TODO:  Read the rest of the properties here

         if (!initOK) return SSOConstants.SSO_INVALID_PARAMETER;

         //TODO:  Check to see if the network database driver exists here,
			and establish a connection with the database

         if (traceLevel >= Ras.TRACE_MINIMUM)
           Ras.traceExit(className, methodName);

         return SSOConstants.SSO_SUCCESS;
    }

    /*************************************************************************
     * Close the Database connection
     *************************************************************************/
    public void Destroy() {
        final String methodName = "Destroy";
        if (traceLevel >= Ras.TRACE_MINIMUM)
          Ras.traceEntry(className, methodName);

        //TODO:  Close the database connection

        if (traceLevel >= Ras.TRACE_MINIMUM) //@ry3
          Ras.traceExit(className, methodName);

    }

    public CMResponse CMSGetUserCredentials(CMRequest cmreq)
    {
        final String methodName = "CMSGetUserCredentials";
        if (traceLevel >= Ras.TRACE_MINIMUM)
          Ras.traceEntry(className, methodName, new String [] {
                         "Network ID       = " + cmreq.getID(),
                         "Application ID   = " + cmreq.getHostApplID(),
                         "Destination Addr = " + cmreq.getHostDestination()
                         } );

        String netID = cmreq.getID();
        String hostApp = cmreq.getHostApplID();
        String hostDest = cmreq.getHostDestination();

        CMResponse resp = new CMResponse();

        String retid = null;
        String retpw = null;

        //TODO:  Build query statement with netID, hostApp, hostDest, and
			the values provided in web.xml (table name, column names, etc)
        //TODO:  Execute the statement and set retid and retpw with the results

         if (retid == null) {
          if (traceLevel >= Ras.TRACE_MINIMUM)
            Ras.logMessage(Ras.MSG_ERROR, className, methodName,
                           "DB_USER_ID_ERROR", netID);
            resp.setStatus(SSOConstants.SSO_CMR_USER_ID_NOT_FOUND_IN_DB);
         }
         else {
              resp.setID(retid);
              resp.setPassword(retpw);
              resp.setStatus(SSOConstants.SSO_CMR_SUCCESS);
         }

        if (traceLevel >= Ras.TRACE_MINIMUM) //ry3
          Ras.traceExit(className, methodName);

         return resp;
    }

    /*************************************************************************
     * Retrieve the property value
     *************************************************************************/

    private String getProperty(String propName, boolean required)   //@d01c
    {
        String value = null;
        //TODO:  Retrieve the specified property from pInit

        return value;
    }

    public String getName() {return "Sample Credential Mapper";}
    public String getDescription() {return "Retrieves host credentials
			from a database";}
    public String getAuthor() {return "My Company";}
    String strParms[] = { DB_ADDRESS, DB_TABLE, TRACE_LEVEL }; //TODO:
			Fill in the rest of the parameters here
    public String[] getParameters() {return strParms;}
    public Properties getParameterInfo(String strParm)
    {
        Properties p = new Properties();

        if (DB_ADDRESS.equals(strParm))
        {
            p.put(CMInterface.cmiRequired, "true");
        }
        else if (DB_TABLE.equals(strParm))
        {
            p.put(CMInterface.cmiRequired, "true");
        }
        else if (TRACE_LEVEL.equals(strParm))
        {
            p.put(CMInterface.cmiRequired, "false");
            p.put(CMInterface.cmiDefaultValue, Integer.toString(Ras.TRACE_NONE));
        }
        //TODO:  Add ifs for the rest of the parameters
        return p;
    }

} //end class CMPIVault
Update the web.xml file.
In order for CMS to work with your custom plug-in, you will need
to update the web.xml file with the appropriate parameters. Use the
following pseudocode as an example:
<init-param>
     <param-name>CMPICredentialMappers</param-name>
     <param-value>CMPISamplePlugin</param-value>
   </init-param>

   <!-- //// Optional Trace parameters //// -->
   <init-param>
     <param-name>CMPI_TRACE_LOG_FILE</param-name>
     <param-value>C:\Program Files\IBM\Host On-Demand\HOD\HODWEL.log</param-value>
     <description>Credential Mapper Log file name.</description>
   </init-param>

   <init-param>
     <param-name>CMPI_CMS_TRACE_LEVEL</param-name>
     <param-value>2</param-value>
     <description>CMS Trace level.  0=none, 1=min, 2=normal, 3=max.</description>
   </init-param>

   <init-param>
     <param-name>CMPI_SAMPLE_TRACE_LEVEL</param-name>
     <param-value>2</param-value>
     <description>HCM Sample Trace level.  0=none, 1=min, 2=normal, 3=max.</description>
   </init-param>
   <!-- //// End of Optional Trace parameters //// -->


   <!-- // Configuration parameters needed for HCM Sample Plug-in /// -->

     <!-- //// Required Parameters //// -->

       <!-- The parameter name must match the value specified in -->
       <!-- CMPICredentialMappers parameter.                     -->
       <init-param>
         <param-name>CMPISamplePlugin</param-name>
         <param-value>com.mycompany.CMPISample,
                      AuthType_3270Host,
                      *
         </param-value>
       </init-param>

       <!-- //// The Network ID to Host User ID Database Parameters //// -->

         <init-param>
           <param-name>CMPI_SAMPLE_DB_ADDRESS</param-name>
           <param-value>jdbc:odbc:my_db_url</param-value>
           <description>URL string that provides the
						address of the database.</description>
         </init-param>

         <init-param>
           <param-name>CMPI_SAMPLE_DB_TABLE</param-name>
           <param-value>NetIDToHostID</param-value>
           <description>The table to be used for querying the database.</description>
         </init-param>

         <!-- //// TODO:  All other parameters added to CMPISample must
			also be configured here.  See vault.xml for examples. //// -->

       <!-- //// End of Network ID to Host User ID Database Parameters //// -->

     <!-- //// End of Required Parameters //// -->


   <!-- // End of Configuration parameters needed for HCM Sample Plug-in /// -->
Glossary of terms
The following terms are used throughout this document:
authentication type
When editing Credential Mapper Servlet (CMS)-related parameters
in the web.xml file for macro-based automation, the parameter value
must contain the full class path name of the implementing class, the
authentication type to be addressed by the credential mapper, and
the host mask.
Once you specify the desired authentication type, the CMS can better
identify which credential mapper to select to handle the request.
You can pair multiple authentication types together to give Host Credential
Mappers (HCM) the freedom to support multiple authentication types.
client certificate
A certificate stored in the client's Web browser used to identify
the user.
connection-based automation
Connection-based automation works in FTP login environments as
well as i5/OS or OS/400 environments that support Kerberos network
authentication. With this type of automation, the user is authenticated
through a telnet negotiation and the host never sends a login screen
to authenticate the client. Therefore, connection-based automation
does not require the use of a login macro, the Credential Mapper Servlet
(CMS), a Network Security plug-in, nor the Host Credential Mapper
(HCM).
credential challenges
Credential challenges are the time at which users are prompted
to provide IDs and passwords.
Credential Mapper Servlet (CMS)
For the macro-based automation style of Web Express Logon, the
CMS is the core of the credential-mapping framework. It is supplied
with Host On-Demand and must be deployed to a Web server or some type
of Web application framework. At a high level, it has two primary
roles: (1) request the client's credentials (called a network
ID) and (2) respond with the host access credentials, which consist
of the host ID and a password or passticket,
depending on the type of HCM.
Digital Certificate Access Server (DCAS)
DCAS is a TCP/IP server that runs on z/OS and OS/390 platforms.
TN3270 servers connect to DCAS using Secure Socket Layer (SSL). The
purpose of DCAS is to receive an application ID and a digital certificate
from a TN3270 server and then ask RACF to return a valid user ID that
has been associated with the certificate and to generate a passticket
for the input user ID and application ID.
Enterprise Identity Mapping (EIM)
EIM is an IBM eServer technology that helps you easily manage multiple
user registries and user identities in an enterprise. EIM is an architecture
for describing the relationships between individuals or entities (like
file servers and print servers) in the enterprise and the many identities
that represent them within an enterprise. In addition, EIM provides
a set of APIs that allow applications to ask questions about these
relationships.
full class path name
When editing CMS-related parameters in the web.xml file for macro-based
automation, the parameter value must contain the full class path name
of the implementing class, the authentication type to be addressed
by the credential mapper, and the host mask.
The CMS uses the value of the full class path name to create a
class object of the specified type. That object is then used to handle
CMS network security or HCM queries. You must place the specified
class file in the ...\WEB-INF\classes subdirectory in a loose file
(not as a JAR file). From this location, the CMS will be able to access
and use it whenever the need arises.
Host Credential Mapper (HCM)
The HCM is a back-end repository that maps users' network IDs to
their host IDs. This repository can be a JDBC database such as IBM
DB2. The DCAS and Vault plug-ins provided with Web Express Logon are
designed to work with a such a database. Another possibility for a
repository is an LDAP directory. However, using LDAP as your HCM requires
you to write your own plug-in..
host ID
A host ID is the credential used to uniquely identify the user
to the host being accessed. In macro-based automation, the host ID
is what the Host Credential Mapper returns to the Credential Mapper
servlet in order to achieve single sign-on.
host mask
When editing CMS-related parameters in the web.xml file for macro-based
automation, the parameter value must contain the full class path name
of the implementing class, the authentication type to be addressed
by the credential mapper, and the host mask.
The host mask is a secondary selection criteria used by the CMS
to identify the most appropriate credential mapper. This value can
contain one or more host addresses.
Kerberos
Kerberos is a network authentication protocol that identifies and
authenticates users who request to log on to a network. It provides
a means of verifying the identities of principals (users) on physically
insecure networks. It provides mutual authentication, data integrity,
and privacy under the realistic assumption that network traffic is
vulnerable to capture, examination, and substitution.
macro-based automation
Macro-based automation is for environments of varying host types
that are not using Kerberos authentication.
As the name implies, it requires you to create a macro to perform
logon automation.
In order to use the macro-based automation style of Web Express
Logon, you must have a network security application in place. Host On-Demand provides
out-of-the-box support for three common network security applications
without requiring additional coding: IBM Tivoli Access Manager, Netegrity
Siteminder, and Microsoft Active Directory (Windows Domain). If you
have a different network security application, you will need to create
your own plug-in to work in your environment.
network ID
A network ID is the credential that uniquely identifies the user
to the network security application. In macro-based automation, the
CMS calls upon the Network Security plug-in to acquire the user's
network ID from the network security application.
Network Security plug-in
In macro-based automation, the Network Security plug-in acquires
the user's network ID from the network security application.
Portal Server Credential Vault
A Portal Server repository where user credentials are stored.
Resource Access Control Facility (RACF)
RACF is an IBM security product that protects resources by granting
access to only authorized users of protected resources. RACF retains
information about the users, resources, and access authorities in
profiles on the RACF database and refers to the profiles when deciding
which users should be permitted access to protected system resources.
Sources for more information
Use the following sources to help you implement Web Express Logon
in your environment:
This information was developed for products and services offered
in the U.S.A.
IBM may not offer the products, services, or features discussed
in this document in other countries. Consult your local IBM representative
for information on the products and services currently available in
your area. Any reference to an IBM product, program, or service is
not intended to state or imply that only that IBM product, program,
or service may be used. Any functionally equivalent product, program,
or service that does not infringe any IBM intellectual property right
may be used instead. However, it is the user's responsibility to evaluate
and verify the operation of any non-IBM product, program, or service.
IBM may have patents or pending patent applications covering subject
matter described in this document. The furnishing of this document
does not give you any license to these patents. You can send license
inquiries, in writing, to:
IBM Director of Licensing
IBM Corporation
North Castle Drive
Armonk, NY 10504-1785
U.S.A.
For license inquiries regarding double-byte (DBCS) information,
contact the IBM Intellectual Property Department in your country or
region or send inquiries, in writing, to:
Intellectual Property Licensing
Legal and Intellectual Property Law
IBM Japan, Ltd.
19-21, Nihonbashi-Hakozakicho, Chuo-ku
Tokyo 103-8510, Japan
The following paragraph does not apply to the
United Kingdom or any other country or region where such provisions
are inconsistent with local law: INTERNATIONAL BUSINESS MACHINES
CORPORATION PROVIDES THIS PUBLICATION "AS IS" WITHOUT WARRANTY OF
ANY KIND, EITHER EXPRESS OR IMPLIED, INCLUDING, BUT NOT LIMITED TO,
THE IMPLIED WARRANTIES OF NON-INFRINGEMENT, MERCHANTABILITY OR FITNESS
FOR A PARTICULAR PURPOSE. Some states do not allow disclaimer of express
or implied warranties in certain transactions, therefore, this statement
may not apply to you.
This information could include technical inaccuracies or typographical
errors. Changes are periodically made to the information herein; these
changes will be incorporated in new editions of the publication. IBM
may make improvements and/or changes in the product(s) and/or the
program(s) described in this publication at any time without notice.
Any references in this information to non-IBM Web sites are provided
for convenience only and do not in any manner serve as an endorsement
of those Web sites. The materials at those Web sites are not part
of the materials for this IBM product and use of those Web sites is
at your own risk.
IBM may use or distribute any of the information you supply in
any way it believes appropriate without incurring any obligation to
you.
Licensees of this program who wish to have information about it
for the purpose of enabling: (i) the exchange of information between
independently created programs and other programs (including this
one) and (ii) the mutual use of the information which has been exchanged,
should contact:
Site Counsel
IBM Corporation
2455 South Road
Poughkeepsie, NY 12601-5400
U.S.A.
Such information may be available, subject to appropriate terms
and conditions, including in some cases, payment of a fee.
The licensed program described in this document and all licensed
material available for it are provided by IBM under terms of the IBM
Customer Agreement, IBM International Program License Agreement or
any equivalent agreement between us.
Such information may be available, subject to appropriate terms
and conditions, including in some cases, payment of a fee. The licensed
program described in this document and all licensed material available
for it are provided by IBM under terms of the IBM Customer Agreement,
IBM International Program License Agreement or any equivalent agreement
between us.
Information concerning non-IBM products was obtained from the suppliers
of those products, their published announcements or other publicly
available sources. IBM has not tested those products and cannot confirm
the accuracy of performance, compatibility or any other claims related
to non-IBM products. Questions on the capabilities of non-IBM products
should be addressed to the suppliers of those products.
If you are viewing this information softcopy, the photographs and
color illustrations may not appear.
Trademarks
The following terms are trademarks of International Business Machines
Corporation in the United States, other countries, or both: IBM
Java and all Java-based trademarks and logos are trademarks
or registered trademarks of Oracle Corporation in the United States
and other countries.
Microsoft, Windows, and the Windows logo are registered
trademarks of Microsoft Corporation.
Other company, product, and service names may be trademarks or
service marks of others.